 DDEV is the official local development tool of Drupal. And like Drupal, DDEV depends on the support of the open source community.
On this page
- Modules activation
- General Configuration
- Auto Image
- Font plugins
- Configuring font colors
- Configuring font sizes
- Configuring font family
- Highlight
- Configuring Highlight
- Link Attributes
- Find and Replace
- Word Count
- Configuring Word Count
- Text transformation
- Configuring Text transformation
- Free version of WProofreader
- Templates
- Page Break
- Select All
- Bookmarks
- To-do list
- Configuring To-do list
- Paste Markdown
- Configuring Paste Markdown
- Emoji
- Configuring Emoji
Configuration Guide
Modules activation
All Plugin Pack modules can be enabled on Drupal’s extend page. The CKEditor 5 Plugin Pack module only contains some common functionality and global configuration. To make CKEditor 5 plugins available respective sub-modules have to be enabled additionally. Most of the configuration is done within the single text format configuration page.

General Configuration
Plugins and their translation libraries are by default downloaded form ckeditor CDN. You can provide custom local path for plugin libraries to load them. The proper config field is available at /admin/config/ckeditor5-plugin-pack

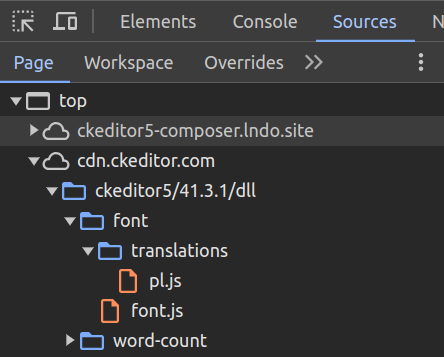
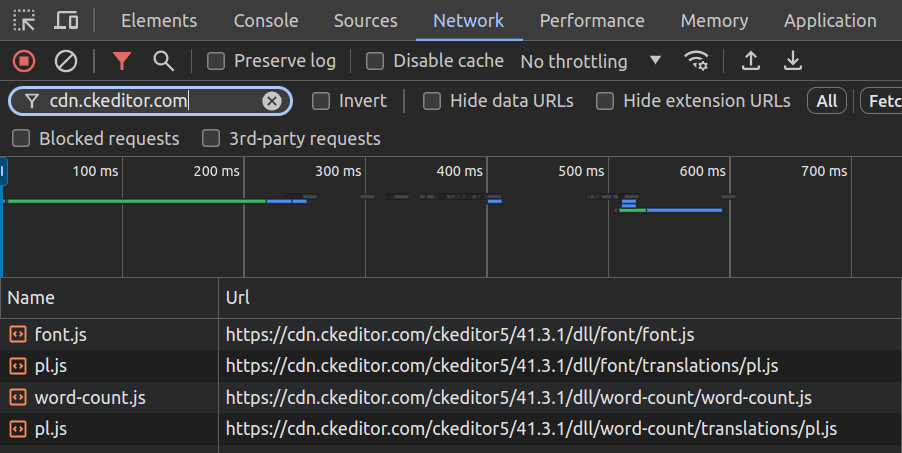
The easy way to check which files you need is to open a page with CKEditor instance then open a Sources (or Network) tab in your browser's inspector and see which files are downloaded from cdn.ckeditor.com.
If your site is configured with multiple text formats which vary in plugins used then either ensure that you check source files with field and user having access to all of them or check them separately.
The main reason why we use CDN by default instead providing plugins directly with module files is that plugin libraries are delivered for each CKEditor 5 version separately and their code can become incompatible with the main CKEditor 5 bundle which is included in the Drupal core.
When custom path is set you should keep the libraries version in sync with main bundle to avoid errors.
The version of currently used CKEditor 5 bundle can be checked in various places:
- in /web/core/core.libraries.yml file
- in sources inspector of your browser at {your_site}/core/assets/vendor/ckeditor5/ckeditor5-dll/ckeditor5-dll.js
- in sources inspector of your browser at cdn.ckeditor.com (available before you switch to local path)
Auto Image
Enable the CKEditor 5 Auto Image (ckeditor5_plugin_pack_auto_image) module.
In order for Auto Image plugin to work, you need to enable it in your text format configuration.

Learn how to use this plugin in the Auto Image feature guide
Font plugins
Enable the CKEditor 5 Font Plugins (ckeditor5_plugin_pack_font) module.
There are four available font plugins (Color, Background, Family, and Size). To enable any of them, drag the plugin icon to your Active Toolbar.
![]()
Configuring font colors
Font and background color plugins provide a default color set. H, however, you can extend the palette or disable the default selection completely. The color settings are available in the "CKEditor 5 plugin settings" section. Each custom color can be set for the font or background independently.
Since CKEditor 5 v38 (added in Drupal 10.1.0), color picker is available directly in the plugin dropdown menu.

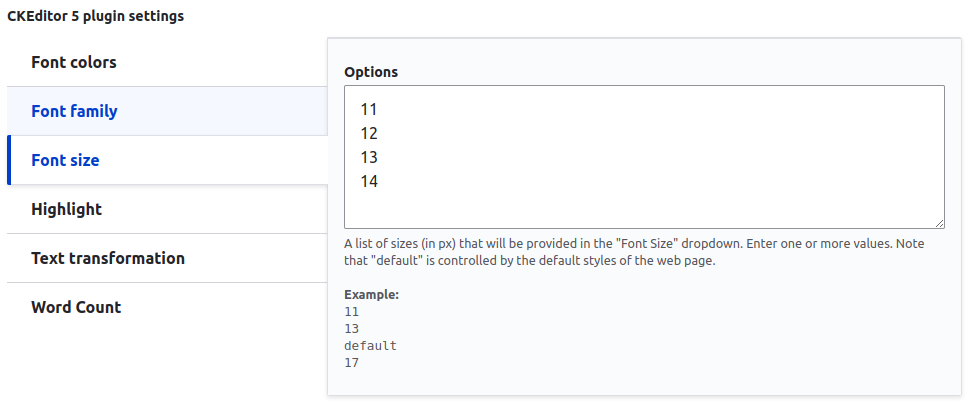
Configuring font sizes
The plugin provides a predefined set of sizes - tiny, small, default, big, and huge. In the editor these are represented by the following CSS rules:
.text-tiny { font-size: 0.7em; }
.text-small { font-size: 0.85em; }
.text-big { font-size: 1.4em; }
.text-huge { font-size: 1.8em; }
You will need to add rules for those classes to your front-end theme on your own.
Alternatively, you can define your own set of sizes specified in pixels (the "default" keyword can be added to the custom set). Those sizes will be added to the content with the style attribute.
Configuring font family
You can define custom `font-family` options containing one or more fonts. Enter one rule per line. The first font name will be used as the dropdown item description in the UI.

Please be aware that font plugins use the `style` attribute to format text (except for default font sizes), so they won't work with the "Limit allowed HTML tags and correct faulty HTML" filter enabled.
Learn how to use this plugin in the Fonts feature guide
Highlight
The difference between Font plugins and Highlight is that in Highlight both font (Pen) and background (Marker) colors are available in the editor from a single toolbar item and classes are used instead of style attributes.
Configuring Highlight
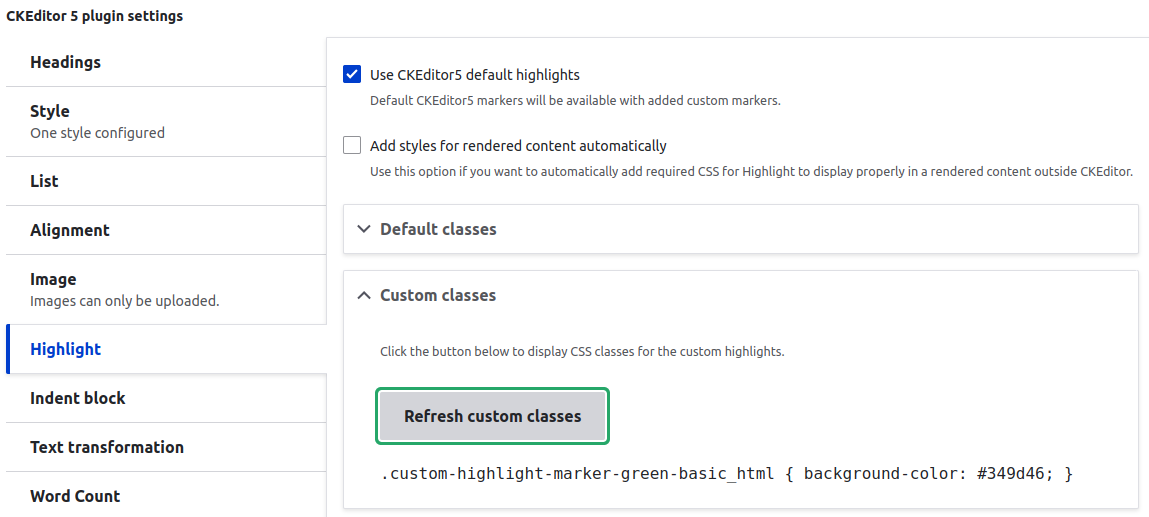
Enable the CKEditor 5 Highlight (ckeditor5_plugin_pack_highlight) module.
Colors configuration is almost identical to the font and background colors. The Marker defines a background color and Pen defines a font color.

Proper CSS rules should be applied to the site theme. Otherwise, all highlighted content will be marked with default browser styling. All default and custom CSS rules are available for copying in the Highlight's CKEditor 5 plugin settings tab.
You can optionally attach highlight styles to frontend pages by activating the "Add styles for rendered content automatically" checkbox. This will work both for default and custom colors.
Learn how to use this plugin in the Highlight feature guide
Link Attributes
Enable the CKEditor 5 Link Attributes (ckeditor5_plugin_pack_link_attributes) module.
In order to define custom attributes, go to the text format configuration.

First, name a group by providing a group label. Then, you can define custom attributes using the 'attribute|value' format. If you want to define multiple attributes within one group, you can do that by defining each of them in separate lines.
Learn how to use this plugin in the Link Attributes feature guide
Find and Replace
Enable the CKEditor 5 Find And Replace (ckeditor5_plugin_pack_find_and_replace) module.
The plugin doesn't provide custom configuration. In order to use it simply drag its toolbar icon to your Active toolbar. To enable the plugin window in the editor, you can use the toolbar icon or the Ctrl/Command+F keyboard shortcut.
Learn how to use this plugin in the Find and Replace feature guide
Word Count
The word count feature lets you track the number of words and characters in the editor. This helps you control the volume of your content and check the progress of your work.
Configuring Word Count
Enable the CKEditor 5 Word Count (ckeditor5_plugin_pack_word_count) module.
The Word Count plugin doesn't provide any toolbar item. To enable it go to its "CKEditor 5 plugin settings" tab and check the "Enable" checkbox. Then you can select which statistic you want to display.

Learn how to use this plugin in the Word Count feature guide
Text transformation
The text transformation feature enables autocorrection. It automatically changes predefined text fragments into their improved forms.
Configuring Text transformation
Enable the CKEditor 5 Text Transformation (ckeditor5_plugin_pack_text_transformation) module.
The Text transformation plugin doesn't provide any toolbar items. In order to enable it go to its "CKEditor 5 plugin settings" tab and check the "Enable" checkbox. Then you can define your custom transformation rules - enter the rules as separate lines in the text area.

Learn how to use this plugin in the Text Transformation feature guide
Free version of WProofreader
The Wproofreader module from CKEditor 5 Plugin Pack package depends on the premium version of the module, however, no license key is required. If you choose to use the paid version of Wproofreader, please uninstall the module from the Plugin Pack package. You will be able to add a license key and configure the plugin at /admin/config/ckeditor5-premium-features/wproofreader
The functionality of this version is limited in comparison to the paid service. You can check detailed differences here
To use the plugin enable the CKEditor 5 WProofreader (ckeditor5_plugin_pack_free_wproofreader) module.
The plugin doesn't provide custom configuration. To use it simply drag its toolbar icon to your Active toolbar.
Learn how to use this plugin in the Free version of WProofreader feature guide
Templates
Enable the CKEditor 5 Templates (ckeditor5_plugin_pack_templates) module.
Templates functionality and configuration are identical to the module version provided in the Premium Features package. You can find the configuration instructions here.
Learn how to use this plugin in the Templates feature guide
Page Break
Enable the CKEditor 5 Page Break (ckeditor5_plugin_pack_page_break) module.
The plugin doesn't provide custom configuration. In order to use it simply drag its toolbar icon to your Active toolbar.

Learn how to use this plugin in the Page Break feature guide
Select All
Enable the CKEditor 5 Select All (ckeditor5_plugin_pack_select_all) module.
The plugin doesn't provide custom configuration. In order to use it simply drag its toolbar icon to your Active toolbar.

Learn how to use this plugin in the Select All feature guide
Bookmarks
Enable the CKEditor 5 Bookmarks (ckeditor5_plugin_pack_bookmark) module.
Bookmarks plugin required CKEditor 5 v44.0.0 or higher. This version is available in Drupal 10.4+ and 11.1+
For Drupal 10.3 and 11.0 users it is possible to update CKEditor 5 version using CKEditor 5 Version Override module which is part of CKEditor 5 Premium Features (version override doesn't require commercial license).
The plugin doesn't provide custom configuration. In order to use it simply drag its toolbar icon to your Active toolbar.
Learn how to use this plugin in the Bookmarks feature guide
To-do list
The to-do list feature lets you create a list of interactive checkboxes with labels. It supports all features of bulleted and numbered lists, so you can nest a to-do list together with any combination of other lists.
Configuring To-do list
Enable the CKEditor 5 To-do List (ckeditor5_plugin_pack_todo_document_list) module.
In order to use it simply drag its toolbar icon to your Active toolbar. To correctly display the to-do list in the frontend theme, a proper CSS rule should be applied. You can use the below example:
.todo-list {
    list-style: none;
}

.todo-list .todo-list__label .todo-list__label__description {
    vertical-align: middle;
    margin: 0 0.5rem
}
Optionally, you can attach those styles to frontend pages by activating the "Add styles for rendered content automatically" in the To-do List tab of the CKEditor 5 plugin settings.
Paste Markdown
The paste Markdown feature lets users paste Markdown-formatted content straight into the editor. It will be then converted into rich text on the fly.
Configuring Paste Markdown
Enable the CKEditor 5 Paste from Markdown (ckeditor5_plugin_pack_paste_markdown) module.
The Paste from Markdown plugin doesn't provide any toolbar items. To enable it, go to its "CKEditor 5 plugin settings" tab and check the "Enable" checkbox.
Emoji
The emoji feature lets you insert emojis into the document from the editor toolbar or while writing the content.
Configuring Emoji
Enable the CKEditor 5 Plugin Pack Emoji (ckeditor5_plugin_pack_emoji) module.
Emoji plugin requires CKEditor 5 v44.3.0 or higher. This version is not yet available in Drupal Core.
For Drupal 10.3+ and 11.0+ users it is possible to update CKEditor 5 version using CKEditor 5 Version Override module which is part of CKEditor 5 Premium Features (version override doesn't require commercial license).
In order to use it simply drag its toolbar icon to your Active toolbar.
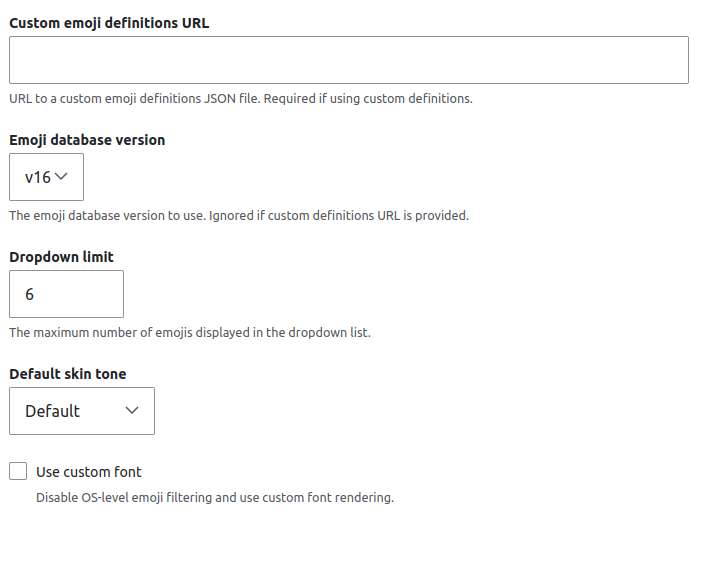
The Emoji plugin provides a basic configuration form in its settings tab:
In case you're using CKEditor 5 with a commercial license and don't use a custom definitions URL, you will get a notification in the browser's developer console. To suppress the warning you can set the cdn value in the custom definitions URL field
Help improve this page
You can:
- Log in, click Edit, and edit this page
- Log in, click Discuss, update the Page status value, and suggest an improvement
- Log in and create a Documentation issue with your suggestion

