Setup Behat UI ~5 with Drupal ~10 project
Install the Behat UI module on Drupal 10 manually
To add Behat UI to your Drupal 10 site, you can use Composer to install it and then enable and configure it in your terminal. Alternatively, you can follow the interactive web-based Bash command provided below.
1. From the terminal run the interactive command:
Given that a Drupal 10 website was installed in "/var/www/html/test/drupal10" directory, using the Drupal Recommended Project.
It is crucial to have a backup of your local development environment before making any significant changes. Therefore, before proceeding with any changes, ensure that you have a backup of your site to prevent any data loss or corruption. Also, it's essential to note that the actions you take in your local development environment may have unintended consequences if performed on a live site. Therefore, it's strongly advised not to make any significant changes to a live site without proper testing and approval.
Change the directory in the terminal to the project:
cd /var/www/html/test/drupal10Here's the command you can copy and paste to run it in the terminal:
bash <(wget -O - https://raw.githubusercontent.com/webship/wbash/v1/behat_ui/drupal10.sh)This command will download and run the shell script from the given URL, which will automate the installation and configuration of Behat UI on your Drupal 10 site.
You could review the content of the Interactive Web Bash command, that will assist you in understanding the command or improving its contents.
wbash/behat_ui/drupal10.sh
During the installation or configuration process, there may be some interactions that require your input. If you are satisfied with the default suggestion, you can simply press the "Enter" key to proceed with that option. This is a common practice in command-line interfaces where default values are provided as suggestions and can be accepted by hitting the "Enter" key.
Full local project path (/var/www/html/test/drupal10):
Project machine name (drupal10):
# set your browser site path
Project base testing url (http://192.xxx.x.xxx/drupal10/web) : http://localhost/test/drupal10/web
Selenium Host domain (127.0.0.1:4444/wd/hub): 
Before running Behat tests, make sure that the following files and folders are located in the root of your project directory:
behat.yml- This file contains the configuration settings for Behat tests.features/- This folder contains the feature files that describe the test scenarios.features/reports/- This folder will store the HTML test reports generated by Behat.features/logs/- This folder will store the log files generated during the test execution.

Make sure that in the behat.yml file:
selenium2: wd_host: 127.0.0.1:4444/wd/hub
And
base_url: 'http://localhost/test/drupal10/web'Run the following command to change the access mode and ownership for folders and files:
sudo chmod 775 -R . ; sudo chown www-data:$USER -R . ;
Which sets the directory and file permissions to allow write access by the web server (www-data) and the current user.
Here's what the individual parts of the command do:
sudo chmod 775 -R .: This sets the permissions for all files and directories in the current directory (.) and any subdirectories (-R) to read, write, and execute for the owner and group (775).sudo chown www-data:$USER -R .: This sets the owner of all files and directories in the current directory (.) and any subdirectories (-R) to the web server user (www-data) and the group to the current user ($USER).
Running this command will make the necessary directories and files writable by the web server and the current user. It's important to note that granting write access to directories and files can potentially compromise the security of your system, so use caution when running this command and make sure to set the correct permissions for your environment.
If permissions were wrong you may face the following Error message: the Features directory dose not existed or is not writable.

2. Enable the Behat UI module
Run ./bin/drush pm:install behat_ui in the terminal or from the user interface.
3. Navigate to Configuration -> Behat UI -> Settings
a. Make sure the full path to your project for Behat configuration directory path field has the following value /var/www/html/test/drupal10.
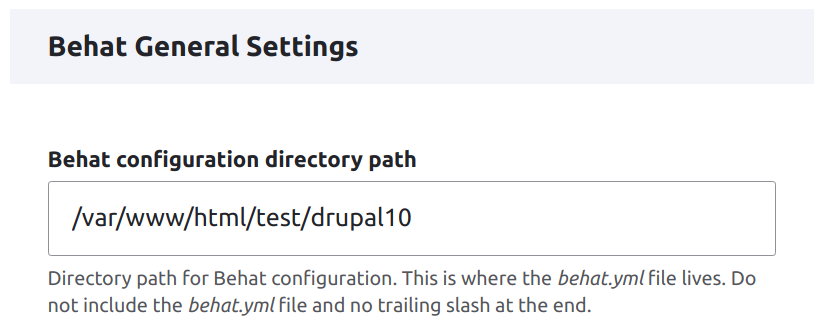
b. Make sure that the behat.yml file is at the root of the project. (Read the description under the field in the step previous).

Or if you want to change the behat.yml file place, just add a new path for the behat.yml file in the field.
Example:
folder-name/behat.ymlc. Make sure that the features folder is at the root of the project.

Or if you want to change the features folder place, just add a new path for the behat.yml file in the field.
Example:
folder-name/features d. Make sure that the Enable HTML report format is checked, and that the full path for the reports folder has the following value /var/www/html/test/drupal10/features/reports

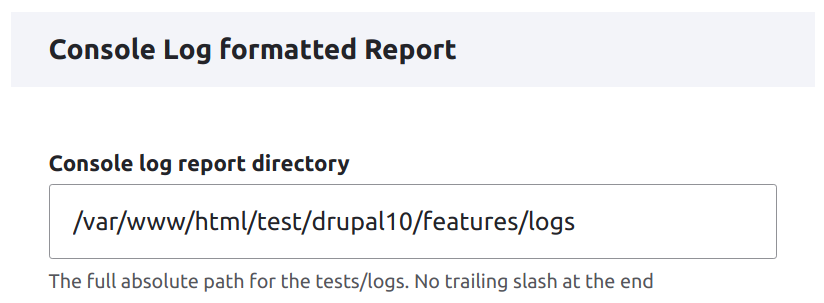
e. Make sure the full path for the logs folder has the following value /var/www/html/test/drupal10/features/logs.
f. Save configuration
4. Make sure that Chrome Driver is installed on your system
Install The Latest Chrome Driver
5. Make sure that Selenium is installed on your system before running Behat tests
a. Install Selenium standalone
6. Navigate to Behat UI -> Configuration -> Create test

7. Click Run >> to activate automated testing for the step definitions written in the left-side text area to show the report in the right-side area.

To run Behat, you can open the terminal and type ./bin/behat features. This will execute the Behat tests in the "features" directory.

Help improve this page
You can:
- Log in, click Edit, and edit this page
- Log in, click Discuss, update the Page status value, and suggest an improvement
- Log in and create a Documentation issue with your suggestion


