On this page
- Dependencies
- Libraries
- Views
- Installation
- Administration
- Charts Permissions
- Default Chart Configuration
- Text Format Configuration
- Enable PHP Filter
- Grant PHP Filter Permissions
- Configure PHP Code Text Format
- Verify PHP Code Text Format
- External libraries
- Using Google Charts
- Using Highcharts
- Comply with the required license
- Enable Libraries API
- Install the Highcharts library
- Configure charts to use the Highcharts library
Getting started
Drupal 7 will no longer be supported after January 5, 2025. Learn more and find resources for Drupal 7 sites
This documentation page details the steps required to get started with the Charts module. It is related to version 7.x-2.x and above. For prior versions refer to the readme.txt file that's included in the used version. For using the 6.x version with a release of PHP prior to PHP 5.2, be aware that the 6.x-1.0 version does include the fixes as described in:
- #473292-17: PHP errors on Charts settings page.
- #755682-2: Call to undefined function: array_fill_keys().
For problems, suggestions or support requests related to installation and/or configuration of the charts module, please create an issue in the charts issue queue. But only after ensuring that the instructions below don't seem to help.
Feel free to correct / extend / refine this community documentation where appropriate.
Dependencies
Libraries
Charts does not have any dependencies if used in combination with the Google Charts library - other than downloading the Google Charts library (see installation below).
For using it with the Highcharts library, charts depends on the Libraries API module. The Highcharts library should be downloaded to the sites/all/libraries/highcharts/js directory. This can be achieved with the following in a drush make file:
libraries[highcharts/js][download][type] = file
libraries[highcharts/js][download][url] = http://code.highcharts.com/highcharts.js
Views
The charts module has no views module dependency in the typical Drupal way. It only has a weak dependency on it: the charts module can be enabled without views enabled. But obviously, to use the views integration of charts, the views modules has to be enabled first.
Installation
Download the charts module from the Charts project page, and follow the normal practices for installing a Drupal module to install and enable the (main) Charts module.
At least one of the included submodules (Google Charts or Highcharts) has to be enabled afterwards. As long as none of these submodules is enabled, an error message like 'No Charts provider installed' will be included in admin/reports/status.
It is recommended to at least temporarily enable the Google Charts submodule, to use it to verify the remaining Charts installation and configuration steps (and eventually disable the Google Charts submodule later on). You must first download and install the Google Charts library. Go to the designated charts directory of the charts_google module (for example /modules/charts/modules/charts_google) and run composer install.
The Highcharts submodule requires more work (as explained below) before it can be enabled, so that submodule cannot be enabled yet.
Visit the out-of-the-box examples delivered with the charts module as a first step to verify the installation of the charts module. In case some type of authorization error shows up (instead of some actual graph), it indicates that the charts module is enabled already, but most probably some required permission is still missing (as detailed below).
Administration
After installing the charts module, there are a few steps that must be performed prior to using the charts module. For more details about these steps, refer to what is below.
Charts Permissions
These are the permissions that are to be configured for using the charts module (via admin/people/permissions):
- Configure chart settings, to indicate the roles allowed to perform configuration tasks related to the charts module (located at admin/config/content/charts).
- Access example charts, to indicate the roles allowed to view the examples delivered with the charts module (located at charts/examples).
Default Chart Configuration
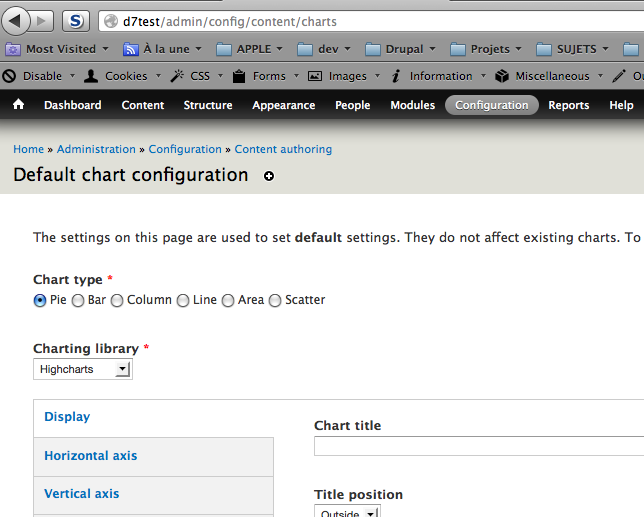
Prior to creating new charts using the charts module, via the views UI, the Default chart configuration options need to be reviewed and tuned where needed. To do so, use admin option 'Configuration > Content authoring > Default chart configuration' or use an URL like admin/config/content/charts.
These are the available options with Default chart configuration:
- Chart type, such as pie, column, area, etc.
- Display, related to global chart attributes such as Chart colors, Legend position, Background color, etc.
- Horizontal axis, related to chart attributes of the horizontal axis, such as Labels rotation, etc.
- Vertical axis, related to chart attributes of the vertical axis, such as Decimal count, Labels rotation, etc.
Note: Setting any of these options (or changing them later on) do not affect existing charts. These default options are only used when creating new charts using the views UI.
Text Format Configuration
To be able to insert a chart as part of the content of a node (via edit of a node), some additional administration steps are required, as further detailed below. Note: These steps are not required to create charts by only using the views UI or by using the Charts API via a call from within another module.
Enable PHP Filter
Verify the list of enabled modules (via admin/modules), and ensure that the PHP Filter module is enabled (if not enable it). This module allows embedded PHP code/snippets to be evaluated (as is required to create a chart as part of a node via the charts module).
Grant PHP Filter Permissions
After the PHP Filter module is enabled, a new permission Use PHP for settings is added to the list of available permissions, as shown via URL admin/people/permissions. Grant this permission to roles that should be able to insert a chart as part of the content of a node (via edit of a node). But only do so for trusted roles (because this permission has security implications), and for sure not to anonymous users.
Configure PHP Code Text Format
To insert a chart as part of the content of a node (via edit of a node), it will be required to select PHP Code as the Text Format of such node (while editing the node). This text format 'PHP Code' will only be included as one of the available options in the Text Format pull down menu (while editing the node), provided at least one of the roles for that user has been authorized to use text format 'PHP Code'.
To actually grant selected roles to use this text format 'PHP Code', use admin option 'Configuration > Content authoring > Text formats' or use an URL like admin/config/content/formats and select the link 'configure' next to the line for text format 'PHP code'. This will open the page on admin/config/content/formats/php_code where the roles can be selected that are authorized to use the text format 'PHP Code'. Select the desired roles and save the configuration options.
Verify PHP Code Text Format
After completing the previous steps to configure the PHP Code Text Format, verify the changes by editing an existing node (or creating a new one). If everything went fine, the 'PHP Code' should now be one of the available options for the Text Format of the node. By switching to another userid who doesn't have any of the roles allowed to use the PHP code text format, a similar verification (to edit or create a node) should fail (ie: PHP code show not be one of the available text formats.
External libraries
Using Google Charts
Out-of-the-box, the charts module (version 7.x-2.x and above) will use the Google Charts library. No extra libraries need to be installed for it, and no configuration settings need to be set or modified to do so (except 8.x needs to install the free google charts library - see installation above). If support for the Highcharts library is NOT enabled (as detailed below), there will even be no configuration options to indicate that the Google Charts library is to be used.
Using Highcharts
The Highcharts library can be used as an alternative to using the Google Charts library. However before doing so, the Highcharts library has to be installed and enabled as detailed below.
Comply with the required license
Prior to use Highcharts on a website, an appropriate license is required. Investigate which license is appropriate, and make sure to comply with it.
Enable Libraries API
Download and enable the Libraries API module using the normal practices for installing a Drupal module.
Install the Highcharts library
Download the Highcharts library and unpack it in a folder named sites/all/libraries/highcharts (don't include any version id in the folder name, rename the folder if needed).
Next make sure to delete the subfolder named 'exporting-server' (together with its entire content). This subfolder contains dangerous sample files that may compromise the security of your site and must be deleted before the Charts Highcharts submodule may be used. Moreover a corresponding 'Highcharts vulnerability' error message will be included in admin/reports/status for as long as this subfolder is not deleted.
Next it should be possible to enable the Highcharts submodule also (there should not be any unresolved module dependencies anymore).
After these steps are completed, return to the charts configuration settings.
Configure charts to use the Highcharts library
After the Highcharts library and the Libraries API module are correctly installed (and enabled), revisit the Default chart configuration options (e.g. by using an URL like admin/config/content/charts). A pull-down menu with a title of 'Charting library' is shown via which the Highcharts library can be selected. This menu will be missing if the Highcharts library or the Libraries API is not correctly installed/enabled as detailed above. It will also be missing if the Google Charts submodule is not enabled, so that the Highcharts submodule is the only enabled submodule.
Help improve this page
You can:
- Log in, click Edit, and edit this page
- Log in, click Discuss, update the Page status value, and suggest an improvement
- Log in and create a Documentation issue with your suggestion


