 The International Splash Awards are back — happening at DrupalCon Vienna on 14 October 2025! Submit your project(s) by 16 June 2025 and join others from around the world to celebrate the very best of what Drupal can do.
On this page
- Preparing for Installation
- Install Java 8
- Prepare pre-installation folder
- Solr installation folder and writing file directory
- Solr Installation
- Install Solr 7.x.x/8.x.x
- Installation File
- Solr User
- Install Solr as a Service
- Check Solr is running
- Create the core directories for Drupal
- Drupal 7 Configuration
- Drupal API Solr Modules
- Login to Drupal Administrator Panel
- Restart Solr
- Add Index Server
- Advanced installation settings
Installing Solr 7.x/8.x on CentOS 7/Debian 11
Preparing for Installation
Install Java 8
sudo yum install java-1.8.0-openjdk.x86_64
Check Java version and that is running.
java -version

yum list installed | grep "java-1.8*"

Note, you only need to download the OpenJDK Runtime Environment (java-1.8.0-openjdk.x86_64), not the Java Development Kit (java-1.8.0-openjdk-devel)
Prepare pre-installation folder
cd /usr/local This is the location where you will download Solr. This path can also be any location, i.e. /tmp, this is just a temporary holding for the .tar file you are about to download.
Solr installation folder and writing file directory
By default, the script extracts the distribution archive into /opt, configures Solr to write files into /var/solr. If you choose to change these directories, see advanced installation setting at the end of this guide.
Solr Installation
Install Solr 7.x.x/8.x.x
Get to the latest Solr version 7 available. For the purpose of this article, the version of Solr is 7.x.x (You will need to update the command to the latest version of Solr 7)
Solr latest version.
Now run the following code to download the latest 7.x.x version of Solr. Make sure to replace the .x.x in the following link for the actual version available. See the example with version 7.2.1 below.
wget https://apache.org/dist/lucene/solr/7.x.x/solr-7.x.x.tgz
Example: wget https://apache.org/dist/lucene/solr/7.2.1/solr-7.2.1.tgz
wget https://apache.org/dist/lucene/solr/8.11.1/solr-8.11.1.tgz
Installation File
Extract the installation file, run the following command.
tar xzf solr-7.x.x.tgz solr-7.x.x/bin/install_solr_service.sh --strip-components=2
Example: tar xzf solr-7.2.1.tgz solr-7.2.1/bin/install_solr_service.sh --strip-components=2
Solr User
By default, the script automatically creates and runs Solr as the solr user. If you choose to change the user, see advanced installation setting at the end of this guide.
Install Solr as a Service
sudo ./install_solr_service.sh solr-7.x.x.tgz
When upgrading use -f:
sudo ./install_solr_service.sh solr-8.x.x.tgz -f
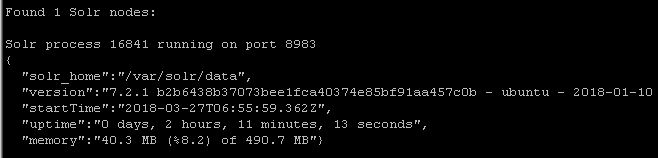
Check Solr is running
sudo service solr status
Create the core directories for Drupal
sudo su - solr -c "/opt/solr/bin/solr create -c drupal_core -n solrconfig"
You have created the required Drupal core directory. Now you can check it on the Solr dashboard.
Open a browser and type your localhost or your server's IP or web address and port 8983:
http://your-server-ip:8983/solr

Drupal 7 Configuration
On the Solr, check that you have created the Drupal_core. You can select Drupal_core from the drop-down under Thread Dump.

Pay attention to the URL on your browser when you select Drupal_core from the drop-down. It should create the following link:
http://your-server-ip:8983/solr/#/drupal_core
Drupal API Solr Modules
Download the latest version of the Drupal API Solr module.
Dev versions contain latest fixes as of March 2018. For the purpose of this post, we will download the dev version.
Open search_api_solr-7.x-1.x-dev/search_api_solr/solr-conf/6.x/solrconfig.xml and edit out valType="float"
<fieldType name="file" keyField="id" defVal="1" stored="false" indexed="false" class="solr.ExternalFileField" valType="float"/>
To this:
<fieldType name="file" keyField="id" defVal="1" stored="false" indexed="false" class="solr.ExternalFileField"/>
Copy the files from search_api_solr/solr-conf/6.x to /var/solr/data/drupal_core
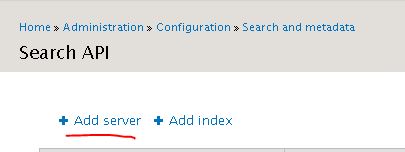
Login to Drupal Administrator Panel
Go to Administration --> configuration --> Search and metadata and select "Add Server"
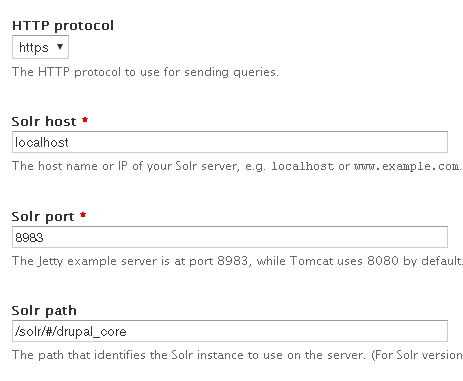
Select the Solr Server from the drop-down menu and enter the following values:
Protocol: Https Change this to http if you cannot reach https and check and fix your TLS/SSL settings.
Solrhost: Localhost
Solrhost: 8983
Solr path: /solr/drupal_core
If that path fails try /solr/#/drupal_core
Restart Solr
sudo service solr restart
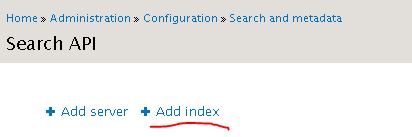
Add Index Server
You have configured your Solr server, now you need to add an index server.
Go to Administration --> configuration --> Search and metadata and select "Add Index"
Advanced installation settings
Advanced installation settings tutorial
Happy searching!
Help improve this page
You can:
- Log in, click Edit, and edit this page
- Log in, click Discuss, update the Page status value, and suggest an improvement
- Log in and create a Documentation issue with your suggestion

