On this page
- Install with composer (recommended)
- Download Drupal and its dependencies using composer
- Starting with Drupal 8.8:
- Alternatively, using drupal-composer (the former way of using Composer with Drupal):
- Create a database
- Install Drupal with the standard profile
- Export the current configuration outside of the webroot (recommended)
- Point the virtual host to the Drupal root
- Initialize Git
- Check for errors and warnings
- Extend
- Alternative install profiles
- Remove an old project before reusing the namespace
- Drupal with the minimal profile
- Umami Demo site
- Umami with Search API Demo
- The Lightning distro
- Acquia BLT (Build & Launch Tool) with the Lightning distro
- Other resources
- Troubleshooting
- Install with drupal/drupal
- Grab the code including dependencies (latest stable)
- Create the needed files folder (requirement)
- Create the needed settings.php file (requirement)
- Create the database
- Initiate the installation process
- TIP: Use local domains with color names
Set up Drupal 8
This documentation is deprecated.
After you have set up a local development environment, you should now be ready for the last step, installing your local Drupal development website.
Install with composer (recommended)
Reference: Using Composer to manage Drupal site dependencies | Drupal.org
It is the recommended setup for a production site, therefore, it should be created the same way on your local machine.
Download Drupal and its dependencies using composer
Starting with Drupal 8.8:
cd /var/www/html
# Remove the test file used previously.
rm -rf example.localhost/
composer create-project drupal/recommended-project example.localhost -n
# Drush and development dependencies like PHPUnit do not come included in the package, so we have to add this.
cd example.localhost
composer require drush/drush
composer require --dev drupal/core-dev
For a permission issue on Drupal 8.8, see #3091285: Composer scaffolding fails when permissions on default.settings.yml or default.settings.php is not writable..
Workaround when it occurs:
# Temporary workaround for a permission issue on Drupal 8.8.0.
cd /var/www/html/example.localhost
sudo chmod -R +w web/sites/default
composer install
Note that Drupal Console currently conflicts with Drupal 9 dependencies. Follow [console] Make Drupal Console work with Symfony 4 · Issue #4220 · hechoendrupal/drupal-console. If it gets fixed, make sure to install it prior to installing Drush with:
composer require --dev drupal/console:@stableAlternatively, using drupal-composer (the former way of using Composer with Drupal):
This open-source project provides the default configuration that otherwise needs to be done manually.
cd /var/www/html
# Remove the test file used previously. Directory must be empty.
rm example.localhost/index.html
composer create-project drupal-composer/drupal-project:8.9.x-dev example.localhost --no-interaction
This will download the latest stable release of Drupal in the /var/www/html/example.localhost/web folder. This will also install drush and drupal-console which will be relative to the example.localhost folder. See also Using Composer template for Drupal projects | Develop guide on Drupal.org.
Create a database
Assume that your database name is "example" and database name and password is "root"
mysql -u root -p
Enter password:
SHOW DATABASES; # Optionally check the list of existing databases first.
CREATE DATABASE example;
\q
If on a live server you would probably want to create a dedicated MySQL user and grant privileges only for the just created table. You would then use this user's credentials in the local.settings.php file on the server.
Install Drupal with the standard profile
cd /var/www/html/example.localhost/web
../vendor/bin/drush site-install --db-url=mysql://root:root@localhost/example
Now you can access your website with http://example.localhost/web/. The benefit of this method is that you don't need to manually handle settings.php and files folder. To login take note of the user name and password given in the terminal message after installation. Alternatively, use drush user:login to display a one-time login link for user ID 1 and be able to change the password:
drush uli -l example.localhostAlternatively use site:install | Drupal Console:
cd /var/www/html/example.localhost/web
../vendor/bin/drupal site:install --db-type=mysql --db-user=root --db-pass=root --db-host=localhost --db-name=example
Export the current configuration outside of the webroot (recommended)
# Change the location of the configuration sync directory.
sudo nano web/sites/default/settings.php # Change the last line to:
$settings['config_sync_directory'] = '../config/sync';
^X # Exit
# Export the current configuration to create an initial set of YAML files.
drush cex
More info
Changing the storage location of the sync directory | Drupal 8 guide on Drupal.org
Point the virtual host to the Drupal root
As the Drupal root is now in the webfolder, you should adjust the following line in /etc/apache2/sites-available/example.localhost.conf:
DocumentRoot /var/www/html/example.localhost/webThis avoids that you have to use http:///example.localhost/web instead of simply http:///example.localhost. To activate the new virtual host file, do not forget to run also:
sudo a2ensite example.localhost.conf
sudo systemctl restart apache2
If you get any errors on Apache restart, you can debug with:
systemctl status apache2.serviceInitialize Git
git initBefore continuing with git add -A, make sure to add files and folders the the .gitignore file.
Check for errors and warnings
The first thing to do after a successful site install is to visit the status report at admin/reports/status. Adress the mentioned errors and warnings that are reported there before pushing it to a remote repo and deploy it on a live server.
Extend
Add contributed modules and themes using Composer.
Remember:
- Add development modules always to Composer with
--dev, for example:
composer require --dev drupal/devel drush en devel # Enable the added module - Use on production always:
composer install --no-dev(recommended).
Alternative install profiles
Depending on your project requirements you might want to have a different starting point. Follow the instructions above with:
- another starting repo (using composer create-project)
AND/OR
- a different site-install command (using the alias drush si)
Below we outline a few alternative profiles or distros. We presume you have set up the Drush Launcher and/or Drupal Console Launcher (to avoid the needed ../vendor/bin/ prefix).
Remove an old project before reusing the namespace
cd /var/www/html
sudo rm -rf example.localhost/
There is no need to "empty" the database as drush site-install will drop the existing tables the next time you want to use it.
Drupal with the minimal profile
If you want the minimal install instead (recommended for unbloated new projects):
composer create-project drupal-composer/drupal-project:8.9.x-dev example.localhost --no-interaction
cd example.localhost
drush si minimal --locale=de --db-url=mysql://root:root@localhost/example
Note that we also set the intended site language from the start, in this case, German (--locale=de). This avoids possible language issues later on.
You should now define your theme, content types, text formats, etc. but it is the best way to avoid features you do not need.
Umami Demo site
The Umami Demo is an install profile that is already inside Drupal core to get a content filled demo site of a Food Magazine (recipes, articles, pages). It showcases many of the capabilities of Drupal core. It makes an excellent use case to base a Drupal training on.
If you want the Umami Demo with Spanish as the default language:
composer create-project drupal-composer/drupal-project:8.9.x-dev example.localhost --no-interaction
cd example.localhost
drush si demo_umami --locale=es --db-url=mysql://root:root@localhost/example
drush cron # To get the content indexed for the search.
Umami with Search API Demo
Setting up Search API with advanced features can be a challenge. Looking at the settings within a demo helps. It includes facets, sliders, sorting, autocomplete and more.
Note that instead of using composer create-project you can also simply git clone the repository followed by a composer install, which is equivalent.
git clone <Repo> <DestinationDirectory>That is what we are using below.
git clone https://github.com/nickveenhof/drupal8-umami-search.git example.localhost
cd example.localhost/
composer install
mkdir docroot/themes/contrib
cp -R docroot/core/profiles/demo_umami/themes/umami docroot/themes/contrib/
cp -R docroot/core/profiles/demo_umami/modules/demo_umami_content docroot/modules/contrib/
sudo rm -rf web/sites/default/settings.php
vendor/bin/drush site-install --db-url=mysql://root:root@localhost/example config_installer config_installer_sync_configure_form.sync_directory=../config/sync/ --yes
vendor/bin/drush ev '\Drupal::classResolver()->getInstanceFromDefinition(Drupal\demo_umami_content\InstallHelper::class)->importContent();'
vendor/bin/drush ev '\Drupal::classResolver()->getInstanceFromDefinition(Drupal\demo_umami_search_content\InstallHelper::class)->importContent();'
vendor/bin/drush search-api:reset-tracker
vendor/bin/drush search-api:index # Re-index the content for search.
vendor/bin/drush cr # Clear cache.
drush uli -l example.localhost # If copy-paste credentials for login fail.
chmod -R 777 docroot/sites/default/files # Needed to generate images.
sudo nano docroot/sites/default/settings.php # Change the below line to FALSE.
  $settings['config_readonly'] = FALSE;
^X # Exit
drush pmu config_readonly
The Lightning distro
Another approach, almost opposite to using the Minimal install profile mentioned earlier, is to use a distribution like Lightning that offers instead a set of common features used for Enterprise Authoring.
composer create-project acquia/lightning-project example.localhost
cd example.localhost
drush si lightning --db-url=mysql://root:root@localhost/example
Remember to adjust the following line in /etc/apache2/sites-available/example.localhost.conf (docroot instead of web):
DocumentRoot /var/www/html/example.localhost/docrootDo not forget to run also:
sudo systemctl restart apache2Acquia BLT (Build & Launch Tool) with the Lightning distro
Going one step further than the previous is to use Acquia's Build & Launch Tool, a standardized template based on Acquia Professional Services’ best practices. Acquia BLT provides automation that is usually needed for enterprise-level solutions. It is perfectly fine to use BLT without having an Acquia subscription or with another install profile than Lightning.
composer create-project --no-interaction acquia/blt-project example.localhost
source ~/.bashrc
cd example.localhost
sudo nano /etc/apache2/sites-available/example.localhost.conf  # Change the below line.
  DocumentRoot /var/www/html/example.localhost/docroot
^X # Exit
sudo systemctl restart apache2
nano docroot/sites/default/settings/local.settings.php # Change the below lines.
$db_name = 'example';
      'username' => 'root',
      'password' => 'root',
^X # Exit
blt setup # From the terminal output, copy-paste the user name and password. Visit example.localhost/user.
blt doctor # Just a sanity check. Fix found issues.
Other resources
The above commands lead to a BLT install running on a native LAMP stack (the scope of this guide). A more common approach is, however, to run it on VirtualBox using Drupal VM. The instructions for this:
Creating a new project with Acquia BLT — Acquia Product Documentation
Troubleshooting
- Acquia BLT FAQ and support — Acquia Product Documentation
- blt: command not found · Issue #288 · acquia/blt
Install with drupal/drupal
Alternatively, use Drupal itself as a template for the new site. It lacks additional configuration that can be helpful and Drupal core cannot be updated with composer update. It is more used for a "quick and dirty" temporary development Drupal setup without any "bells and whistles". DO NOT use it for an intended production project.
Grab the code including dependencies (latest stable)
cd /var/www/html
composer create-project drupal/drupal example.localhost
For an older version:
composer create-project drupal/drupal:8.4.8 example.localhostCreate the needed files folder (requirement)
mkdir /var/www/html/example.localhost/sites/default/files

sudo chown :www-data /var/www/html/example.localhost/sites/default/files
Fixing Permissions on the Files Directory in Drupal
Create the needed settings.php file (requirement)
cp /var/www/html/example.localhost/sites/default/default.settings.php /var/www/html/example.localhost/sites/default/settings.php

sudo chown :www-data /var/www/html/example.localhost/sites/default/settings.php
Create the database
mysql -u root -p
Enter password:
CREATE DATABASE example;
\q
Initiate the installation process
Visit http://example.localhost and follow the instructions. On your local machine for the database example username, you can use root with the MySQL password. For a local site, you can use the username (superuser #1) admin with the password admin. For sites on a server, you choose your credentials obviously more careful.
If all went well you get a message (translated into your install language):
Congratulations, you installed Drupal!
More detailed info: Run the installation script | Drupal.org
TIP: Use local domains with color names
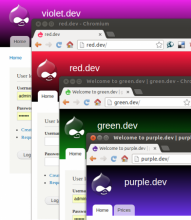
For local development use domains with color names like 'red.localhost', 'green.localhost' and yellow.localhost. Why?
-
We seem to remember colors better than numbers or words.
-
Different colored sites and favicons visually distinguish them when working on multiple projects contemporarily (see image).
-
Not being associated with a client, functionality or Drupal version, a color can be reused for any project.
Find attached a set of different colored Drupal favicons so you can differentiate the browser tabs of your development environments. The color blue is missing. You can probably guess why.
So, go back to the previous chapter and the instructions above, and repeat the steps replacing example with a color name to set it up. If you at least create the virtual hosts and databases for all colors in the below-attached zip file, you have everything prepared to quickly start up new projects.
Attachment:
colored_drupal_favicons.zip (15.11 KB)
Next: Version Control System >>
Help improve this page
You can:
- Log in, click Edit, and edit this page
- Log in, click Discuss, update the Page status value, and suggest an improvement
- Log in and create a Documentation issue with your suggestion
