 Support for Drupal 7 is ending on 5 January 2025—it’s time to migrate to Drupal 10! Learn about the many benefits of Drupal 10 and find migration tools in our resource center.
This project is not covered by Drupal’s security advisory policy.
Provides Kashing Payments integration with Drupal.
Start accepting secure card payments instantly with the Kashing module on your website. It’s quick and easy to set up. You can do it yourself in no time!
All the transactions are logged through your Kashing membership account and are available for you to view and search anytime.
Never miss out on an online sale again.
Do you sometimes need to sell things face-to-face as well? Have a look at the Kashing Smart App and ditch your old fashioned card reader.
Features
- Integrate your Kashing Smart Payment Technology account with your Drupal website and allow your site visitors & clients to pay directly on your website.
- Build unlimited payment forms – each with a different transaction amount and description – so you may easily recognise them in your Kashing transaction history.
- Display your payment form in chosen page region using block.
- Easily place payment forms anywhere on your website using shortcodes (module required).
- Debug and test the integration with a convenient ”Test Mode” before you go live.
- Easily change the transaction currency.
- Fully customize the payment failure and success pages.
Installation
- Download the Kashing module (bottom of this page).
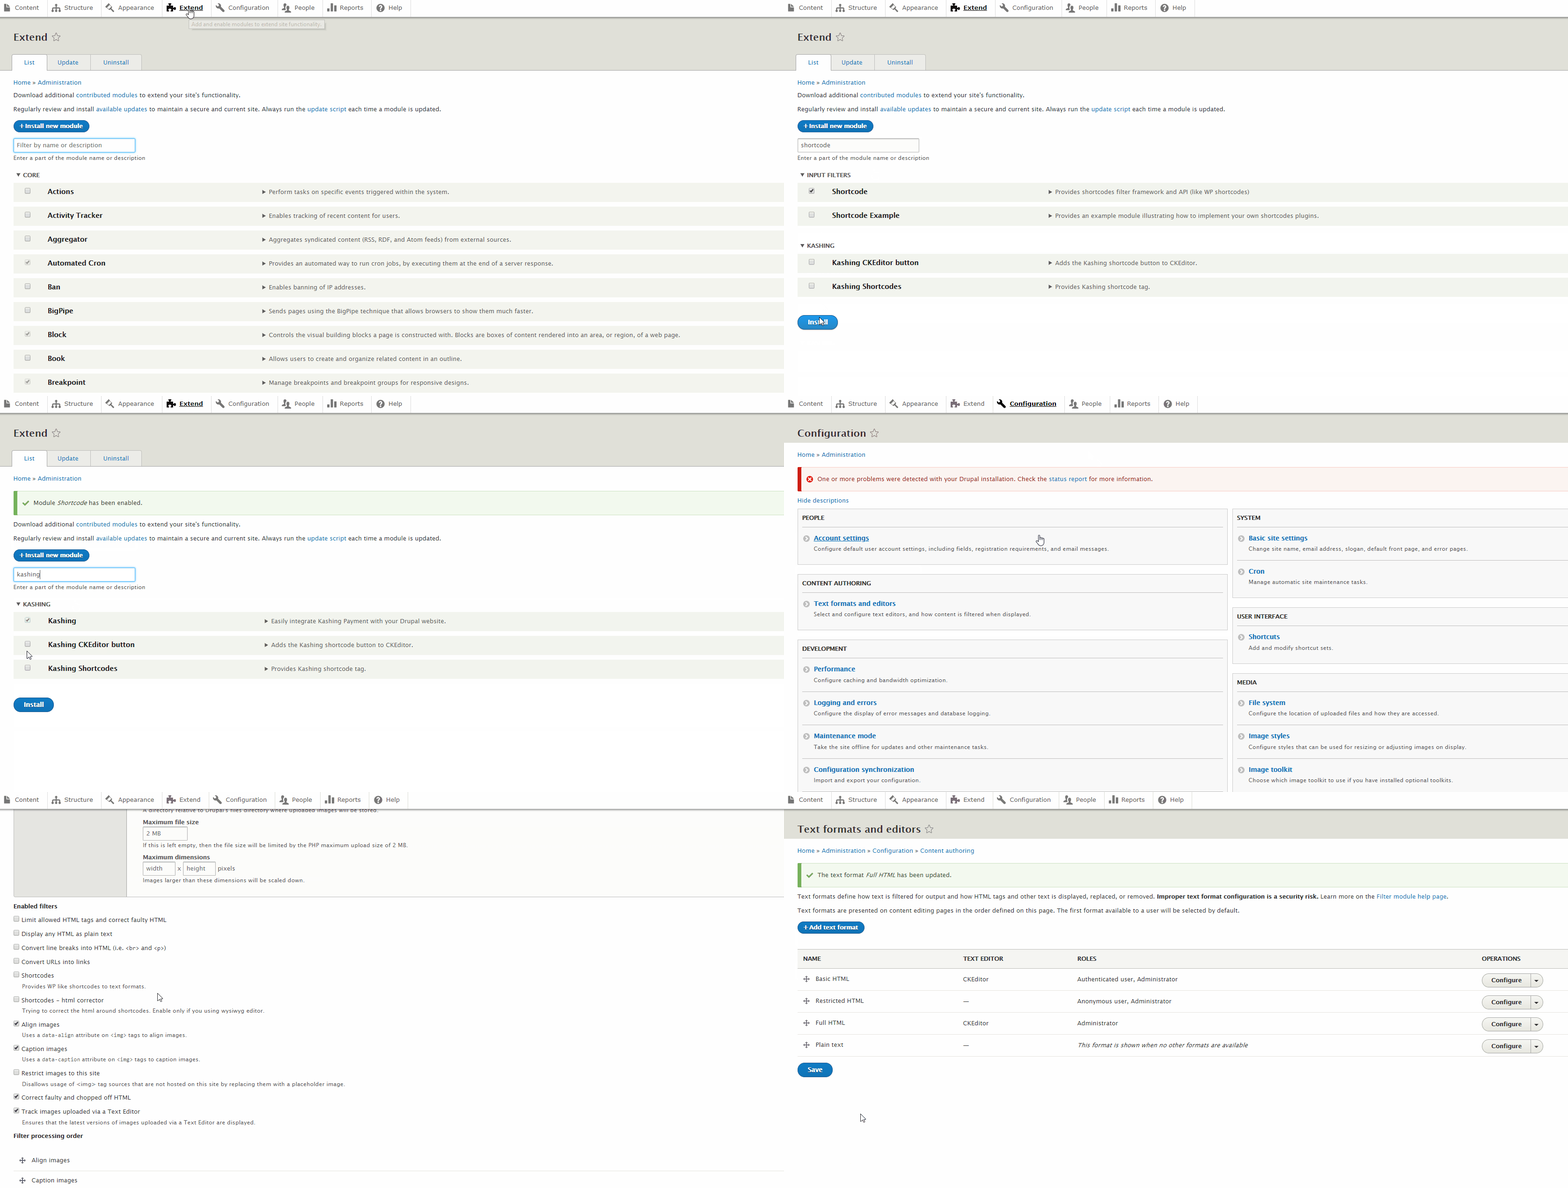
- Login to your page as an administrator and navigate to Extend menu.
- Choose the +Install new module option. You will be redirected to module installation page.
- Either upload previously downloaded module .zip file or just paste the module URL. You can also just unzip the kashing module folder and place it directly in
/modules/directory of your page. - Go back to Extend menu. In a Filter by name or description field type in Kashing or scroll the page down to the Kashing module section.
- Activate selected module elements (Kashing itself is the main one and is required by the other elements) by marking them out and click an Install button.
- If you are not able to mark any of the module elements verify the required modules (click on the module description).
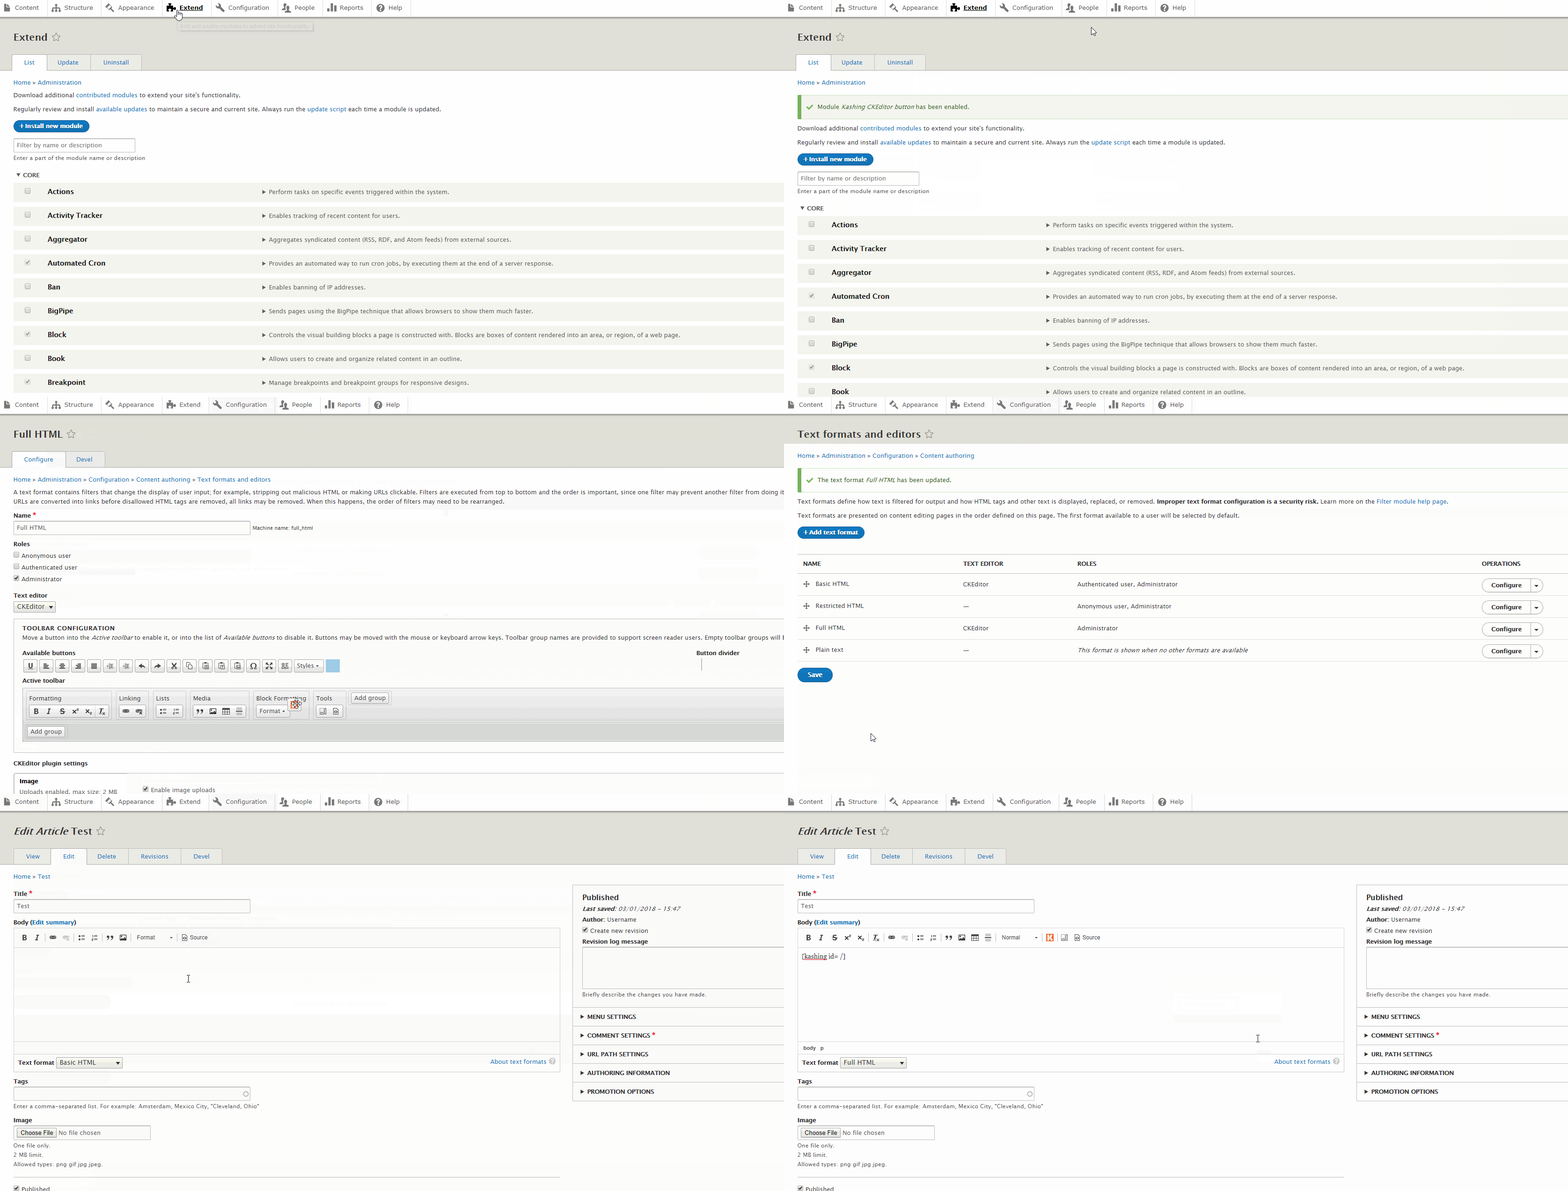
- After the CKEditor button or Shortcodes module selection make sure to follow up the instructions under Activating shortcodes functionality and/or Activating CKEditor button functionality section of this page.
- Do not forget to clear cache.
- After the installation, selected module elements should be available.
Module elements
- Kashing - the main standalone module providing Kashing payments functionality. It allows to configure the payments (API keys) and to create payment form in a separate block.
- Kashing Shortcodes - provides Kashing shortcode tag functionality. Just put down
[kashing id=[ID] /]in your node body, where[ID]refers to previously created form ID (block machine name). Note: the shortcodes module is required. - Kashing CKEditor button - adds the Kashing shortcode button to CKEditor, which allows to easily choose one of the created forms and place a shortcode directly in selected node.
Kashing module configuration
- Navigate to Extend/Kashing and under the module details click on Configure button. Alternatively go to Administration page and you will find Kashing Payments Settings under the Index tab.
- Click the Retrieve Your Kashing API Keys link (Configuration tab) – that will take you to the latest version of Kashing documentation where you will be explained how to retrieve the module configuration data.
- After you receive the configuration data, fill all 4 fields in the Configuration tab: Test Merchant ID, Test Secret Key, Live Merchant ID, Live Secret Key. The first two are going to be used only if the Test Mode is enabled. When you’re done, click Save Settings button.
- For test purposes, it is recommended to use the Test Mode.
- To change the currency or to create success and failure pages select the General tab.
- Choose your desired currency from the Choose Currency dropdown menu.
- Design the look of both the success and failure page in a standard way using CKEditor.
- Once again save changes.
Creating a Payment Form
- Navigate to Add New Form tab under the Kashing settings (Similarly to step 1 of Kashing module configuration instruction).
- Enter the form title and fill out the required fields: Amount and Description.
- The Form ID field fills in by itself but you can change it too. Just remember to use only small letters, numbers and underscore symbol. The Form ID is used in a shortcode functionality to identify created forms.
- When you’re done, save the form by clicking Add New Form button.
Editing Payment Forms
- Navigate to Edit Forms tab under the Kashing settings (Similarly to step 1 of Kashing module configuration instruction).
- If there are any forms you will see the ID, name, amount and description of all available forms.
- To edit a form just click on Edit option associated with the table row. You will be redirected to a block layout edition page.
- To delete a form click on the Delete option. Confirm by clicking on Remove button.
- To delete multiple forms at once mark out chosen rows checkboxes and click on Delete Forms button.
Activating shortcodes functionality
- To enable the shortcodes functionality download, install and activate shortcode module.
- Navigate to Configuration / Text formats and editors.
- Choose one of the CKEDitor variants by clicking the Configure button under the Operations column.
- Make sure that Shortcodes checkbox under the Enabled filters is selected
- Scroll down to the Filter settings section and varify if the Enable Kashing shortcode is checked.
- If necessary save changes by clicking Save configuration button.
- Now you are able to use
[kashing id=[ID] /]
shortcode. Just change the ID to previously created form ID (machine name).

Activating CKEditor button functionality
- Navigate to Configuration / Text formats and editors.
- Choose one of the CKEDitor variants by clicking the Configure button under the Operations column.
- In the Toolbar Configuration section drag and drop Kashing button to the desired place in CKEditor Active toolbar.
- Save changes by clicking Save configuration button which can be find at the bottom of the page.
- You should now be able to see the Kashing button during a content edition. If not make sure you are using a correct Text format.

Project information
Seeking new maintainer
The current maintainers are looking for new people to take ownership.- Module categories: E-commerce
- Created by gerthorne on , updated
This project is not covered by the security advisory policy.
Use at your own risk! It may have publicly disclosed vulnerabilities.


