Quick Start Guide
On this page
- Download and install
- Adding feeds
- Sharing feed items
- Sharing aggregations
- Narrowing down results with search
- Using tags and creating a channel
- Adding new feed streams to the dashboard
- Conclusion
- See also
The power of managing new comes from aggregating data from multiple sources and displaying that data in meaningful ways. In this Quick Start Guide, we're going to walk through the process of using Managing News to track news about Apple's latest and greatest product lines from a variety of sources.
Download and install
To install Managing News, follow the installation instructions here.
Adding feeds
Adding a new feed is simple. Simply click the Feeds tab at the top of the screen, and click the Add feed button in the left-hand column:

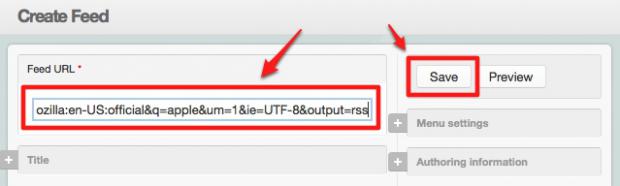
This will take you to a form where you can enter a feed URL. We're going to start by pulling in information from Google News for the keyword "apple". You can typically find the RSS feed for a page by looking for an RSS icon either in the browser address bar or somewhere on the page. For Google News, it's in the footer:
![]()
After clicking on this, copy the URL from the browser address bar and paste it into the Add feed form. Click the Save button to import the feed:
Even with just a single feed, Managing News gives you some unique ways of looking at the data:
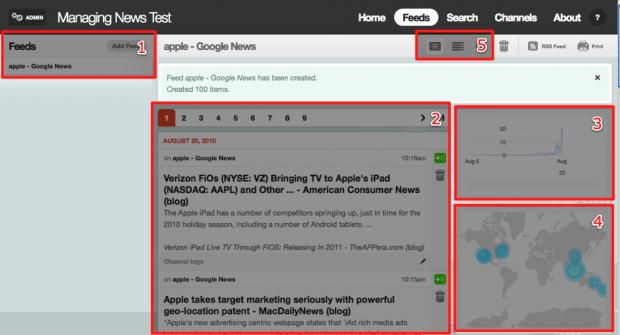
There are two unique displays in the right-hand column, one that shows the number of posts over time (3), and another that displays the location of posts based on geo-tags on a small map (4).
A list of individual feeds display in the left-hand column (1). When you click on the Feeds tab, all feeds are aggregated into a single stream, however you can view a single feed by clicking on an item in this list.
The default view of aggregated stories (2) include a title, short snippet and a few other pieces of data. You can change this (5) to a list display that shows only headings, or a map display that shows a larger, richer version of the map you see in (4).
From here, you can follow the same steps to add several feeds to build a stream that's unique to your goals.
Sharing feed items
Say you're viewing your aggregated news and run across an article you'd like to post to Twitter. Instead of firing up your favorite Twitter app, there's an easier way to share.
When viewing a story collection with the news or list display, click on the green (+) icon to share a story via a variety of social networks or e-mail. Let's go ahead and share our story through Twitter.
When you click on the green share icon, an overlay will display at the bottom of the screen:
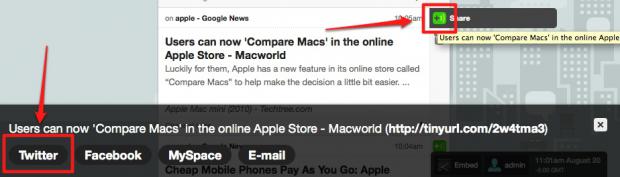
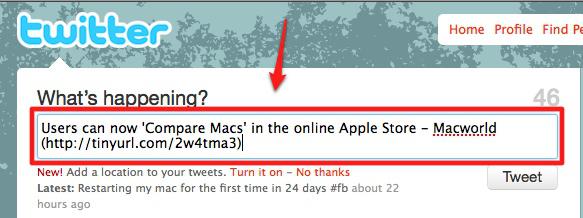
Click on the Twitter link to launch a new page with a status message pre-filled (note that you must be logged into Twitter for this to work):
Super easy! You can learn more about the sharing via social networks and e-mail here.
Sharing aggregations
If you want to share a unique story collection with other sites, there are two methods you can use. First, every story collection includes an RSS feed that other web sites or aggregators can subscribe to. You can view the feed by clicking the RSS link in the upper right-hand corner:
![]()
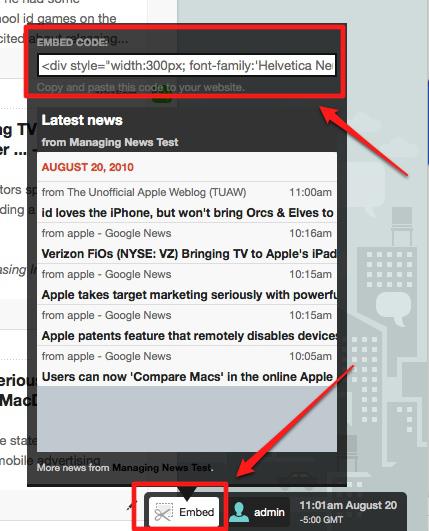
You can also share web widgets, which allow you to embed aggregated content on another web page. There are map and lists displays available. Just click the Embed link on the bottom of the screen of the story collection you want to share, copy the code and past it into another web site:
Narrowing down results with search
Now that we have a number of stories about the Apple company, let's say we want to focus these streams into particular topics based on particular products and services, say the iPhone, iPad and iTunes. This is easy with Managing News search.
To begin, click on the Search tab at the top of the screen. Once you are on this page, you may see a red box that index that indicates how much of your content has been indexed:
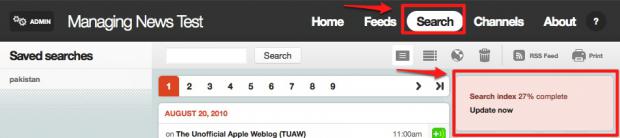
You can manually index content by clicking the Update now link in the red box (note that this can take several minutes to run), or you can set up a cron job to index content at regular intervals.
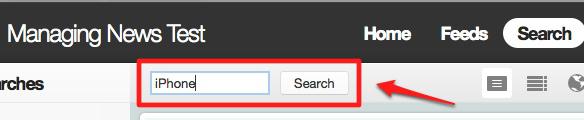
Once your content is indexed, fill in the search form and click Search:
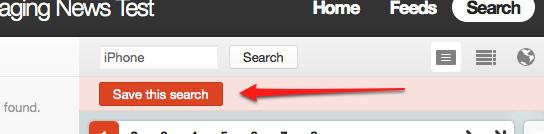
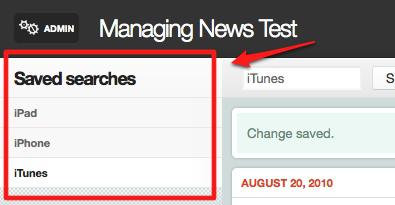
Now you should see a story collection that only matches this search term. Let's go ahead and save this search so we can view it quickly later on by clicking the Save this search button under the search box:
Once a search is saved, it will display in the left-hand column. I went ahead and added a saved search for the words iPad and iTunes as well:
You can read more about search and saved search here.
Using tags and creating a channel
Adding a tag
Let's say we want to be able to mark certain stories for future reading. A Channel is a perfect tool for this. While the search feature allow us to create story collections automatically, Channels allow us to manually tag stories for human-filtered story collections.
Let's start by marking a few items with the tag Read later. When reviewing items in a story collection, there is a section below each story called Channel tags. This displays any current tags for the story. If you click the pencil icon to the right of this section, you can add new tags:
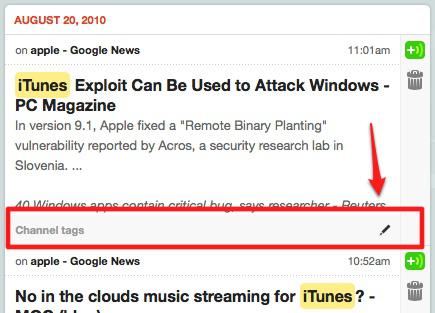
You can separate multiple tags with a comma, but for now we're just going to add our Read later tag. Once you've added the tag, click the Save link next to the input and your tag will display:

We can click the tag to view any stories that have this tag, but in order to display a box on our home dashboard, we'll need to create a channel for it.
Creating a channel
Click on the Channel tab, and click the Add channel button in the left column:

This will open up a form for you to add a new channel. The magic happens with the Channel tags input, where you can add any tags you want to aggregate into the channel. As you type, Managing News will search for matches, so you can just type the first few letters and press enter to fill in the rest:
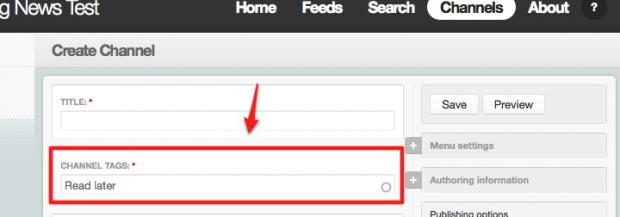
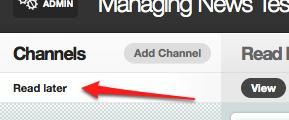
Choose a title for your channel (in this case I picked Read later) and click the Save button to save the channel. Now the channel will display in the left-hand column:
Learn more about channels here.
Adding new feed streams to the dashboard
Now that we've created saved searches and a channel, it's time to bring everything together on our dashboard so we can see it all in once place.
You can view your dashboard by clicking the Home tab at the top of the screen. The blocks on this page are completely configurable. You can move them around, add custom ones or remove the ones that are there, all in-line.
To modify the dashboard, click the Dashboard link at the bottom of the screen:
![]()
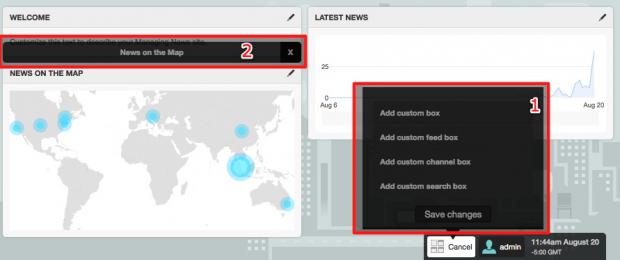
Doing this will display a list of blocks that you can add to the dashboard (1), but is also allows you to hover over any existing block to change its display options (if they exist) or delete it (2):
Let's begin by adding a search block on the term iPhone. To do this, drag the Add custom search box over to where you would like it displayed on the dashboard. You will see gray dotted lines around the area where the block will appear:

Go ahead and drop the block. You should now see a form which you can fill out with the details:
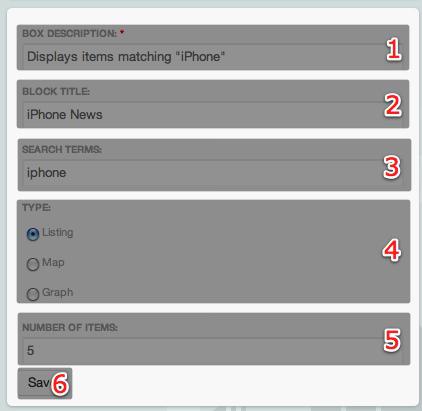
- The Box description (1) will display as a title when hovering over the block.
- The Box title (2) will display as the title for the block.
- Add whatever search terms should be used for the block in the Search terms (3) input.
- The Type (4) determines whether the stream should display as a list, a map, or an activity graph.
- You can set the number of items to display in the Number of items input (5).
- When you're done, click the Save button (6).
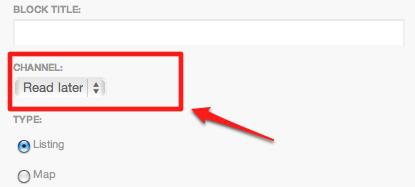
To add a Channel block, the process is exactly the same except that you'll begin by dragging the Add custom channel box over to the dashboard. In the settings form, you can select which channel to display:
You can do other neat things with the dashboard, like have multiple dashboard pages. Learn more about the dashboard here.
Conclusion
Congratulations on getting up and running with Managing News! From here, you might want to take a look at the Basic Usage section for detailed information on setting up the dashboard, sharing stories with web widgets or broadcasting them across social networks.
See also
Related pages
Help improve this page
You can:
- Log in, click Edit, and edit this page
- Log in, click Discuss, update the Page status value, and suggest an improvement
- Log in and create a Documentation issue with your suggestion
