


Description
This module allows you to insert Syntaxhighlighter tags into a textarea. It supports both plain text and wysiwyg textareas. It makes it easier to create the tag needed for Syntaxhighlighter to highlight the code the way you want it to. All you have to do is select the options and press "insert".
Currently supported options are:
- Title
- Brush
- Auto Links
- Collapse
- HTML Script
- Smart Tabs
- Toolbar
- Class Name(s)
- First Line
- Highlight
- Tab Size
This module contains three modules:
- Syntaxhighlighter Insert: Provides general syntaxhighlighter insert functionality (e.g. permissions).
- Syntaxhighlighter Insert Text: Add a fieldset under the selected textarea (you can choose this when editing the field).
- Syntaxhighlighter Insert WYSIWYG: Adds an extra button to wysiwyg editors and opens a popup to select the syntaxhighlighter tag options to insert.
Dependencies
Usage
Syntaxhighlighter Insert Text
- Go to the content types page (admin/structure/types) or ANY other entity edit page where you can manage its fields.
- Click on 'manage fields' for the content type/entity that has the field for which you want to enable syntaxhighlighter insert.
- Click on 'edit' next to the field for which you want to enable syntaxhighlighter insert.
- In the 'Syntaxhighlighter insert' fieldset, check the checkbox ('Use Syntaxhighlighter Insert for this field').
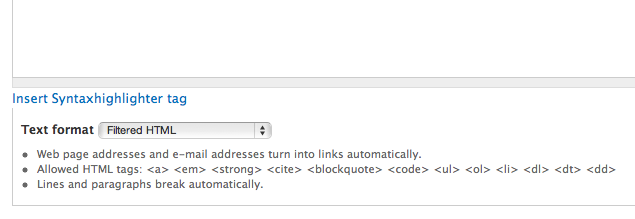
- When adding the node/entity there should be a link below the field that says 'Insert Syntaxhighlighter tag'.
- When you click it a form pops up with all the options you need.
- When you've configured all the options press 'Insert' at the bottom.
- Paste your code within the pre tags that have been inserted into the textfield.
- Save the node/entity and you're code should be highlighted.
Syntaxhighlighter Insert WYSIWYG
- Go to the WYSIWYG Profiles page (admin/config/content/wysiwyg/profile)
- Press 'edit' next to the profile for which you have enabled the WYSIWYG editor.
- In the 'Buttons and Plugins' fieldset, check the 'Insert syntaxhighlighter tag' checkbox.
- The new button should now appear in the editor.
- When you click it a form pops up with all the options you need.
- When you've configured all the options press 'Insert' at the bottom.
- Write your code within the black box in the textfield. Use SHIFT + ENTER to go to a new line or you will go out of the box.
- Save the node/entity and you're code should be highlighted.
Project information
 77 sites report using this module
- Created by jelle_s on , updated
 Stable releases for this project are covered by the security advisory policy.
There are currently no supported stable releases.


