Keycloak OAuth SSO Setup
This document will help you configure Keycloak as an OAuth Provider making Drupal your OAuth Client. Following these steps will allow you to configure OAuth/OpenID SSO between Keycloak and your Drupal site such that your users will be able to log in to your Drupal site using their Keycloak credentials.
We provide Drupal OAuth & OpenID Connect Login - OAuth2 Client SSO Login module which is compatible with Drupal 7, Drupal 8, Drupal 9, Drupal 10, and Drupal 11.
Prerequisite:
- Install and activate the OAuth & OpenID Connect Login - OAuth2 Client SSO Login module on your Drupal site. Follow these steps to install the module.
Specific version(21.1.1)
This setup guide is for Keycloak (version 21.1.1), but if you want to test Keycloak with a different version, you can use this guide.
Steps to configure Drupal as OAuth Client:
-
After installing the module in your Drupal site. Navigate to the Configuration tab and click on the miniOrange OAuth Client Configuration.
(/admin/config/people/mo-oauth-client/mo-client-config)
-
In the Manage section, under the Client Configuration tab, click on the + Add New button to configure the desired OAuth Client.

- Provide the following information in the Client Configuration -> Add tab:
- Select Keycloak from the Select Application dropdown.
- Enter the Custom App Name as Keycloak.
- Copy the Callback/Redirect URL, and keep it handy. This is required to configure Keycloak as an OAuth Provider.

Configure OAuth/OpenID Single Sign-On Application in Keycloak:
- Log into your Keycloak administrator console.
-
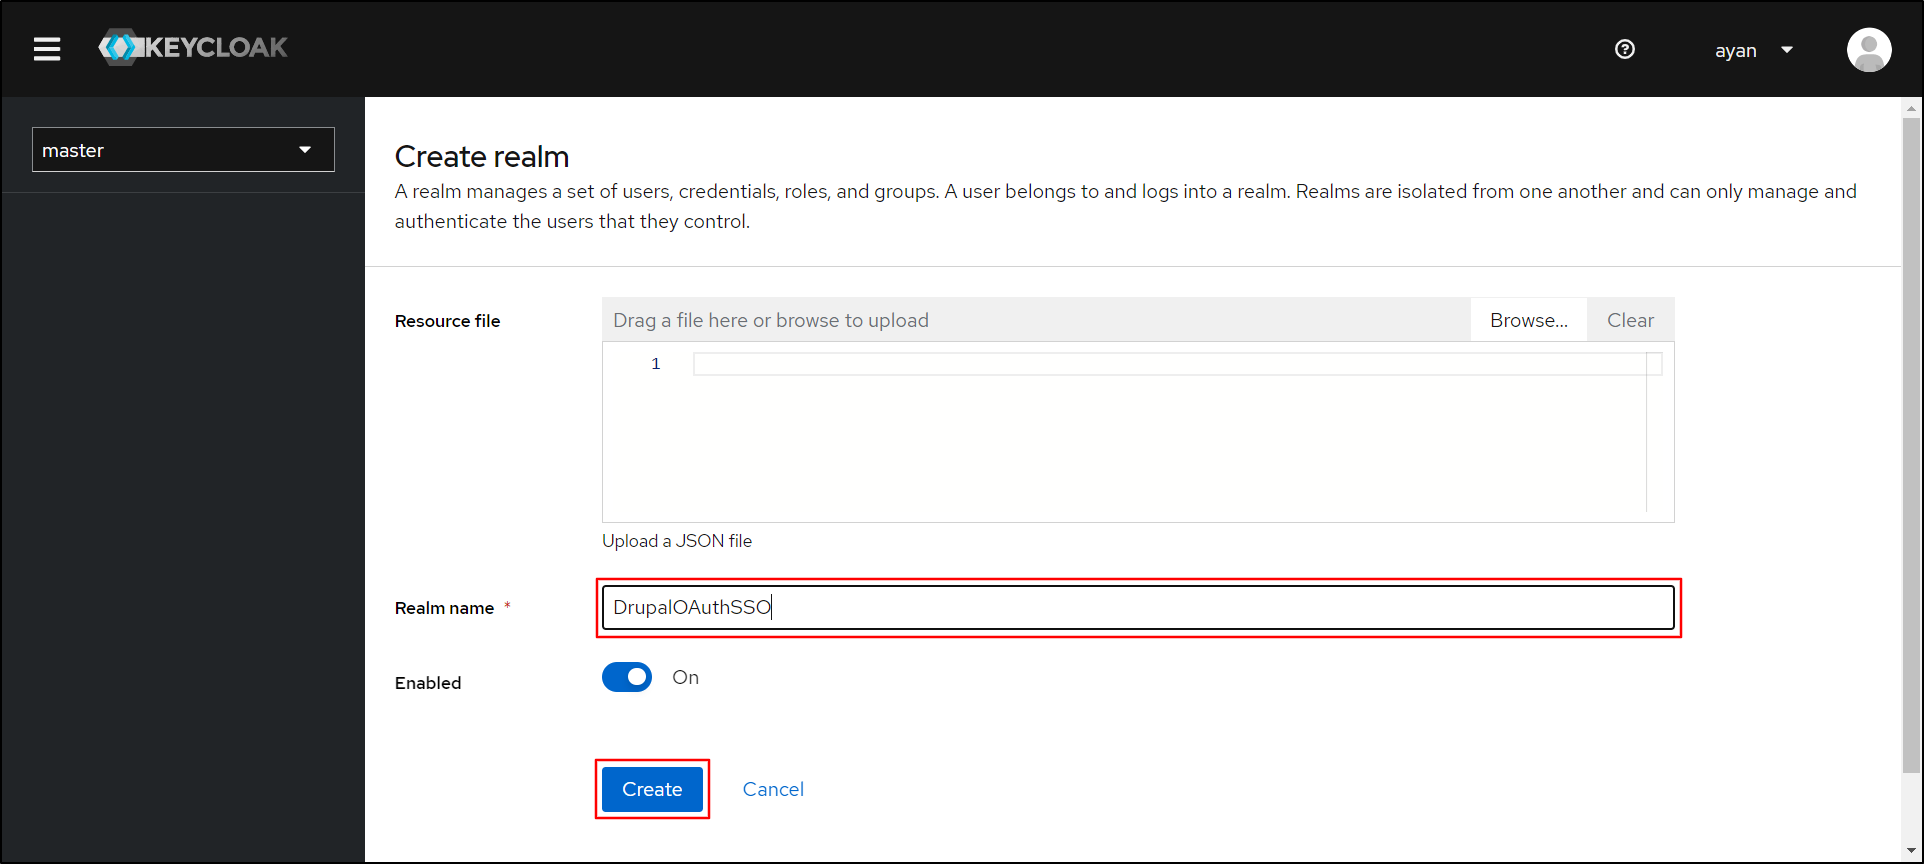
From the left side, under the master dropdown, click on the Create Realm button.

-
On the Create realm panel, enter the application name in the Realm name text field, then click on the Create button to proceed.
-
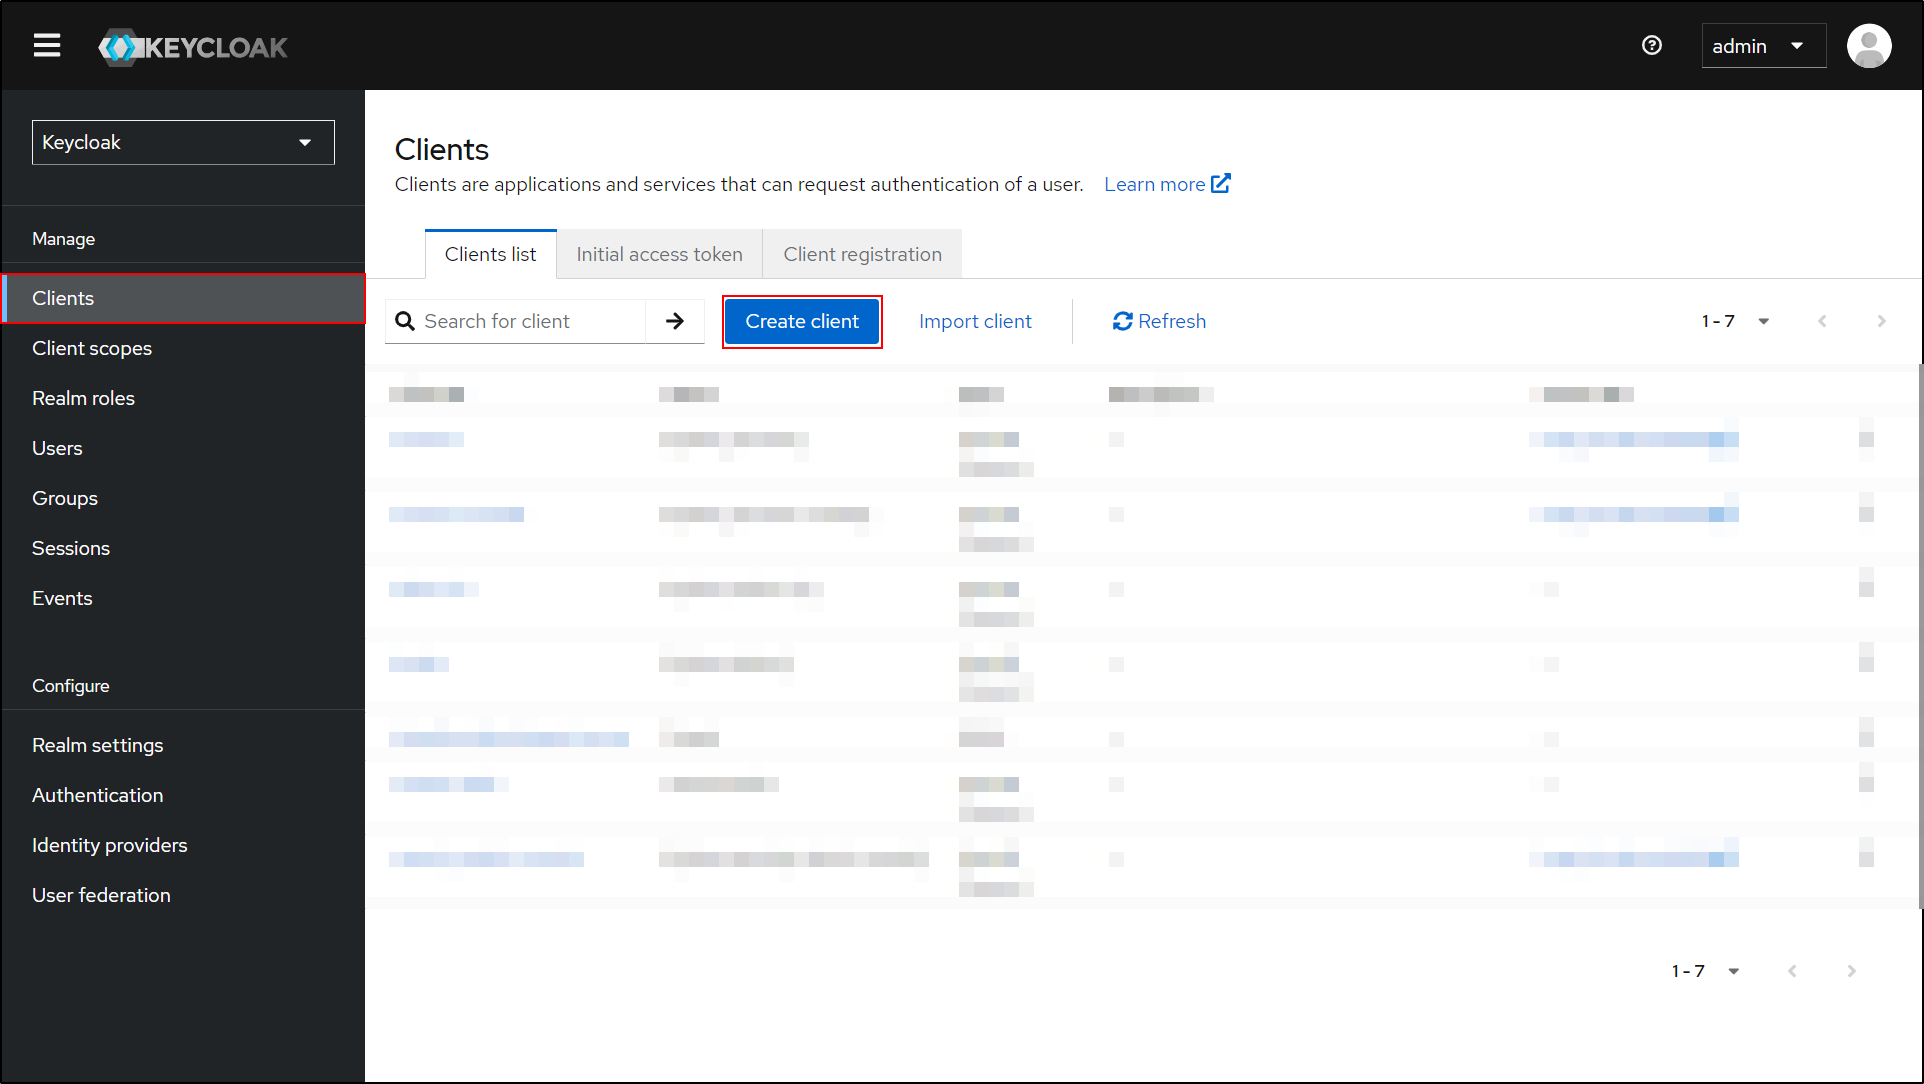
Navigate to the Clients from the left side.

-
Under the Clients list tab, click on the Create client button.
-
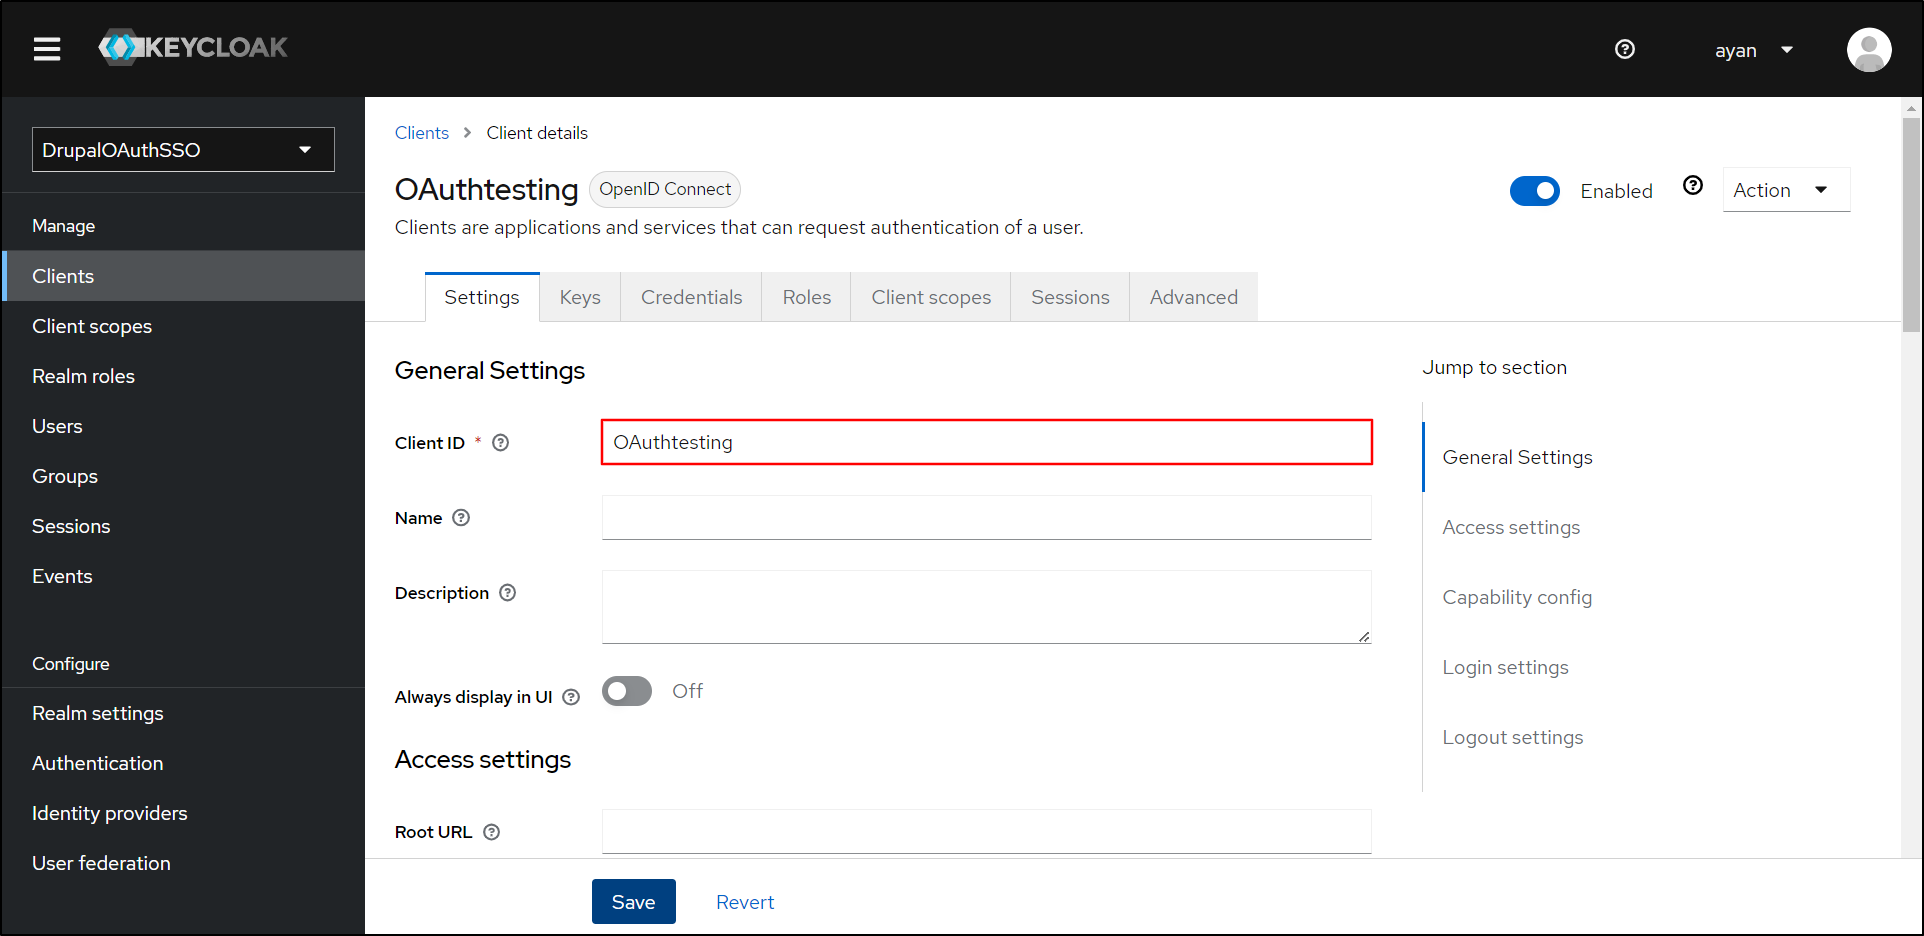
From the left side, in the General Settings, enter the Client ID and click on Next button to proceed.

-
On the Capability Config, enable the checkbox for Client authentication and click on the Next button.

-
Paste the previously copied Callback/Redirect URL into the Valid redirect URIs text field and click on the Save button.

Integrating Drupal with Keycloak:
-
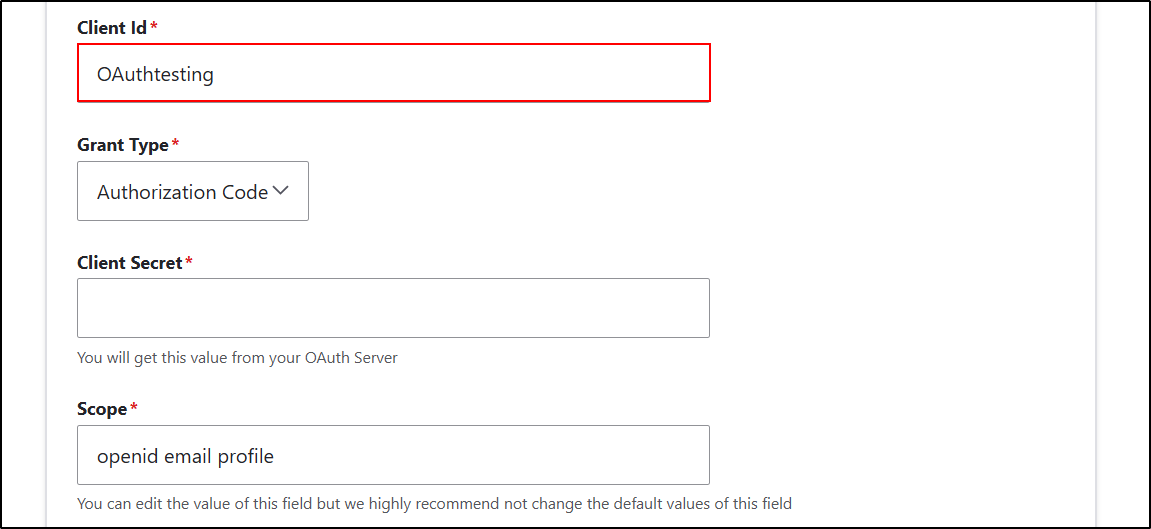
Go to your Keycloak Application. On the Settings tab, copy the Client ID from the General Settings section. Keep it handy.
-
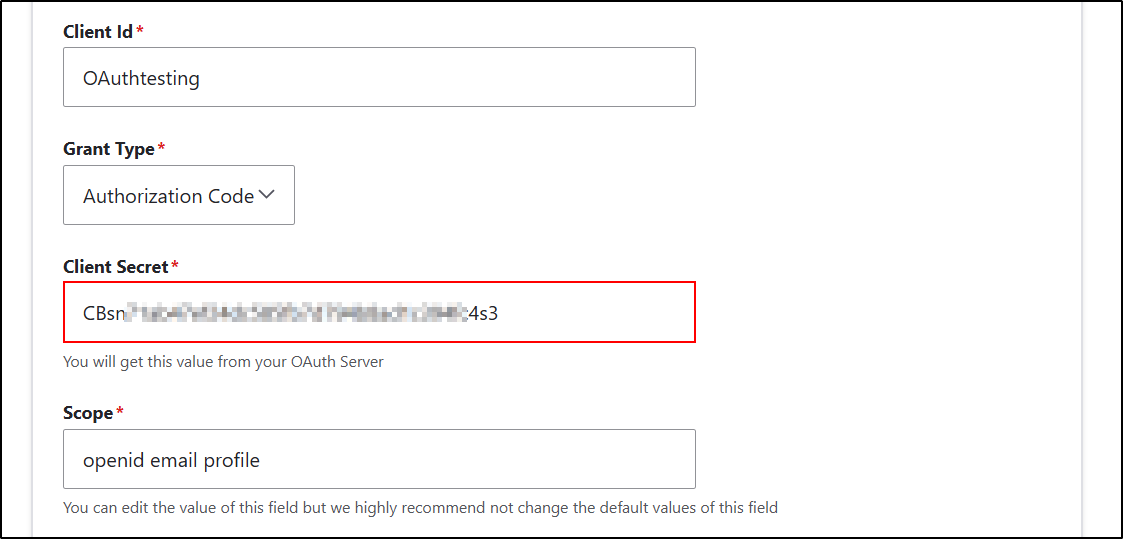
Go to the Drupal site and paste the copied Client ID into the Client ID text field.
-
In Keycloak, navigate to the Credentials tab and copy the Client secret by clicking on the Icon to copy it to the clipboard.

-
Navigate to the Drupal site and paste the copied Client Secret into the Client Secret text field.
- Again, go back to the Keycloak Administrator console.
-
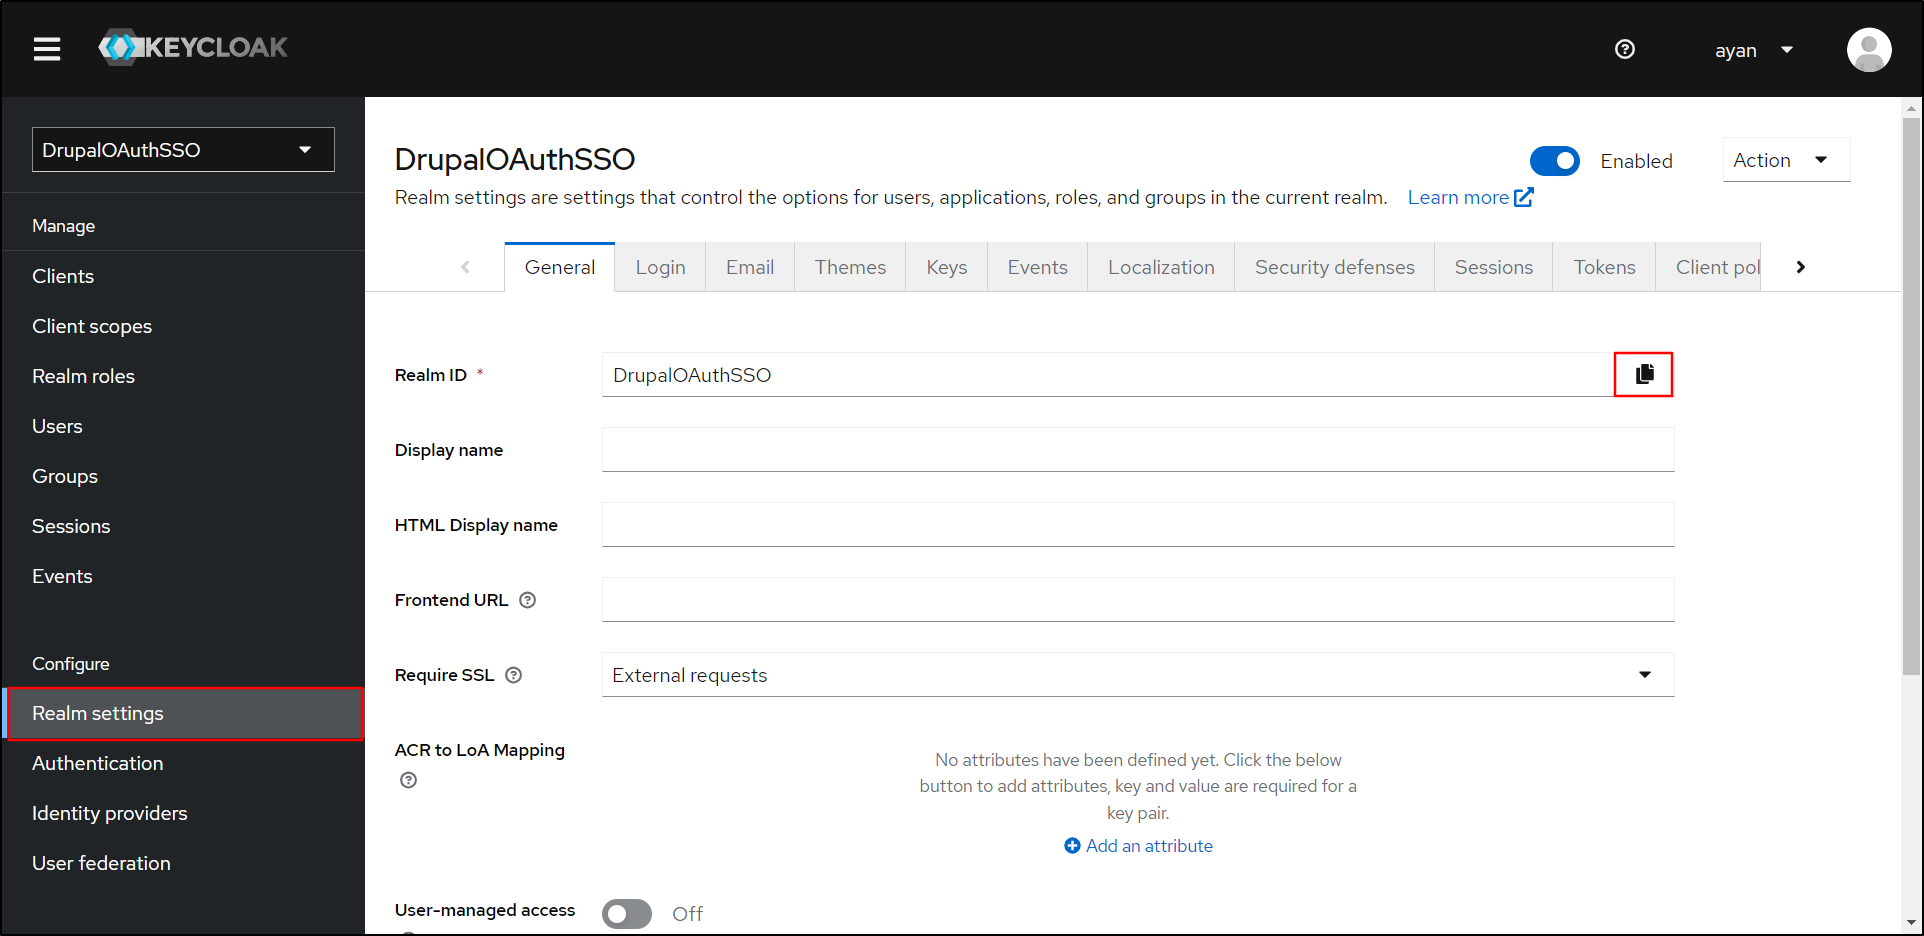
From the left side, navigate to Realm settings under the General tab, and copy the Realm ID by clicking on the copy Icon. Keep it handy; it will be required to configure Drupal.
-
Navigate to the Keycloak Administrator console and copy the Keycloak domain URL. For example, if your Keycloak is running on localhost, then the domain would be "https://localhost:8080". (Refer to the below image.)

- Replace the "Keycloak_base_URL" with the Keycloak domain URL and Realm ID with "realm-name" in the Authorization Endpoint, Token Endpoint, and UserInfo Endpoint text fields.
-
The Send Client ID and Secret in header or body redio button is used to send the Client ID and Secret inside the header or body of the Token End Point Request. Then, click on the Save Configuration button.
Authorization Endpoint <Keycloak base URL>/realms/{realm-name}/protocol/openid-connect/auth Token Endpoint <Keycloak base URL>/realms/{realm-name}/protocol/openid-connect/token UserInfo Endpoint <Keycloak base URL>/realms/{realm-name}/protocol/openid-connect/userinfo Scope openid email profile 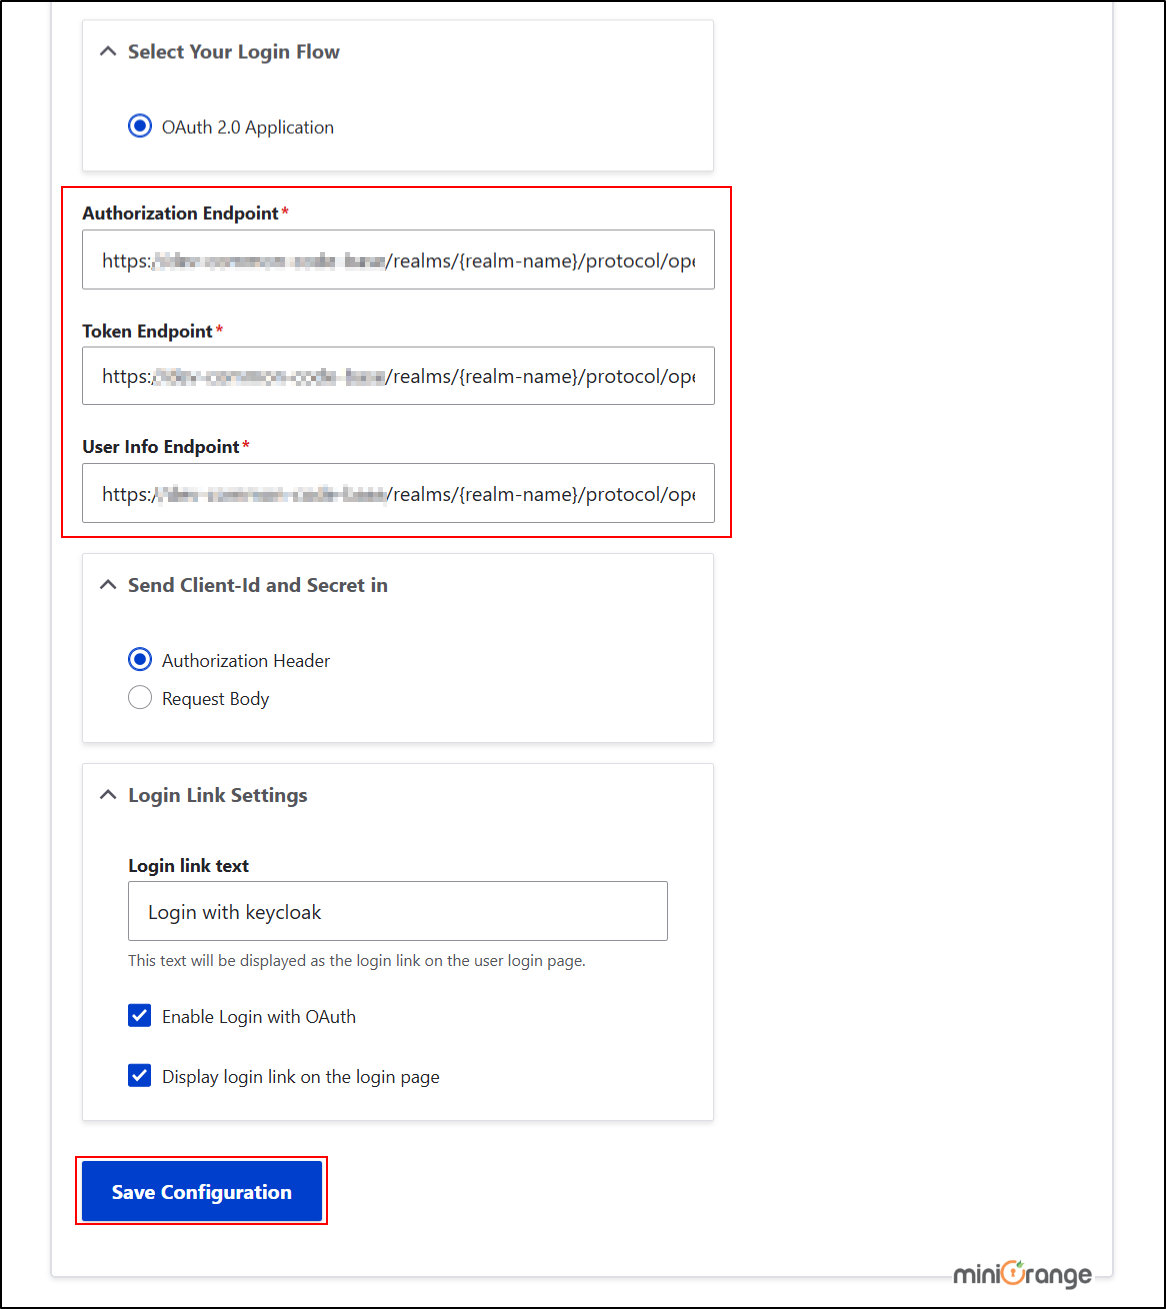
Test Configuration for Drupal with Keycloak:
-
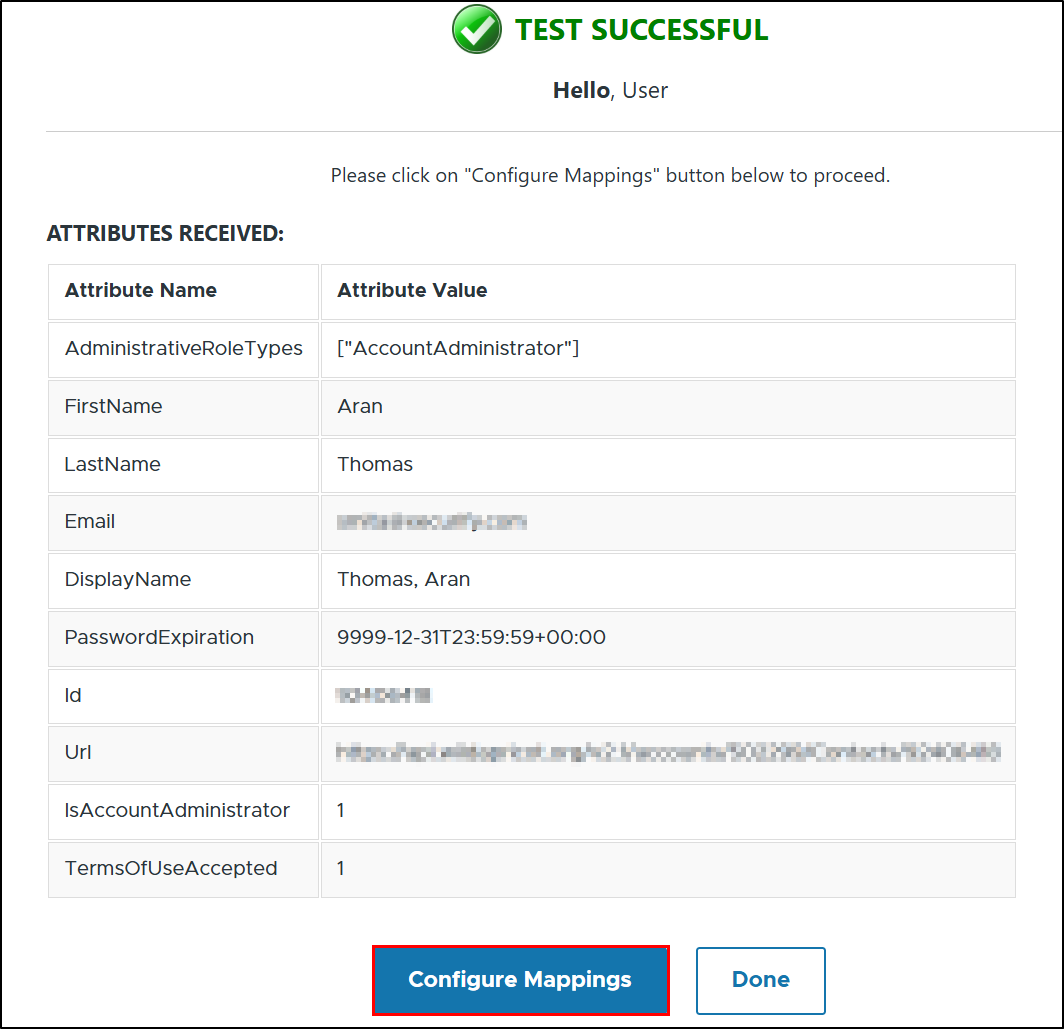
After saving the configuration, click on the Perform Test Configuration button to check the OAuth SSO connection between Drupal and Keycloak.

- On a Test Configuration popup, if you don't have an active session in keycloak on the same browser, you will be asked to sign in to your Keycloak administrator console. After successfully logging into Keycloak, you will be provided with a list of attributes that are received from Keycloak.
-
Scroll to the bottom and click on the Configure Mappings button.
-
Once you click on the Configure Mapping button, you will be redirected to the Attribute Mapping tab. From there, select the appropriate attribute from the OAuth Server Attribute dropdown where the email value is received, and then click the Save Configuration button.
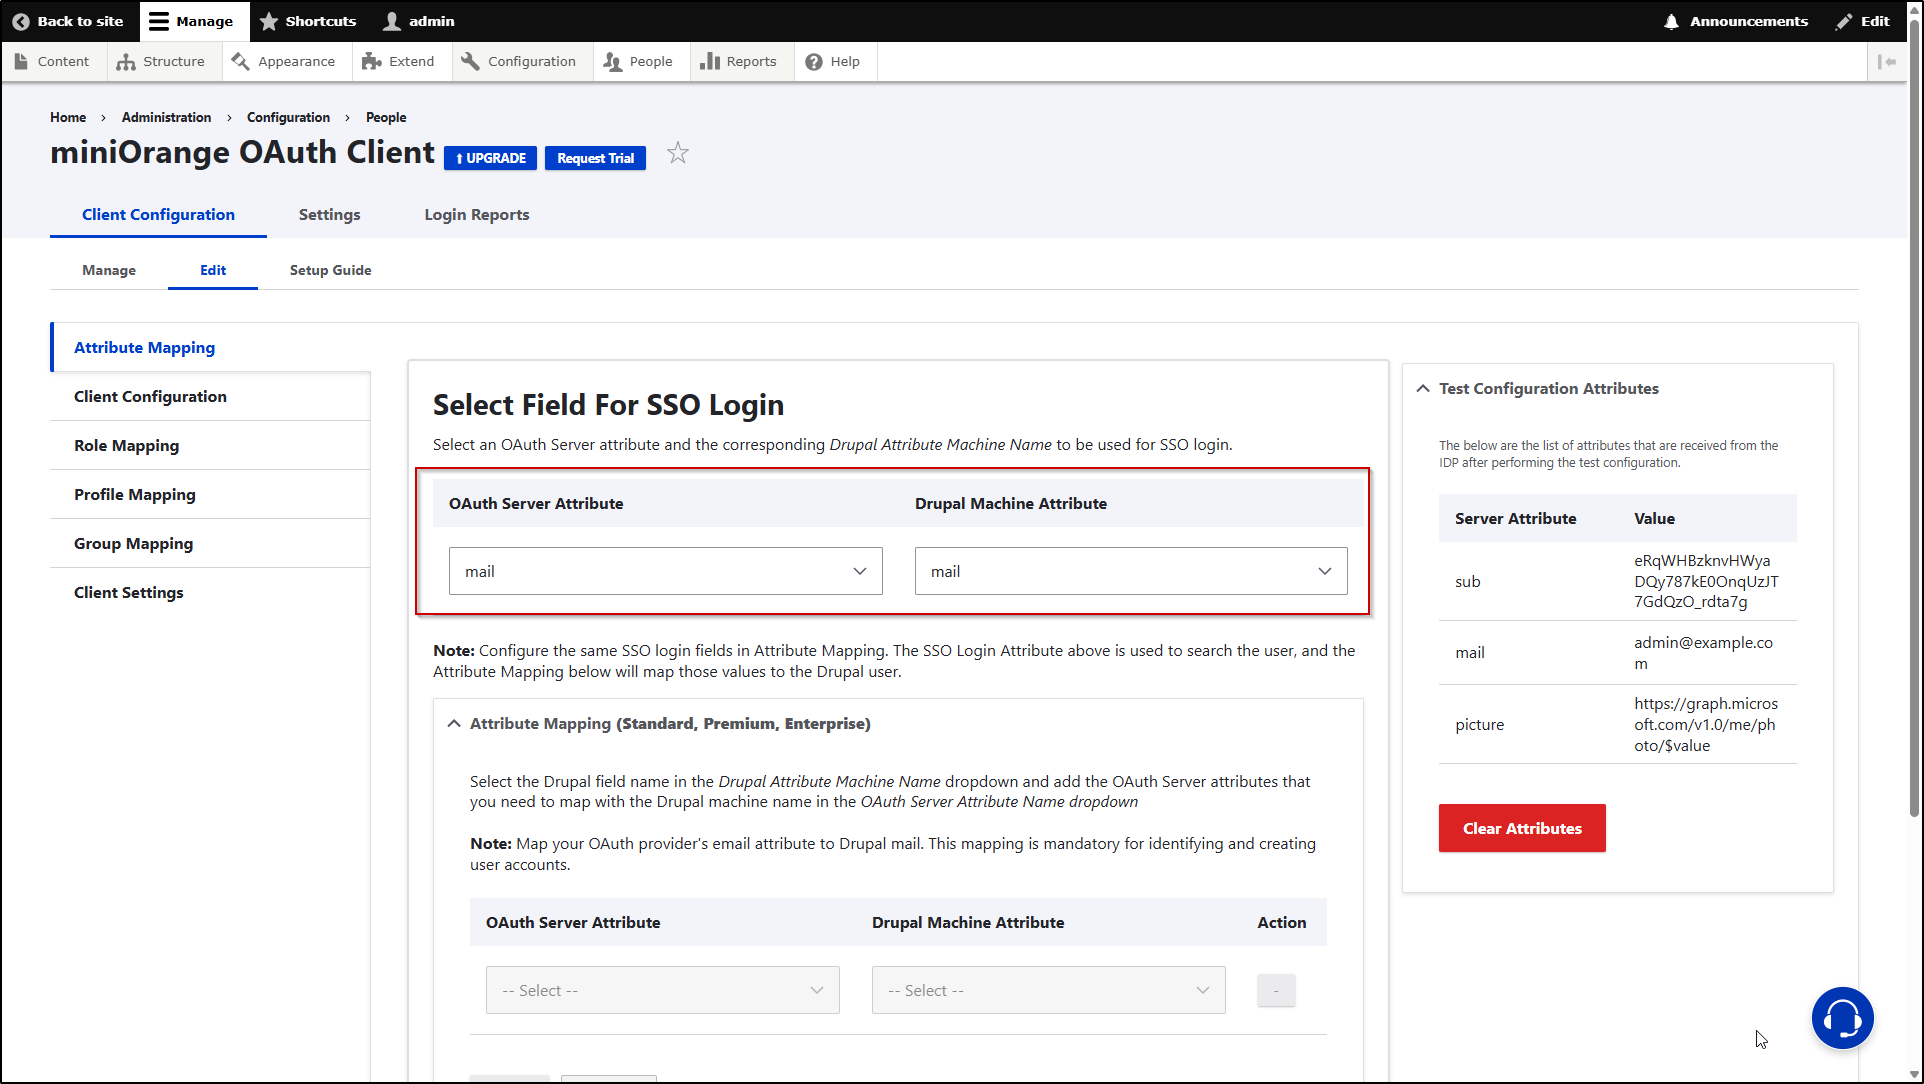
Note: Mapping the Email Attribute is mandatory for your login to work.
Congratulations! You have successfully configured Keycloak as the OAuth Provider and Drupal as the OAuth Client.
How to perform the SSO login?
- Now, open a new browser/private window and go to your Drupal site login page.
- Click on the Login using Keycloak link to initiate the SSO from Drupal.
-
If the configuration is correct, you will be logged in to the Drupal site.
Help improve this page
You can:
- Log in, click Edit, and edit this page
- Log in, click Discuss, update the Page status value, and suggest an improvement
- Log in and create a Documentation issue with your suggestion

