How to Connect Drupal OAuth & OpenID Client module with any Provider ?
This document will show you how to enable Single Sign-on (SSO) on your Drupal site using our OAuth/OpenID connect SSO login module and connect it to any OAuth Provider. Following these steps will allow you to configure OAuth/OpenID SSO between OAuth Provider and your Drupal site so that your users can log in to your Drupal site using their OAuth Provider credentials.
The Drupal OAuth/OpenID connect SSO Login module is compatible with Drupal 7, Drupal 8, Drupal 9, Drupal 10, and Drupal 11.
Prerequisite:
- Install and activate the OAuth & OpenID Connect Login - OAuth2 Client SSO Login module on your Drupal site. Click here to check out the module installation step.
Steps to configure Drupal as OAuth Client:
- After installing the module on your Drupal site, go to the Configuration tab and click on the miniOrange OAuth Client Configuration module.
- In the Configure OAuth tab, Select OAuth Provider/Application from the Select Application dropdown list. Also, you can't find the desired Application/Provider into the Select Application dropdown, you can simply select the Custom OAuth 2.0 Provider instead.
- Copy the Callback/Redirect URL and keep it handy. (This is required to configure your OAuth Provider.)
If your provider only supports HTTPS Callback/Redirect URLs and you have an HTTP site, please make sure to enable the 'Enforce HTTPS Callback URL' checkbox at the bottom of the tab.
- Enter name of the application in the Display Name text field.
Integrating Drupal with OAuth Provider:
In the CONFIGURE APPLICATION window, enter the following information:
- The OAuth Provider generates a unique Application ID for your application. You can get the Client ID and Client Secret and paste them into the Client ID and Client Secret text field on your Drupal site.
- Scope: The scope will decide the what kind of information, which you want to getting from your OAuth Provider.
For example, if you want to request the 'email' scope, you will only receive the user's email address from the OAuth Provider. However, requesting the 'profile' scope may provide you access to the user's name, given name, family name, and other basic profile information.
- Authorize Endpoint: You will receive the auth2/authorize endpoint from your OAuth Provider Application. Navigate to the Drupal site and paste it into the Authorize Endpoint text field.
- Access Token Endpoint: You can obtain the auth2/token endpoint from your OAuth Provider and paste it into the Access Token Endpoint text field on your Drupal site.
- Get User Info Endpoint: The user_info endpoint will be provided by your OAuth Provider, and you will enter the copied URL into the Get User Info Endpoint text field on your Drupal website.
- Enable Login with OAuth: You can enable this checkbox to add an SSO link to your Drupal site's login page.
- After you've finished configuration, click on the Save Configuration button.
Test Configuration of Drupal with OAuth Provider:
- After successfully saving the configuration, click the on Perform Test Configuration button to check the Single Sign-On (SSO) connection between Drupal and your Provider.
- On a Test Configuration popup, if you don't have an active session in OAuth Provider on the same browser, you will be asked to sign in to your OAuth Provider account. After successfully logging into OAuth Provider account, you will be provided with a list of attributes that are received from the OAuth Provider.
- You can select the Email Attribute (The Attribute which contains the user's email address. In our case, 'email') from the dropdown menu, and then click on the Done button.
- After clicking the Done button, you'll be directed to the Attribute & Role Mapping tab, where you may select the Username Attribute from the dropdown list that includes the Name, and then click on the Save Configuration button.
Please note: Mapping the Email Attribute is mandatory for your login to work.
How to perform the SSO login?
- Now, open a new browser/private window and go to your Drupal site login page.
- Click on the Login using <Your OAuth Provider Name> link to initiate the SSO from Drupal.
-
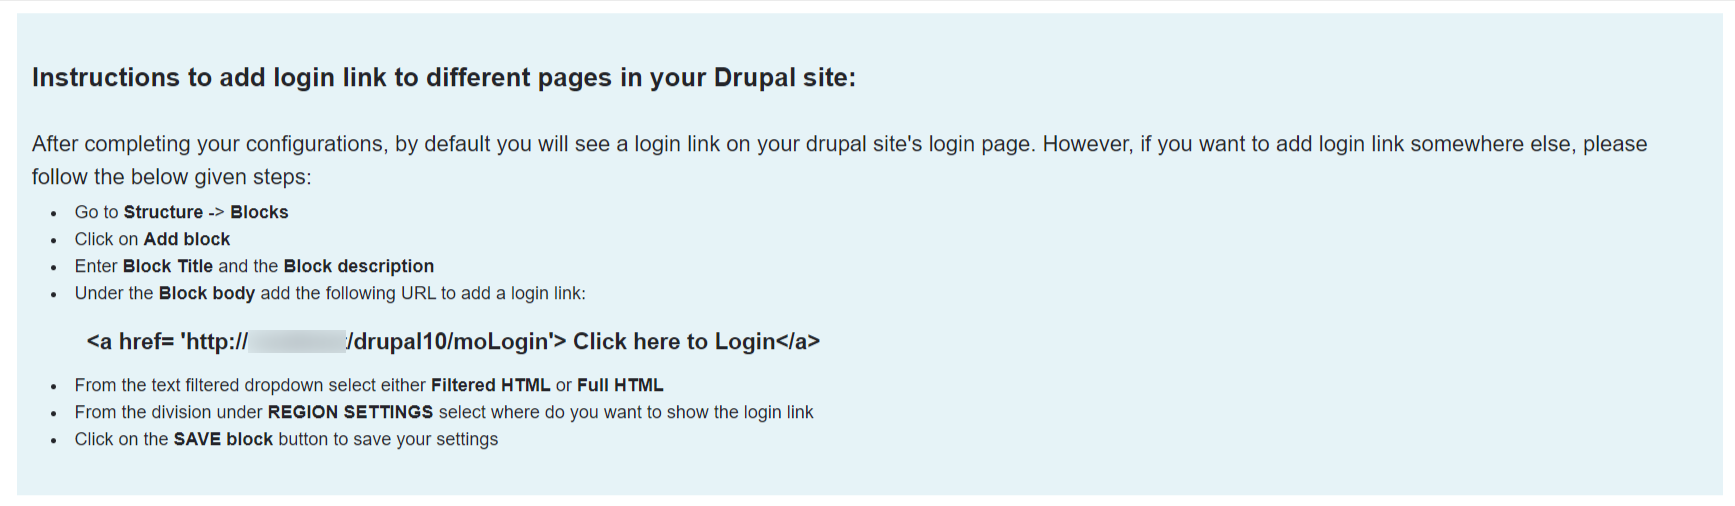
If you want to add the SSO link to other pages as well, please follow the steps given in the image below:
Help improve this page
You can:
- Log in, click Edit, and edit this page
- Log in, click Discuss, update the Page status value, and suggest an improvement
- Log in and create a Documentation issue with your suggestion
