 Come together with the global Drupal community in Rotterdam, 28 Sept – 1 Oct 2026. Sessions, contribution, connection, and Early Bird savings until 8 June.
Site builders guide
Motivation
Images can be the biggest assets delivered to a website visitor. However, they can contain far more data than is strictly required for display and can simply be encoded at a much higher quality than is required. There are a number of command line tools and web services that can help remove this data. Image Optimize module integrates those tools with Drupal.
Approach
Image Optimize module defines 'pipelines', each made up of one of a number of configurable 'processors'. A pipeline can be applied to an image to remove all the extra metadata, or to recompress the image etc.
By default the module can optimize all images that go through the core image style system, so most images that Drupal outputs will be optimized.
Processor modules
To build up a pipeline we need some processors. Processors are supplied by modules that you will need to install separately. You only need to install the modules that provide the processors you intend to use in your pipelines:
- Image Optimize Binaries - Provides plugins that integrate with command line image optimization tools, like AdvPNG, JpegOptim, PngCrush, etc.
- Image Optimize reSmush.it - Provides a plugin that uses the reSmush.it web service to optimize the image.
- Image Optimize TinyPNG - Provides a plugin that uses the TinyPNG web service to optimize the image.
- Kraken - Provides a plugin that uses the Kraken web service to optimize the image.
Configuring a pipeline
Pipelines can be configured in the Drupal administrative UI: Administration » Configuration » Media » Image Optimize pipelines.
You'll get a list of the pipelines that are configured, links to add a new one and the ability to set a 'default' pipeline.
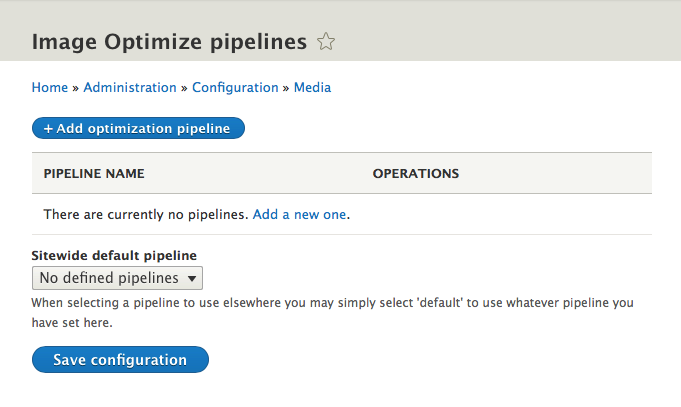
Click the link to 'Add a new one' to get started. You'll be prompted to enter a descriptive name for your pipeline. Try to describe what the pipeline does, rather than how it does it, for example: You may like to have a pipeline called 'Lossy recompression' and another called 'Lossless recompression' or 'Metadata removal'.
Once you've created your pipeline you'll be presented with the pipeline editing screen:
![]()
At the moment the pipeline has no processors configured, so if applied to an image it will do nothing.
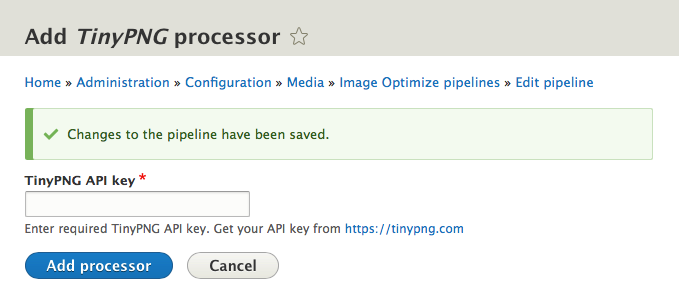
To add a processor, select the processor to you want and click 'Add'.
If the processor you add is configurable, then you'll be taken to the configuration form for that processor instance. For example, when adding the TinyPNG processor you will be presented with:
Different processors will have different configuration forms. The binary image processors have lots of configuration items to tailor the modifications to your exact needs. The web service processors tend to be more concise with their configuration, indeed the reSmush.it processor has no configuration whatsoever.
When an image is sent through a pipeline it will be passed to each processor in turn and successful results passed onto the next processor.
You may add as many processors as you need to a pipeline, and the same processor may be added to the same pipeline as many times as needed, with different configuration if needed.
That is it! Your pipeline is defined and is going to do something to images that are passed to it.
Using a pipeline in an image style
The easiest way to use an optimization pipeline is to configure the default sitewide pipeline from the main pipeline configuration form: Administration » Configuration » Media » Image Optimize pipelines. Select a default pipeline and save the configuration.
Automatically all subsequent Image style derivatives created by Drupal will be passed through the selected Image Optimize Pipeline.
If you have specific optimization requirements for certain image styles, then you can edit an individual image style and select a specific pipeline to use. This may be useful for not performing expensive or time-consuming operations on image styles that are only ever shown to a very small subset of your visitors, like thumbnails of uploaded images or galleries of images to select from.
Optimizing Previously Uploaded Images
Images uploaded prior to installation and configuration of Image Optimize will not be optimized until you have flushed your Image Styles. To flush the image styles, go to admin/config/media/image-styles. For each image style, click on the dropdown arrow next to "Edit" and select "Flush".
Help improve this page
You can:
- Log in, click Edit, and edit this page
- Log in, click Discuss, update the Page status value, and suggest an improvement
- Log in and create a Documentation issue with your suggestion
