

Closed (fixed)
Project:
D7 Media
Version:
7.x-2.x-dev
Component:
WYSIWYG integration
Priority:
Normal
Category:
Support request
Assigned:
Unassigned
Reporter:
Created:
17 Oct 2010 at 16:41 UTC
Updated:
11 Jun 2012 at 22:51 UTC
Jump to comment: Most recent, Most recent file



Comments
Comment #1
Jackinloadup commentedOne way this could be done would be to separate wysiwyg related stuf into media_wysiwyg and require it to have Image Resize Filter
Comment #2
betoscopioSeems that Image Resize Filter could work fine with Media module, it is only matter of configuration.
I'm using media-1.0-beta5 and image_resize_filter-1.12 and is necesary reorder the filters in 'Text formats' configuration. 'Image resize filter' must be after 'Converts Media tags to Markup', is nice too have 'Limit allowed HTML tags' before the media filter for not have problems when inserting videos from internet.
With this configuration work fine for me.
Comment #3
tsvenson commented@betoscopio: Nice to hear. Before I try myself, can you please check the end result that is saved to the DB, is it a modified media style embedding or a hardlink to to the scaled image?
If it is a hardlink, then it would mean that part of what the media modules is about is gone, namely being able to update an image elsewhere and then it will automatically be updated where it is embedded without having to manually change it for each piece of content.
Comment #4
betoscopioHi @tsvenson, I'm not sure exactly which table look at, I'm just starting to see code on modules, I will keep looking for have a better answer, but for now i can tell:
- When select the 'Full HTML' text format while editing, in wich i don't have any wysiwyg configured (just plain text) i see something like this where the image is placed:
- When i click over the contextual browser menu and select "See image" the URL for the selected rezised image is something like 'http://mysite.com/sites/default/files/resize/styles/large/public/image-1...'
Comment #5
tsvenson commented@betoscopio the "[[{..." stuff is the embedded media tag. Whats interesting to know is what happens with it after you resize the image, save it and then reopen it in the editor. Is it still "[[{..." or has it been replaced by a hard link to to resized picture.
Comment #6
betoscopio@tsvenson, yes the embedded media tag is still there, i have resized the image many times and i didn't have problems.
Comment #7
tsvenson commented@betoscopio Brilliant. Thank you so much for taking time and testing this for me. Will use your example in a test setup now.
Comment #8
tsvenson commentedBumping to 2.x
Comment #9
mpgeek commented@tsvenson, I can verify that Image Resize Filter does work with Media 2.x. The particular setup that was used to validate:
Here's how to do it:
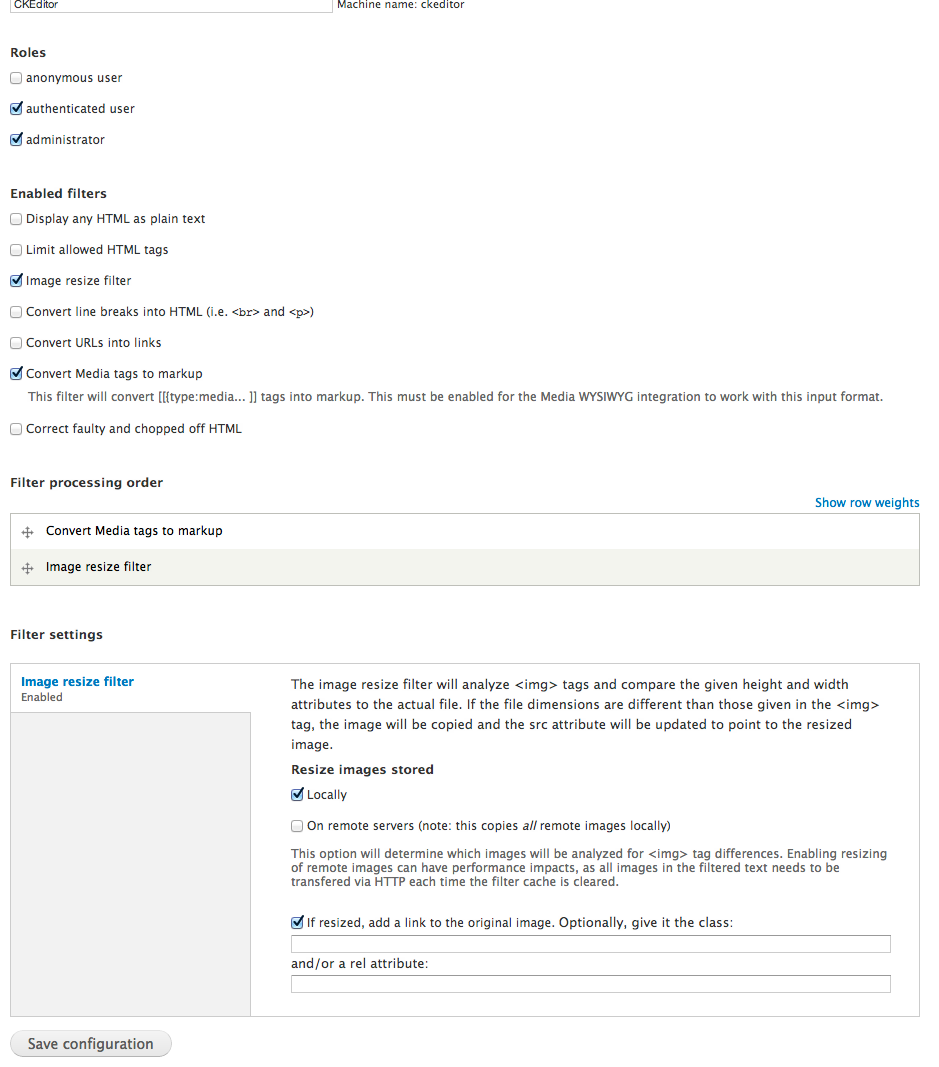
Set up the input format with the resize filter
In order to get Image Resize Filter to pick up the fact that an image has been resized, and create a thumbnail, the Media markup must change from ...
[[{"type":"media","view_mode":"media_original","fid":"25","attributes":{"alt":"","class":"media-image","height":"244","typeof":"foaf:Image","width":"261"}}]]... to ...
[[{"type":"media","view_mode":"media_original","fid":"25","attributes":{"alt":"","class":"media-image","height":"244","style":"width: 150px; height: 140px;","typeof":"foaf:Image","width":"261"}}]]Note that the new width and new height are recorded in the style attribute. This is what Image Resize Filter looks for. When found, a thumbnail will be created at...
files/resize/{original_filename}-{new_width}x{new_height}.{extension}... and the resized image will be displayed instead of the original, and possibly linked to the original image (depending upon how you set up the filter).
This resizing change can be effected with just the input format setup and editing the HTML accordingly via your WYSIWYG editor of choice in "source" mode. If you'd like to set this up point-n-click style (give users buttons so HTML editing is not required), then you have a little bit more work to do, depending upon your chosen editor.
CKEditor (v3.6.3.7474)
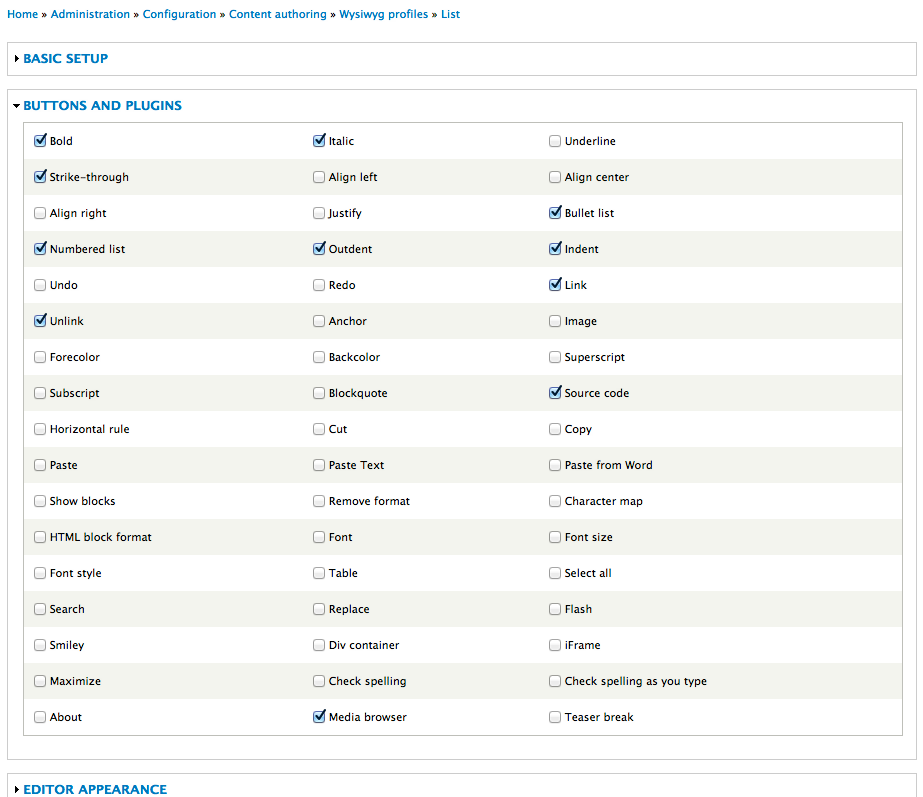
CKEditor is the easiest editor to get working. Not much needs to be done to the WYSIWYG profile other than to be sure you've added the Media browser plugin. Visit the setup screen at example.com/admin/config/content/wysiwyg/profile/{YOUR_PROFILE_NAME}/edit, and make sure the "Media browser" checkbox is selected [See screenshot #2].
Editing workflow
You should see a resized image in the display, and if you inspect the HTML, you will see that thumbnail has in fact been created, displayed, and possibly wrapped with a link to the original image (if thats how you configured the filter).
TinyMCE (v3.5.0.1)
TinyMCE is a little harder in that even if you are using the Context Menu TinyMCE plugin, the context menu that enables you to edit the image width and height is written directly into the width and height attributes of the Media markup instead of the style attribute. So you need a way to edit the style attribute.
To do this you can either use the "Style properties" or "Advanced Image" TinyMCE plugins. Head to example.com/admin/config/content/wysiwyg/profile/{YOUR_PROFILE_NAME}/edit, and select at least one of those two [see screenshot #4]. The steps outlined below assume you chose to use "Style properties" (easier), but the process is the same for "Advanced Image."
Editing steps
1. go edit your node of choice, insert/upload an image via the Media button.
2. select the image by clicking on it, then click the "Style properties" button [see screenshot #5].
3. in the dialog that pops up, enter the width and height in the "Style" field, i.e. "width:87px; height:81px" [without quotes, see screenshot #6].
4. click insert
5. save the node
You should see the sized image in the display, and inspecting the element should reveal that a thumbnail has been created.
This should work for other editors assuming you can find a way to edit the style attribute in the UI. Or, you can just edit the HTML source and add the sizing info "manually".
Comment #10
mpgeek commentedFYI the above setup in #9 also works with 7.x-2.0-unstable3+24-dev + CKEditor 3.4.2.6041 and TinyMCE 3.3.9.3 libs.
Comment #11
mpgeek commentedFeel free to open back up if the steps aren't working for you.
Comment #12
tsvenson commented@mpgeek: That's an awesome guide for how to get it working. Shame if it would just disappear here in the issue queue. Maybe you can add it as an HowTo child page on http://drupal.org/node/1290480?
Comment #13
mpgeek commentedPosted: http://drupal.org/node/1599070.
Comment #14
tsvenson commentedAwesome @mpgeek. On golden druplicon for your effort.
Comment #15
fenstratGreat work around solution here in #9 and http://drupal.org/node/1599070. However this doesn't cover the case where you're dealing with a WYSIWYG editor like TinyMCE which only generates width and height attributes on the
imgtag (rather than as CSS properties of the style attribute). If that's your issue then have a look at #1411340-12: Resizing images in WYSIWYG broken in media-7.x-1.0-rc3+ & 2.0-unstable3+.Comment #17
Joel MMCC commentedNow that mobile (and even non-mobile) “retina” devices are all the rage, this issue should perhaps be revisited. Physically scaling images to the reported pixel sizes is no longer the optimal solution in many cases.
For photos, doing this is still generally a decent solution, but in some cases it may be better to size it to 2× of the displayed dimensions. This would normally mean a 4× increase in data size were it not for compression, but using a lower .JPG quality can compensate for this. Since the actual pixels are much smaller, the artifacts will be as well and not be anywhere near as objectionable as they would otherwise be.
For .GIFs and .PNGs (which are usually logos and UX elements), sizing to 2× is best these days. They really should be hand-crafted to 2× the desired display size (assuming a standard 1× display) for best results rather than relying on algorithmic scalers built into browsers and in PHP libraries.
With this in mind, perhaps for now it would be nice to have such an autoscaling feature only apply to .JPGs (which are usually photos), not to .GIFs or .PNGs.