
On this page
How to Configure Copilot in Drupal using miniOrange SharePoint Integration
Last updated on
17 June 2026
This guide will help you configure the Microsoft Copilot-powered AI Chat Widget on your Drupal site using the miniOrange SharePoint Integration module.
Prerequisites
Before you begin, make sure that:
- The miniOrange SharePoint Integration module is installed.
- You have administrator access to your Drupal site.
- Your Microsoft Copilot Studio agent is ready.
Step 1: Set Up Copilot Studio in the Module
- After installing the module, navigate to the AI Settings tab in the module configuration.
- Select the AI Provider as Copilot Studio.
- Under the Connection section, enable the Copilot Chat Widget toggle.

Step 2: Set Up Microsoft Copilot Studio
- Log in to your Microsoft Copilot Studio account.
- Click on the Agent option.

- Under Agent Settings, fill in the required details based on your requirements.
- Click the Create button.

Your Agent has now been created successfully.
- Enter the Description for your Agent.
- Select your Agent’s model.
- Add instructions for your Agent.
(We have provided basic instructions for reference.)
Sample Instructions for the Agent
## SCOPE
You are a SharePoint assistant for the miniOrange Drupal
SharePoint Integration. Only answer questions related to
SharePoint content, files, lists, libraries, and miniOrange
integration guidance.

For off-topic questions, respond with:
"I'm built for SharePoint assistance only."

## RULES
- Never include external URLs, web links, or internet resources.
- Only return content that exists in the connected SharePoint sites.
- When a file exists in multiple locations, always show ALL locations.

Step 3: Add SharePoint as a Knowledge Source
- Go to the Knowledge tab.
- Click on the Add Knowledge button.

- Select SharePoint.

- Add your SharePoint site URL and click on the Add button.

How to Get the SharePoint Site URL
- Go back to your Drupal site.
- Click on the Site Configuration tab.
- Copy the Site URL.

Step 4: Configure the Copilot Chat Widget in Drupal
- Go to the Channels section from the +2 option at the top.

- Click on the Demo Website.

- Copy the generated URL.

- Go back to your Drupal site.
- Paste the copied URL into the Copilot iFrame URL text field.
- Click the Save Configuration button.

Step 5: Optimize the Copilot Chat Widget UI
To optimize the UI of the Agent:
- In the Channels tab, select Web App.

- Under the Embed Code section, copy the generated string.
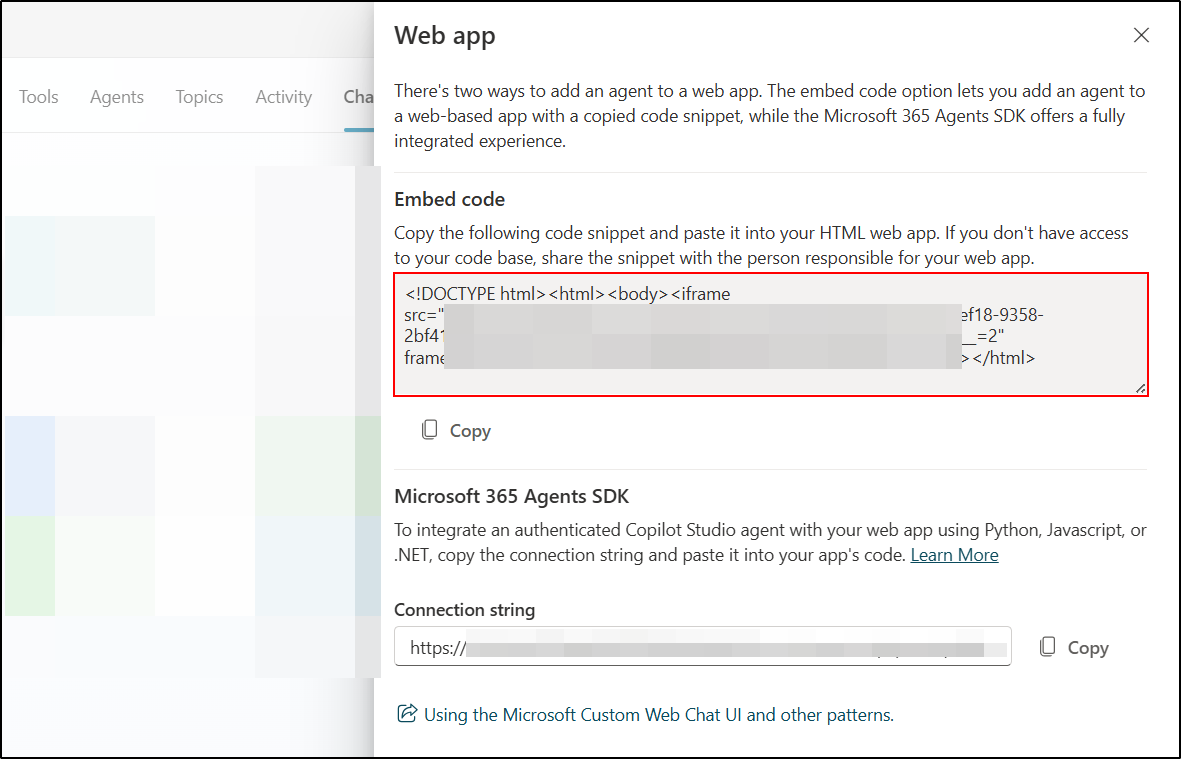
- Use this embed configuration to improve the appearance and UI experience of the Copilot Chat Widget.
- Once done, click on the Publish button.

- Once published, your AI agent will be live and ready to assist users directly within Drupal.

Need any help?
If you face any issues or need any help in configuration, please feel free to reach out to us at drupalsupport@xecurify.com. You can also connect with us on the Drupal Slack channel.
Help improve this page
Page status: No known problems
You can:
You can:
- Log in, click Edit, and edit this page
- Log in, click Discuss, update the Page status value, and suggest an improvement
- Log in and create a Documentation issue with your suggestion
