Support for Drupal 7 is ending on 5 January 2025—it’s time to migrate to Drupal 10! Learn about the many benefits of Drupal 10 and find migration tools in our resource center.
ADDING MENU BLOCKS
------------------

To add new menu blocks, use the "Add menu block" link on the administer blocks
page, admin/structure/block. You will then be able to configure your menu block
before adding it.


CONFIGURING MENU BLOCKS
-----------------------

When adding or configuring a menu block, several configuration options are
available:

Basic Options:

Block title
  For menu trees that start with the 1st level, the default block title will be
  the menu name. For menu trees that start with the 2nd level or deeper, the
  default block title will be the title for the parent menu item of the
  specified level.

  For example, if the active menu trail for the Management menu is: Administer >
  Structure > Menus > Main menu, then a menu block configured to start with the
  1st level of the Management menu will display a block title of "Management".
  And a menu block configured to start with the 3rd level of the Management menu
  will display a block title of "Structure".

Block title as link
  For menu trees that start with the 2nd level or deeper, the default block
  title will be the title for the parent menu item of the specified level. If
  this option is checked, the block title will be a link to that menu item.

Administrative title
  To help identify the block on the administer blocks page, you can specify a
IMPORTANT: the code and documentation related to these modules are still experimental and should not be used in production enviroment.
The new version of Patterns provides the changes to offer compatibility with the new Patterns Server and Patterns Client modules (to be released soon), whose aim is to act as a hub for sharing Patterns files among Drupal users.The key attributes we aimed for are simplicity and security.
This tutorial will guide you through the initial steps to get up and running with Cartaro. Because Cartaro is based on several open source components, we need to make sure all requirements are met. This guide is based on Ubuntu Precise (12.04 LTS). You might need to adapt commands depending on your Linux distribution.
If you find the installation too complicated for a first sight at Cartaro then you should try Cartaro on the OSGeo Live DVD or use the Docker container for Cartaro.
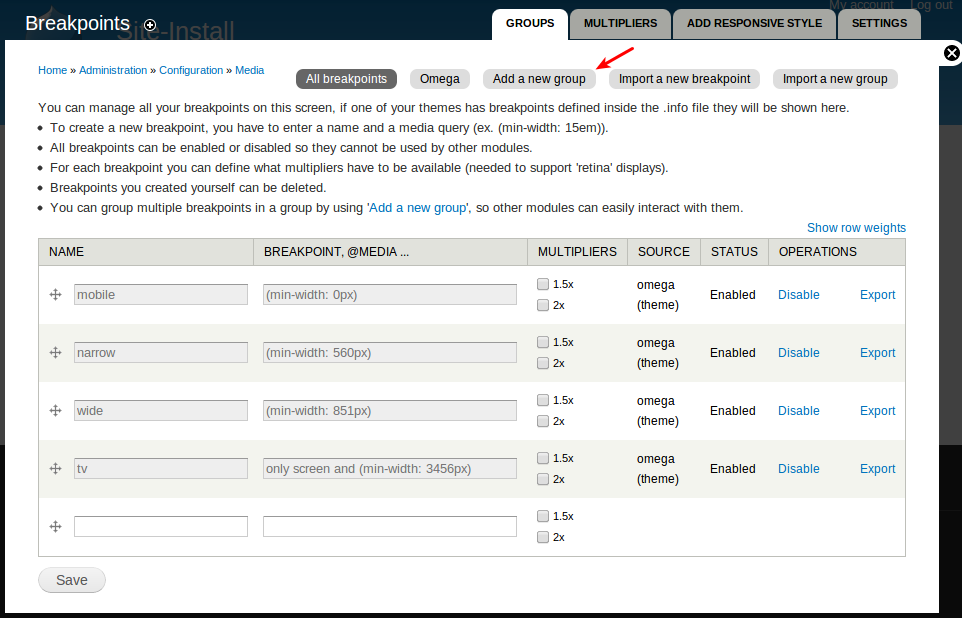
The Breakpoints module allows you to group breakpoints together. This way other modules can use these groups. The Picture module, for example, allows you to select a breakpoint group when you select the Picture display formatter for a field. The formatter will determine the size of the image to display based on the breakpoints in the selected group.
Following these steps you can create your own groups:
Navigate to the breakpoints configurations page
Go to Configuration » Media » Breakpoints. You will notice you can add your own breakpoints on this page.
In stead, click on "Add a new group":
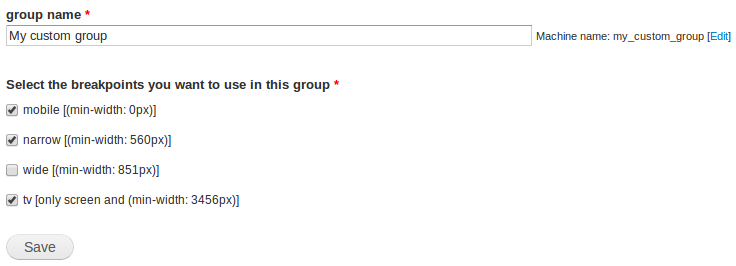
Configure the breakpoints group
Enter a name for the new breakpoints group and select the breakpoints to include in this group:
Save the form and your new group should show up at the top of the page. You should also see the breakpoints selected on the previous step in this group: