
Hi,
I really like how Maestro came with a few examples, but it would be great if the Webform Task Type portion included an example Workflow as well. I just started using this module and I'm finding it a bit tough to figure out without good examples.
I'd like to have a manager notified when a form is submitted, along with an Accept/Reject function. If Accepted, the form is sent to another user. If rejected, the form is sent back to the original submitter. The manager is determined based on a Select Options list on the Webform itself.
This (to me) sounds like something Maestro could do, but I don't really know how/where to start. Are there any Webform examples that could be provided that should how to set up the approval/rejection process.
Thanks
| Comment | File | Size | Author |
|---|---|---|---|
| #12 | xvt_maestro.zip | 5.66 KB | taggartj |
| #5 | webform workflow Rule.JPG | 38.54 KB | kyleheney |
| #5 | webform workflow Message.JPG | 32.21 KB | kyleheney |
| #5 | webform workflow IF.JPG | 30.93 KB | kyleheney |
| #5 | webform workflow interactive task.JPG | 21.2 KB | kyleheney |


Comments
Comment #1
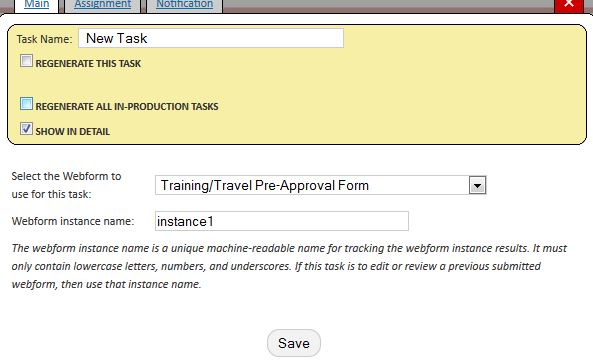
blainelang CreditAttribution: blainelang commentedAdd the webform task to your workflow and then edit that new task. The task help will explain that you need to select the webform you wan to use and then assign this instance of the webform in the workflow a machine name. You will use this instance name again if you want to use another webform task to allow another user to edit it again.
Add an interactive task, edit the task to configure it and select the webform review or webform view function. The selected function help message explains that you need to add a task variable called "instance_name" and set it's default value to the instance name you used earlier.
The tasks are setup like the other tasks.
Comment #2
kyleheney CreditAttribution: kyleheney commentedThanks for the help. Unfortunately, for a novice/first time user, this process of setting up workflows is a bit more complicated. I've attached an image of what I could figure out... I don't know how to set the default value of the instance_name task... all that pops up is a dialogue box that lets me name the task, not set a default value.
I believe part of this whole process is setting up a rule to run when a Webform is submitted. I consider that part of a true instruction document that should exist. i.e. step 1: create rule (with steps how to create the specific rule); step 2: create Maestro workflow (with instructions how to notify people, approve/reject, etc.... how to create an IF statement that sends the initiator a message saying it was approved/rejected
A true start to finish detailed example would really go a long way and would be very helpful to add to the documentation for this module.
Thanks
Comment #3
kyleheney CreditAttribution: kyleheney commentedComment #4
blainelang CreditAttribution: blainelang commentedHave you reviewed the video's that are linked on the maestro module page?
Comment #5
kyleheney CreditAttribution: kyleheney commentedYes I have reviewed the videos and have figured out how to "add a task variable called "instance_name" and set it's default value to the instance name you used earlier".
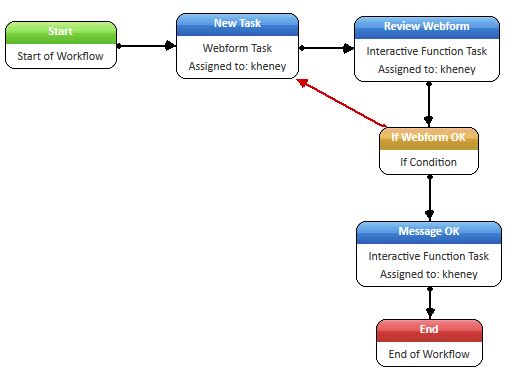
I believe I have now set up my workflow properly and created a rule that Launches the Maestro workflow when the form is submitted.
Nothing happens though. I believe I am missing something, but since there is no step by step example of a Webform Workflow, I have no idea what's wrong. So far I have done exactly what you wrote in #1... there ARE additional steps to make this actually work (Rules, etc.)... those steps need to be documented for novice users.
I have added more screenshots...
Comment #6
blainelang CreditAttribution: blainelang commentedHave you run any of the demo workflows that come with the module to verify the module is installed and working ok? You may not have setup the workflow engine "orchestrator" to run - review the install notes in the maestro module readme file.
Comment #7
_randy CreditAttribution: _randy commented@kyleheney You should review a recent blog post I have about how to fire off a workflow with rules:
http://www.nextide.ca/maestro-fire-a-workflow-after-saving-content-with-...
That uses an article content type. Webforms are a slightly different animal. However, if you're after how to launch flows with rules, that blog post says it all.
Also, I suggest using the dev release of Maestro in order to get the best rules integration. The dev branch will eventually (in the near future) be made in to a new release of Maestro anyway.
Comment #8
kyleheney CreditAttribution: kyleheney commentedHi,
@blainelang - Orchestrator is running and Maestro is working properly (from what I can tell).
@_randy - thanks for the link. I have been using this blog post as reference. I also just upgraded to Dev.
Question: In #1, @blainelang said to first add a Webform Task. I did that, along with selecting my Webform title, and giving a Webform Instance Name (instance1). If I choose to add a notification to this task, then Maestro will send an email saying that a new task has been assigned. But that's it...
After creating the Webform Task (as stated in #1), I created an Interactive Task and selected the Review Webform option. THIS is the task that I think should be assigned to a user (seems obvious to me). So I assigned this to a user and told Maestro to notify them.
The problem is that the process stops at the first Webform Task. It sends the email saying there is a new task, with a link to the Task Console (no idea what this is by the way)... but that's it. The Interactive Task (the important one) doesn't trigger and I don't know why.
I tried to remove any Assignment or Notification from the Webform Task (because this doesn't seem to need these types of things), but when I do that, the Maestro process doesn't do anything.
I DO get a notification on my Webform node that says "New Process Code Success! - Process ID: 11" but I have no idea what this means.
PS thanks for any/all help. I will be happy to write out a tutorial for using Maestro with Webforms if I can figure this out with some help. I honestly believe this module needs more clear documentation (start to finish processes) and I'd be happy to contribute this sort of thing - - - if I can get some help to get it to actually work!
Comment #9
kyleheney CreditAttribution: kyleheney commentedAlso, regarding the blog post in #7, I'm lost when it gets to the point where it states:
"You also will have to create a new process variable for this workflow. As you can see, this variable is called "node_id" and will be used to store the created node's ID inside of the process after it has been created."
Where do you add this "Process Variable"... based on the workflow diagram given in the blog post, it's not another task to add to the process... so how do you add these variables? They show an "initiator" variable, along with "node_id"... it doesn't say how to actually add these though...
Comment #10
_randy CreditAttribution: _randy commentedYou were wondering what the task console is? That's where you've been launching workflows from. Located at /maestro/taskconsole.
The message you get when launching a new flow is there to tell you that the engine has done its magic to launch a flow.
Template variables are added from the Maestro Template listing editor. In the list of buttons available to click on, the first one is the task editor, second one is the template variables. Hovering your mouse over the buttons should show a tooltip/alternate text information about what the button is.
Comment #11
kyleheney CreditAttribution: kyleheney commentedUpdate:
I've been able to get the "Webform Task" to be assigned to a user, and an email is sent to them (but only after I go to example.com/maestro/orchestrator - not sure how to make this happen automatically... my Rule must not be correct I guess...? I also have to go to the Task Console as Admin user and "Launch" the process each time... seems odd). I have no idea how to move the process to the "Interactive Task" though (which is the task that has the approve/reject action attached to it). The Task Console shows that I have assigned a number of tasks to a user, but how does this user act on any of these tasks? There aren't any approve/reject links, links to the form submissions, etc.
Comment #12
taggartj CreditAttribution: taggartj commentedYou need to create a plugin please see the module i just uploaded in files