
This documentation is for the submodule of the Commerce PayPal project. Support / feature requests and module or documentation feedback should not be posted to these comments. Please use the project issue tracker instead.
Module description
PayPal Payments Advanced (PPA) / Payflow Link (PFL) are two names for the same service offered through the PayPal Manager, requiring a separate account from a normal PayPal premier or business account as used by other PayPal payment methods. The services are nearly identical, with the following key differences:
- PPA is only available in the U.S. while PFL is available in the U.S. and other countries.
- PPA uses PayPal as your payment processor while PFL requires you to have a third party payment processor.
The primary service offered by PPA / PFL is called Hosted Checkout Pages, a redirected payment method selected during your site's normal checkout process. Customers will see this payment method as Credit card, debit card, or PayPAl in your Payment checkout pane:

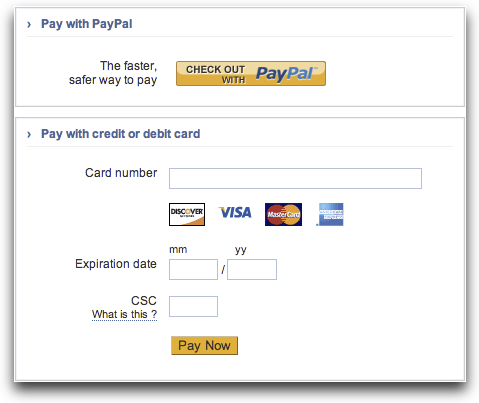
When customers continue through checkout, they will either see the Hosted Checkout Page in an iframe to submit payment on your site or be redirected to Payflow (depending on your payment method configuration). They can choose to pay via Express Checkout (EC) or the various credit card types your payment processor accepts:
If your customers choose to pay via EC, they will be redirected to PayPal to login and submit payment and be returned to your site's checkout completion page. Any updates to that transaction will be communicated to your site via PayPal's normal Instant Payment Notifications (IPN). For this all to function properly, you must also have installed and configured the EC module (see the documentation) and linked your PPA / PFL payment method to your EC payment method (see below).
If your customers choose to pay via credit card, the payment will be processed immediately and they will continue on to your site's checkout completion page upon success.
Using PayPal Payments Advanced / Payflow Link
- Register for the appropriate account:
- Download and install the Commerce PayPal module package on your Drupal Commerce site.
- Enable the PayPal, PayPal Payment Advanced / Payflow Link, and PayPal Express Checkout modules in the Commerce (PayPal) modules category.
- Optionally, register for a test Payflow account to test transactions without using a live account or real money.
Payflow account configuration
To ensure your PPA / PFL account is prepared to use the Hosted Checkout Pages service, you should login and examine the contents of the Service summary box on the front page of your PayPal Manager account:

To configure Hosted Checkout Pages, click on its name in the service summary and then click the Set up link on the next page. Pay special attention to the following settings:
- Transaction Process Mode: this should be in Test mode until you're ready to go live.
- Enter Text for Cancel URL: this can be any text you want the customer to click on to cancel payment from a Hosted Checkout Page; you do not have to set the URL, though, as that will be passed in with the API request.
- Cancel URL Method: must be POST for proper integration with the Commerce PayPal module.
- Enable PayPal Express Checkout: ensure this is set to Yes to accept payment via PayPal (recommended).
- PayPal email address: this is the PayPal e-mail address PayPal payments will be sent to and managed from.
- PayPal Sandbox email address: if you setup a Sandbox account to test EC as described in its documentation, enter that e-mail address here to test the EC integration end-to-end before going live.
- Show confirmation page: this should be set to On my website so customers are returned to your site to see the checkout completion page.
- Return URL Method: must be set to Post for proper integration with the Commerce PayPal module; the URL does not need to be set, as that will be passed in with the API request.
- Use Silent Post: leave this set to No, as the module currently does not offer any Silent Post integration. Accordingly, transactions should be updated (i.e. voided, captured, refunded, or referenced) through the Drupal Commerce payment interface to ensure proper recording on your orders.
- Enable Secure Token: this must be set to Yes for proper integration with the Commerce PayPal module; the other security settings depend on your preferences and your processor's requirements.
Settings not mentioned in this list can be configured to your liking, though settings that are passed in as part of an API request will always override the options you specify in this form.
PayPal also recommends you create a separate user account from your personal login to use for shopping cart integrations. You can do this from the Account Administration > Manage Users interface. Just ensure you give the user the API_FULL_TRANSACTIONS role (or higher).
Payment method configuration
- Browse to Administration > Store > Configuration > Payment methods.
- You'll see here a list of rules that enable the payment methods defined on your site for use by your customers. Click on the edit link for the PPA or PFL payment method, whichever you registered for.
- This page shows you the conditions (none by default) that must be met for PPA / PFL to be available as a payment method and a single action enabling it for use by your customers. Click the edit link for that action.
- You are now looking at the settings form where you can put in your API credentials and configure how Drupal Commerce should interact with PPA / PFL. The settings are the same with minor differences in the help text depending on which payment method you're using. Here's a brief description of what you need to configure:
- Partner, Merchant login, Username, Password: these are the precise values you use to login to the PayPal Manager. The recommended best practice is to create a user account specifically for use by this module. The following characters cannot be used in the password: ampersand (&), equal sign (=), or number sign (#). Note that the Password field must be re-entered every time you edit this form.
- Processing mode: this should match your PayPal Manager account status; you are strongly advised to run through the end-to-end integration in test mode before going live.
- Default transaction type: choose whether or not payment should be authorized and captured immediately from customers' PayPal or credit card accounts or merely authorized to be captured at a later date. Authorization only transactions are primarily used in instances where you are shipping physical products and need to delay capture until the product has actually shipped (or in instances where you otherwise need to review the details of an order before accepting it).
- Default currency: PayPal's basic services only accommodate a handful of currencies around the world (see their currency charts). Choose the default currency you wish to accept payments in, and the PPA / PFL module will convert order totals to this currency before redirecting the customer to PayPal for payment.
Additionally, there's a checkbox beneath the currency setting that allows you to accept payment in any of the listed currency options. In this case, a multi-currency site could accept payment in any currency configured on the site, with the PPA / PFL module only converting the transaction amount to the default currency if the customer is shopping in a currency not supported by PayPal.
Note that only a subset of the listed currencies may be valid for you depending on your payment processor. - Payment option icons to show on the checkout form: select the payment options supported by your account; these vary by payment processor and by your Hosted Checkout Pages service settings (i.e. if you disabled Express Checkout, PayPal should not be selected here).
- Checkout redirect mode: the default option is to embed the Hosted Checkout Page on your site's Payment checkout page using an iframe. The recommended best practice is to combine this with putting the review pane on the Payment checkout page and theming it so the two panes appear side-by-side. In the event that this is impossible, using the iframe on its own on the page is the next best solution, with POST and GET redirects being available as fallbacks if necessary.
- PayPal Express Checkout payment method rule: because PPA and PFL are designed to be used in conjunction with EC, you should enable and configure that module per its documentation and select here the payment method rule whose configuration matches the PayPal e-mail address or PayPal Sandbox e-mail you entered in your Hosted Checkout Pages service settings. Make sure you update both rules before going live.
When using EC in conjunction with PPA / PFL, it is recommended to leave the box checked that disables the EC payment method radio button on the checkout form. Customers can instead be redirected to EC by the Hosted Checkout Page. - Express Checkout billing agreement description: if you need to perform reference transactions on PayPal payments captured through PPA / PFL, you must enter the customer facing name of a billing agreement identifying your site to your customers. They will be asked to confirm the billing agreement if they choose to pay via EC, and you will be authorized to perform reference transactions from PayPal payments for up to one year after the initial transaction. This only affects PayPal payments, as credit card payments require no additional information to be referenced for up to a year after the initial authorization or payment.
- Checkout form message: you can turn on a message to be displayed in the payment checkout pane if desired, indicating the customer should submit the form to proceed to PayPal. This is primarily useful when PPA / PFL is mixed with other on-site payment options. If used, you should like give some attention in your theme to render the message more fittingly.
- Have PayPal e-mail a customer receipt: you can instruct PayPal via a checkbox to e-mail a receipt to your customer upon payment. However, since your store likely has e-mail notifications upon checkout completion, this may be unnecessary.
- API request / response logging: use the checkboxes and radio buttons under these two headings to configure the desired level of logging during module usage. During testing, it is recommended to enable full API request / response logging so you understand exactly how the module works and are able to debug any problems.
Silent Post, Payflow's IPN service, remains to be integrated, but IPNs will be logged for PayPal payments according to your EC payment method configuration.
Unified experience
The PPA / PFL API supports a variety of parameters for customizing the look of the Hosted Checkout Page that we do not include in our API requests. Instead, we direct users of this module to customize these options through the visual designer included in the PayPal Manager.
To access this, go to Services Settings > Hosted Checkout Pages > Customize. This module uses the "MINLAYOUT" API option, which corresponds to Layout C in the designer. Clicking on that will show you the options you have primarily for customizing the colors used in the interface, allowing you to customize it to best match your site's theme.
Ready to go live!
If you've configured your PayPal Manager account and payment method settings and tested both the credit card and EC payments, you're ready to go live. During testing, make sure you've attempted every operation you expect your customers and the merchant to make to ensure Drupal Commerce is updating orders and transactions as expected.
For additional information and documentation, please refer to the PayPal Payments Advanced page on PayPal's x.com.
Troubleshooting
There are various problems that can arise getting this to work correctly.
"Payment failed at the payment server. Please review your information and try again."
This error can show after completing an order. The problem appears to stem from problems in the Paypal account's configuration. To resolve the problem, confirm that the Paypal account and the "hosted payment" option are both set the same, i.e. both set to "test" mode or both set to "live" mode.


Comments
One thing that got me was the
One thing that got me was the fact that if you don't enter in a "PayPal Sandbox email address" you'll get an error stating "PayPal Express Checkout is not setup on this account".
For those of you having trouble -- you need to register for a sandbox account via http://developer.paypal.com.
Reference Transactions
I just wanted to make a note about this section regarding reference transactions:
This only affects PayPal payments, as credit card payments require no additional information to be referenced for up to a year after the initial authorization or payment.
Apparently you have to be a business pro subscriber ($30 / month) to even use the sandbox feature when trying to perform reference transactions on credit cards through paypal payments advanced, otherwise you get error 10501: invalid merchant configuration. This does not apply to express checkout...because users have to specifically login to a paypal account when billing agreements / reference transactions are enabled for express checkout. Hope this info helps someone else so they don't spend days trying to figure out why it isnt working like I did.
Security Kit settings
When using the Security Kit (seckit) module a few changes need to be made to its settings:
--
Damien McKenna | Mediacurrent