On this page
- Installation
- Managing custom pages
- Basic data for custom pages
- Argument settings
- Access control
- Menu items
- Selection rules and variants
- Contextual objects
- Panels configuration
- Layout
- Basic settings for the panel
- Panel content
- Editing panes
- Editing custom pages and variants
- Configuring HTTP response code pages
- Other modules using Page manager
- Views content panes
- Using Views content panes
- Input of contextual filter values in Views content panes
- Override view settings with content panes
- Exercises: documentation site
- Easily update your own collections
- How to demo
- Preparation
- Suggested solution
- Comments
- View documentation pages in collection context
- How to demo
- Preparation
- Suggested solution
- Comments
- Select list for navigating collections
- How to demo
- Preparation
- Suggested solution
- Comments
- This documentation page also appears in…
- How to demo
- Preparation
- Suggested solution
- Comments
- Exercises: News site
- Redirect fact boxes to article pages
- How to demo
- Preparation
- Comments
- Alternative fact box redirects for writers
- How to demo
- Preparation
- Section lists for top sections only
- How to demo
- Preparation
- Article view with top-level section article list
- How to demo
- Preparation
- Comments
- Article view with same-level *and* top-level section lists
- How to demo
- Preparation
- Section editor presentation
- How to demo
- Preparation
13: Basic Page manager and Panels configuration
Drupal 7 will no longer be supported after January 5, 2025. Learn more and find resources for Drupal 7 sites
The Page manager and Panels modules used to be one and the same project, originally created as an alternative to Drupal's block system. A simplified description of the two modules is:
- Page manager is a tool for defining new, arbitrary paths on your Drupal site, and configuring how that page should look and work. It is possible not only to define new paths, but also to override some of the paths defined by other modules. One important part of the Page manager functionality is to collect and send contexts, contextual information that may affect the page.
- Panels is a tool for splitting the main content on a Drupal site into several regions and defining what content each region should contain.
It is possible to use Panels without Page manager, but you will lose most of the reason for using Panels. It is also possible to use Page manager without using Panels, but there are few other modules that may provide page content to Page manager. This is necessary for Page manager to be useful.
This chapter presents only the aspects of Page manager and Panels that are relevant for information structure on your Drupal site.
The initial version of this section of the Community Documentation came from the book Drupal 7: The Essentials, courtesy of NodeOne and Johan Falk.
A good video introduction to Page manager and panels can be found at: http://nodeone.se/en/learn-page-manager (you will need to use the links in the sidebar as the links in the body text are broken).
Author's note: This chapter would benefit from including the new Panelizer and Fieldable panels panes modules.
Installation
Page manager is a part of the Chaos tools suite project which is made up of a number of interesting modules. The Panels project also contains a number of modules, of which Panels is one. This book only covers the Page manager, Views content panes and Panels modules.
The modules are installed as usual: download and place in the sites/all/modules folder.
TIP: The name Chaos tools suite stems from the original author of the project, Earl Miles, who at drupal.org uses the nick name merlinofchaos. Apart from Page manager and Panels, he is also the original author of the Views module and is one of the most appreciated contributors to the Drupal module ecosystem. Hats off to Merlin!
Managing custom pages
Page manager could be compared to a traffic cop on your website. When a page handled by Page manager on your site is requested, Page manager collects the necessary information, checks which module is responsible for the page content and calls that module together with all the information it requires. It is worth noting that the actual content is provided by other modules. Page manager only routes the request.
At the toolbar, Structure, Pages is an overview of all the paths handled by Page manager, along with links for editing the pages. (See figure 13.1.) Pages handled by Page manager are called custom pages. Above the list is a link add custom page.

Figure 13.1: The overview page for Page manager lists all custom pages on your site.
How can this be used? Two common use cases for Panels and Page manager in combination, are customized front pages and extended administration pages.
TIP: Page manager allows you to override a number of paths defined by other modules, in a standard Drupal installation this is node view, node edit, user view and taxonomy term lists. These overridden pages are managed almost identically to other, manually defined, custom pages. The differences are pointed out below.
Basic data for custom pages
The process of creating new custom pages with Page manager is divided into several steps. The first is to provide some basic data for the custom page. (See figure 13.2)
- Administrative title: This is the name of the custom page, as used on administration pages. You will get an automatically suggested machine name.
- Administrative description: It is a good habit to always provide your Drupal configuration with descriptions when possible. This holds for custom pages as well.
- Path: This is the path on which the custom page will be displayed. You can set dynamic parts of the path by using the placeholder %keyword (required part) or !keyword (optional part) as parts in the path. See the section on argument settings for details.
- Make this your site home page: If this option is set, the site settings will be updated to make this custom page the front page.
- Variant type: This option decides how the content of the custom page should be provided. Page manager provides the option HTTP response code, while the Panel option, not surprisingly, is provided by the Panels module. This setting cannot be changed once the page is saved.
- Optional features: If any of these settings are checked (access control, visible menu item, selection rules, contexts), their respective settings pages will be included in the wizard for creating the custom page. You can also edit and change the settings after creating and saving the page, too.

Figure 13.2: The first step in creating a new custom page is to set some basic data. Some of the basic data cannot be changed once the page is saved.
Argument settings
If the custom page path includes optional or required keywords (!keyword or %keyword, respectively), Page manager can use the values provided in the path to load contextual objects (covered later on in this book). A click on the change button at context assigned opens a dialogue where you can specify how Page manager should interpret the provided path argument. In most cases, the path arguments are numeric IDs used to load the corresponding node, user or taxonomy term, but other options are available, too. You are also provided an opportunity to give an administrative name (context identifier) for the object loaded from the path argument.
If for some reason you don’t want to load any contextual object with the path argument, choose no context assigned.

Figure 13.3: If the custom page path contains dynamic parts, arguments, Page manager may use the provided values to load data.
How can this be used?
Keywords in a path user/%account/message/%friend can be used to load two separate user accounts, with IDs corresponding to %account and %friend. These could then be used (with Views) to list nodes written by %account and addressed to %friend.
The keyword in the path replies/%comment could be used to load the comment with ID %comment, and (with Views) list all comments posted as a reply to that comment.
Access control
The access control settings allows you to set up the conditions that must be met to make the custom page accessible. Examples could be that the acting user is logged in, that the content being viewed is of a particular type, or that the acting user has permission to edit the viewed node. Which conditions can be used depends on the available contextual objects. If there are two user objects available, for example, the array of conditions will include user: compare.
A select list will show you which types of conditions are available. Any existing conditions can be edited by clicking the corresponding gear button and erased by clicking the button with a cross on it. (See figure 13.4)

Figure 13.4: Access control decides when a custom page as a whole should be visible.
How can this be used?
A custom page with the path admin/content/comments/spam could have access settings only letting users allowed to administer comments to reach the page.
A custom page with the path node/13: Basic Page manager and Panels configuration/comments could have access settings only making the page accessible only if the viewed node is an article.
TIP: Links leading to pages that you are not allowed to visit will normally not be displayed. This is a feature making it possible to use access rules to make custom pages appear as tabs only on nodes of selected types.
TIP: Access control for nodes, users and terms are set by their respective modules and the access settings in Page manager are skipped.
TIP: The acting user will always be available as an object when configuring access control.
Menu items
The available menu settings in Page manager are close to identical with the ones found in Views (see figure 13.5). See the description in the second Views chapter for details. Page manager has one more option for menu items, though, local action. Local actions are similar to tabs, but are (in a standard installation) displayed with a plus sign and a link right above the main content. Also, while Drupal requires two menu tabs for displaying them, even solo local actions are displayed.

Figure 13.5: The menu settings for custom pages are very similar to the menu settings in Views.
How can this be used?
A custom page with the path admin/content/comments/spam can be displayed as a menu tab on the administration page for comments.
A custom page with the path user/%account/comments can be displayed as a menu tab on user pages.
Selection rules and variants
Page manager allows you to create multiple variants for one single path. When a custom page is called, Page manager goes through the stack of variants for that custom page and uses the first one to fulfill the selection rules. One common way of using this is to have separate variants for different node types, all used on the custom page node/13: Basic Page manager and Panels configuration.
Selection rules are configured in the same way as access control and just like the access control are dependent on the available contextual objects.
How can this be used?
The custom page for node display, node/13: Basic Page manager and Panels configuration, could have a variant called only if a basic page is being displayed.
A custom page used as site front page could have separate variants loaded for administrators and other users.
TIP: If no selection rule is fulfilled, Page manager will send control of the path back to Drupal. Drupal will then try to use any default behavior for the path, which works for paths defined by other modules, or fall back to a 404 response (page not found).
Contextual objects
The settings for contextual objects (contexts) is, at least from an information structure perspective, the most important and most interesting part of Page manager. These settings allow you to gather information from other parts of the website, and make it available to modify the page's behavior and content.
Contextual objects are added in two different ways (see figure 13.6):
- By manual selection, for example a specific user or node. You may also use this to add the acting user as a contextual object.
- By relationships to existing contextual objects, such as the vocabulary for a loaded taxonomy term, or the author of a given node. This is the most common way of adding contextual objects.
A third way of adding contextual objects is the argument settings. These are loaded by dynamic parts of the path of the custom page.
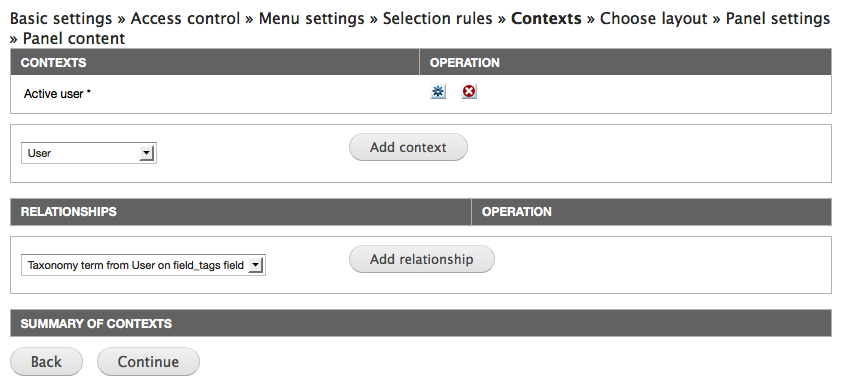
Figure 13.6: Contextual objects are one of the most important functionalities in Page manager. The settings allow you to load data from your website, making it available for the custom page.
How can this be used?
A custom page displaying a node could load the node author as a contextual object, thereby providing more options for use and show data related to the author.
On a site with a vocabulary section, used to categorize articles, a custom page for article display could load the viewed article's section as a contextual object, load the top parent term and (with Views) list more articles in the same top-level section.
Panels configuration
Since Page manager and Panels integrate tightly, it is difficult to note where the border between them is. If you configure a custom page step by step, the border is here! Below is a description of the final steps for configuring a custom page and getting its content from Panels. If you are creating another type of custom page (such as HTTP response code), you won't see these settings.
Layout
One of the points of Panels is to allow you as administrator to split the main content into different regions. How this is done is determined by the panel's layout. Panels comes with a number of layouts, grouped by their number of columns. (See figure 13.7)

Figure 13.7: Panels ships with a number of layouts. You can also configure, or code, your own.
TIP: The flexible layout allows you to build your own layout by pointing and clicking. The tool is rather complex though not impossible to understand and is not described further in this book.
Basic settings for the panel
On the next configuration page, you are prompted to set some basic data for the panel. (See figure 13.8)
Administrative title: This is the name of the variant constituted by this panel.
- Disable Drupal blocks/regions: This option stops any regular blocks from being displayed in your theme's regions, making the panel alone responsible for all the content on the page. This option may be useful on a front page.
- Renderer: In a default installation only the standard option is available. With the Panels In-Place Editor module enabled you will have another option, but it is not described here. (But try it, it's really cool!)
- CSS ID: Any string entered here will be used as CSS ID for the panel, making it easier to modify the presentation of this specific page.
- CSS code: Any CSS code entered here will be used with the panel. There are several reasons to put CSS in your theme instead of in your Drupal database. Use this setting only if you have good reasons.

Figure 13.8: Basic settings for the panel mainly concern the presentation of the panel.
Panel content
The last step of configuration is to add actual content to the regions in the panel. (See figure 13.9) This is done by clicking the gear for the relevant region and selecting add content. In the resulting dialogue you may select among available panes, pieces of content that can be placed in the panel. The panes are grouped into categories, to make them easier to browse. (See figure 13.10)
The panes available depends on the contextual objects available on the custom page. Some examples are:
- Block: All blocks on the website are available as panes.
- Page elements: Elements like tabs, the site name and the breadcrumbs can be used as panes.
- Node: If a node is available as context, different parts of the node and its related information may be used as individual panes, such as node title, the comment form or attached files.
- Entities: Most entities – such as users or taxonomy terms – can be embedded as panes, in a view mode you select.
- Entity tokens: Tokens built from entity data are automatically available as panes.
- Fields: All fields for the available contextual objects can be used as content panes.
- Existing nodes on the website can be added as separate panes, even without being available as contextual objects. This is done by the existing node option, in the lower-left corner of the dialogue.
- You can also add custom-written content as panes. This is done by the new custom content in the lower-left corner of the dialogue.
Each type of pane may have its own settings, or no settings at all. (See figure 13.11 for an example.) The pane settings are not described further in this book.

Figure 13.9: The last step of configuring a panel is to add content to the panel regions.
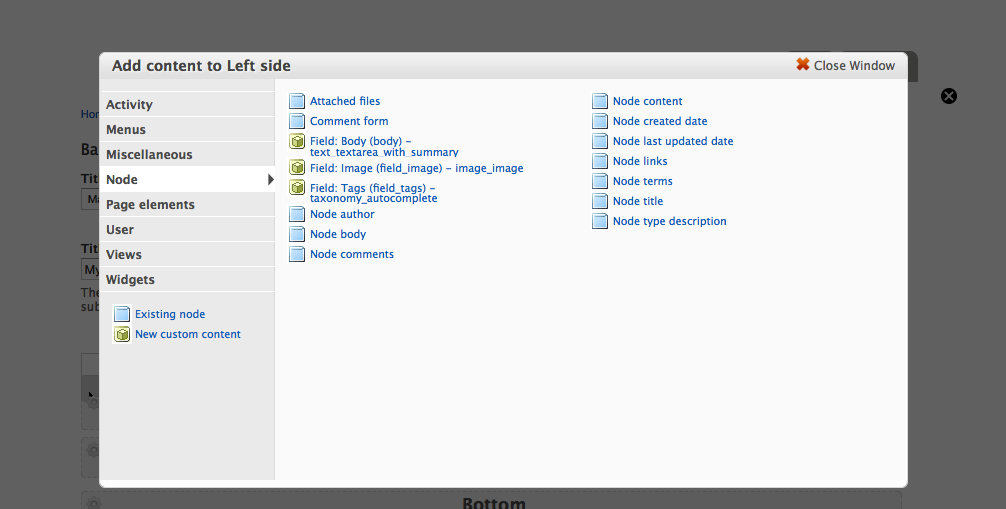
Figure 13.10: The available panes are divided into categories to make them easier to browse.

Figure 13.11: Each pane may have further settings which may be specific to this type of pane.
On the page for adding panel content, you may also set the title for the custom page. The title will be used both in the rendered HTML page and as the HTML title (displayed in the browser header). You can set the title manually, let the title be inherited from one of the embedded panes, or have no title at all. A manually entered title may use substitutions, the Page manager term for token replacement patterns, to allow dynamic titles.
How can this be used?
A custom page for articles may have separate panes for displaying title, body, image, tags and the comment form, distributed independently of each other.
A custom page with the path user/%accout/comments could have the title set to comments by %account:name.
Editing panes
There are several ways of configuring and tweaking existing panes:
- The pane-specific settings can be changed by clicking the gear on the pane and selecting settings (or edit for some types of panes).
- One particularly useful setting is visibility settings, also accessible through the gear menu. It allows you to use the same types of conditions used for access control and selection rules, to determine when the pane is visible or hidden.
- Panes may be deleted by the remove option in the gear menu. They can also be temporarily disabled by the disable this pane option. They are re-enabled with the option enable this pane.
- You can set CSS IDs and CSS classes for each pane by the CSS properties option found in the gear menu.
- If the panel inherits its title from a pane, there is also an option in the gear menu for selecting this pane as the one used for setting the title.
- You may move panes between regions by clicking and dragging in the title list of each pane.
How can this be used?
A pane displaying the comment form can be displayed only if the active user is allowed to post comments.
A custom page displaying both the active user's recent content and the recent content by the author of a currently viewed node, can hide one of these lists if the active user is the node author.
Editing custom pages and variants
When all the steps for creating a custom page are over, you are brought to an overview of the custom page. (See figure 13.12) It contains a number of tabs on the left side and the main part of the page contains the settings for the selected tab. You may switch between the tabs to edit any of the settings described above, except the variant types (such as panel or HTTP response code), which cannot be changed.
At the overview page you will also find links to clone, export, delete and temporarily disable each variant The same settings are also available for the custom page as a whole. You will also find a link to add more variants to the custom page. Since Page manager will use the first variant with matching selection rules, there is also a reorder variants link.
How can this be used?
A variant without any selection rules on the node/13: Basic Page manager and Panels configuration custom page may be placed at the bottom of the variant list, to be used if no other variant fits.
A variant used to display articles may be cloned and then freely edited, to create a variant used for displaying basic pages.

Figure 13.12: The overview of a custom page allows you to switch between all its variants, and edit virtually all settings within them.
TIP: There is a difference between updating and saving a custom page. Just like in Views, it is a good habit to save the settings at least once to not risk losing them all when leaving the configuration.
Configuring HTTP response code pages
The procedure of adding and editing an HTTP response code custom page is short and easy when compared to creating panels. These types of variants, also have selection rules and contextual objects. The main configuration consists of a only variant name and the response code used on this path. (See figure 13.13)
There are three options for response codes: 404 page not found, 403 access denied and 301 redirect. The redirect option allows you to enter a path to which the user should be redirected. You may enter internal as well as external paths and you may use tokens provided by contextual objects.

Figure 13.13: The settings for custom pages of the HTTP response code type all fit within one page. Sweet.
How can this be used?
A website using nodes to build a catalogue of external web pages of interest for visitors, may use a redirect variant to send any visitor clicking on a node to the site it links to.
The same site may have another variant to check if the active user is allowed to edit the node, and if so redirect to the edit page instead.
When links are built, Drupal normally checks if the acting user is allowed to visit the target page. If the resulting page is a redirect, Drupal will only check if the redirect is accessible, not the page it ends with. Thus, you may end up displaying links leading to access denied pages if using redirects too vigorously.
Other modules using Page manager
Apart from Panels and Page manager, the only module providing variant types (known to the author) is Contextual Administration.
It is used to:
- build customized administration pages, for example to create new nodes with node references pre-populated,
- account creation pages where roles are set and hidden,
- placing an add term page in a section of the site where the terms actually are used.
Your site administrators will be happier if you learn to use it well.
Views content panes
In the last section of the last chapter in this book it is only fair to reward the devoted reader with one of the most powerful, flexible and fun tools for building information structure – Views content panes.
Views content panes is a module included in the Chaos tools suite project and it is an excellent bridge between Page manager/Panels and Views. The module provides a new Views display type, content pane. Displays of this type can be inserted as panes in a panel. It makes it possible to set parts of the view configuration, not least contextual filters, from the panel.
The two most important factors making this display type powerful are:
- You can control exactly how values for your contextual filters are fed to the view and what kind of data must be available in order to call the view. This means that you can completely ignore the clunkly (and frankly speaking quite hacky) options for creating default values for contextual filters. This is not only comfortable for you as Drupal developer, but also makes your views more secure and reliable.
- You can adjust quite a few settings for the view, for each panel you embed it in. In one panel you may use the acting user for building a contextual filter value and display ten results, and in another panel use a node author for the contextual filter and display three results. This decreases the need for separate displays and makes it easier to reuse your configuration. This in turn makes the site easier to understand, develop and maintain.
Using Views content panes
When using Views with the Views content pane module enabled, you can add displays of the type content pane. These have a few display-specific settings, found in the pane settings group (see figure 12.14):
- Admin title: This is the name used to represent the pane in the list of available content panes (in Panels).
- Admin desc: This is a more detailed description of the pane and is shown as a tooltip in the list of available content panes (in Panels).
- Category: This is the category where the pane will be placed in the list of available content panes.
- Link to view: This option creates a link from the pane's title to any page display configured for the view (or to any path override).
- Use panel path: When a view is dependent on a path, such as for exposed filters displayed in blocks, this option will make the view use the path where the view is embedded.
- Argument input: This is the setting that more than any other makes this display type powerful. You may set how any contextual filter values should be collected from the panel where the view is embedded. You may set each contextual filter input separately. See below for details about the options.
- Allow settings: This setting allows you to override some of the view configuration at each embedding of the view pane. These settings will be available in the configuration for the pane. See separate section for details about the options.
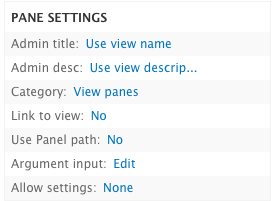
Figure 12.14: The Content pane display type has a number of display specific settings. The most interesting ones are argument input and allow settings.
How can this be used?
The admin title option is particularly useful when a view has two different content pane displays – since by default they inherit the view name, it can be difficult to tell apart when working in Panels.
The category option is particularly useful when creating a number of displays relating to the same features on a website, such as grouping them in a photo gallery category in Panels.
Input of contextual filter values in Views content panes
The argument input setting at the pane settings group has a number of options. (See figure 13.15)
- No argument: This option collects no contextual filter value from the panel.
- Argument wildcard: This option will have the contextual filter return all results.
- From context: This is the most used setting and makes it possible to use information from contextual objects in the panel to build filter values. In a remarkably long list you can select (1) which type of contextual object should be required when embedding the view and (2) which data should be collected from the contextual object. Each filter input can also be checked as context is optional, making it possible to embed the view even if the specified type contextual object is not available in the panel. One of the most common options is to require a node object, and collect its ID as contextual filter value.
- From panel argument: If the panel's custom page has any path arguments, these may be used as contextual filter values in the view. Using from context will normally provide higher flexibility and precision.
- Fixed: This is used to provide a static, manually entered value for the contextual filter.
- Input on pane config: This allows you, as administrator, to manually enter a filter value in the pane configuration dialogue.
How can this be used?
A display listing the most recent content written by (with contextual filters) a specified user, could fetch a filter value from context to be sure the provided value is always a valid user ID.
A display listing articles tagged with (with contextual filters) a specified term could be embedded on a node display page where a tag is loaded as a contextual object, to display similar articles, as well as on a taxonomy term page.
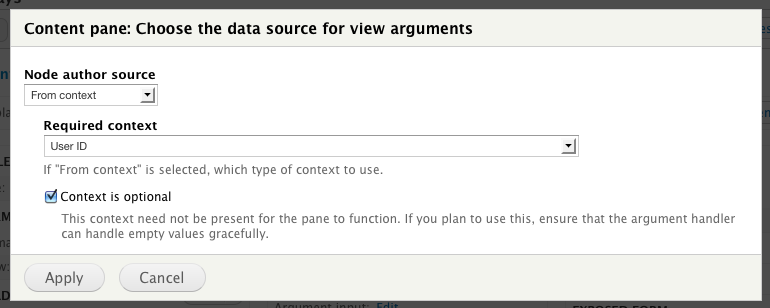
Figure 13.15: The argument input setting allows the display to fetch contextual filter values from contextual objects on a custom page.
Override view settings with content panes
With Views, you normally need to create separate displays to achieve even minimal changes in how the view is displayed and used. With the content pane display, you may override a number of settings in the configuration dialogue displayed in panels each time you embed the view. This significantly decreases the need for different displays. (See figure 13.16) The settings you can override are:
- Use pager: This overrides the pager settings in the view.
- Items per page: This overrides the number of results displayed per page.
- Pager offset: This overrides the offset for the view, skipping the first few results.
- Link to view: This overrides the option to link the pane title to any page display (or path override).
- Path override: This allows manual setting of a new base path for the view, to use instead of any page display. This is useful when using exposed settings in a view content pane.
- Title override: This is the most common setting and allows manual overriding of the view title.
- Use exposed widgets form as pane configuration: This setting embeds any exposed settings as part of the pane configuration dialogue, instead of displaying them to the end user.
- Fields override: This option allows you, as administrator, to select which view fields should be displayed.
How can this be used?
Using the Title override option, a display listing content created by a specified user may be given the title My Content in a panel showing the acting user's content.
A comment list with an exposed filter for Day Published can be embedded three times on the same panel page to – with the setting Use exposed widgets form as pane configuration – display comments written today, yesterday and the day before that.

Figure 12.16: The allow settings options makes it possible to override parts of the view configuration from the panel where the view is embedded.
TIP: The Views content panes module also provides a display type called context. It can be loaded as a context in custom pages, with two effects. The first is that individual elements from the view, such as the pager, exposed settings or selected rows, may be output as panes. The second is that the view results may be loaded as new contextual objects. The latter function allows strange and wonderful things to happen.
Exercises: documentation site
These exercises build on previous exercises in the documentation site suite. They can be carried out individually, with some preparation, or in sequence with the previous exercises. The exercises require using the concepts described in parts A and B of this book, as well as this chapter.
Video recordings of the suggested solutions to these exercises can be found at nodeone.se/learn-drupal.
Easily update your own collections
Author's note: This exercise is pretty silly – a lot of work and not very useful result. It might be a good warm-up exercise though, and a good way to see what can be done with Page manager. But feel free to skip to the next exercise right away. It's better.
As a site member viewing my own documentation collections, I would like to have the edit form for the collection available in a separate column. This is important since I almost always want to change the content of a collection when I visit my collection pages. This feature would save me a click on the edit tab.
View a video of this exercise and its suggested solution.

Figure 13.17: An example of how the documentation collection pages may look.
How to demo
- Log in to the site with an account different from user 1. (Create an account if necessary.)
- Create a collection.
- When visiting the collection page, verify that you end up at a page displaying both the collection content and the edit form for the collection in separate columns.
- Log out. With a user account allowed to view and edit the collection, but different from the collection author, visit the collection page. (You could use the user 1 account.)
- Verify that the collection is displayed without any editing form.
Preparation
- The site should have the documentation page and collection content types, as provided by the first exercises in this suite.
Suggested solution
- Go to the overview page for Page manager. Enable the node/13: Basic Page manager and Panels configuration/edit page and add a new variant with the name editing own collection. Make it a panel variant, and check that you want to add both selection rules and contexts.
- As selection rule, add node: type and verify that the node being edited as a documentation collection.
- In the context configuration, add the node author as a context by selecting user from node (on node.node_author) in the list for adding relationships. Call the new context object collection author.
- In the panel layout configuration, select a two column layout. In the basic panel settings, just leave all settings to default values.
- In the panel content configuration, add node content to the left column. Set all options to mimic the full node display.
- In the right column, add the general form pane.
- Let the custom page inherit the title from one of the panes. Edit both panes to override their titles with an empty text, so you don’t duplicate titles on the page.
- Update and save the custom page. Now, with all context objects available, revisit the selection rules tab and add the criteria user: compare to verify that the logged in user is the same as the collection author.
- In the Page manager overview, enable and edit the node/13: Basic Page manager and Panels configuration custom page.
- Add a new variant with the name redirect for editing own collections. Make it a HTTP response code variant, and check that you want to add both selection rules and contexts.
- Add the same selection rules and contexts as in the previous custom page, using the redirect only on collections, and adding the collection author as context.
- As response code, choose 301 redirect with the target node/1582906/edit. Update and save the custom page.
- Edit the selection rules again and add the criteria that the logged in user must be the same as the collection author.
Comments
- There are several possible approaches to this user story. The suggested solution redirects to the edit page. Another approach would be to embed the edit form on the view page.
- In the redirect variant, it would make sense to also add the selection rule node: accessible to verify that the logged in user has access to edit the collection. Even if this always is the case with the example site configuration, it might not be so in a future point in time.
View documentation pages in collection context
As the site builder, I would like to be able to know which collection is currently active, if any, when a user views a documentation page. I want this implemented by being able to display documentation pages at URLs on the form node/[collection-nid]/[docspage-nid]. This is important since it allows further enhancements on the site, displaying documentation pages within the context of a collection.
Note that this not a real user story, as it doesn't provide any value to end users of the site. It should really be a development task within a user story.
View a video of this exercise and its suggested solution.

Figure 13.18: An example of how documentation pages can be viewed. Note the URL in the browser.
How to demo
- Log in to the site.
- Create a documentation page. Remember its node ID.
- Create a documentation collection, including the new documentation page. Remember its node ID.
- Manually enter the URL in the form node/[collection-nid]/[docspage-nid]. Verify that the documentation page is displayed.
- Alter the URL and replace the documentation page node ID with a string or a number not corresponding to a documentation page node ID. Verify that you are given a “404 page not found” response.
- Alter the URL to replace the collection node ID with a string or a number not corresponding to a collection node ID. Verify that you are given a “404 page not found” response.
Preparation
- The site should have the documentation page and documentation colletion content types, as provided by the first exercise in this suite.
Suggested solution
- Go to the Page manager overview and add a new custom page. Call it documentation page within a collection, give it the path node/%collection/%docspage and check that you want to have selection rules. Make it a panel variant.
- In the argument configuration, set both %collection and %docspage to be interpreted as node IDs, and give them the labels collection and documentation page.
- In the selection rules configuration, add conditions to check that the collection and documentation page correspond to the expected node types.
- Chose the single column layout. Leave the basic panel configuration as it is.
- In the panel content, add node content and have the settings mimic a standard node display. Override the title with an empty string, and instead let the panel variant as a whole display the title, inherited from the pane.
Comments
- If there is access control on the documentation collection, it makes sense to also disallow viewing documentation pages within that context. It also makes sense to add access control on the documentation page, to assure that the active user may view it. (Page manager won't display nodes that a user isn't allowed to access, but explicitly verifying the access makes it possible to have custom reactions.)
- It would definitely make sense to verify that the viewed documentation page actually is included in the active collection. However, this requires conditions not natively supported by CTools. If installing the Rules Bonus Pack module, Page manager may use Rules components to check conditions. This drastically increases the possibilities for access control.
- To make the viewer more aware of the collection she is browsing, a custom pane could be added above the documentation page, saying You are currently browsing the %collection:title collection.
Select list for navigating collections
As a site visitor viewing a documentation collection, I would like to easily switch between different documentation pages in the collection. I would like to do this using a select list at the top of the page, containing all the pages in the collection. I would like the same select list available when viewing the collection itself. This is important since it helps me view the individual pages without having to refer to the collection all the time.
View a video of this exercise and its suggested solution.

Figure 13.19: An example of how the finished documentation page may look.
How to demo
- Log in to the site.
- Create a documentation collection, linking to at least two documentation pages. (Create documentation pages first, if necessary.)
- At the documentation collection, verify that there is a select list with the included documentation pages.
- When selecting a page in the list, verify that you are presented with the relevant page and that the list is still present.
Preparation
- The site should have the documentation page and collection content types, as provided by the first exercises in this suite.
- The site should be able to display documentation pages in the context of a collection, as described in the previous exercise.
Suggested solution
- Create a new node view with the name collection navigation. No content type restriction is needed, no sorting, and no displays.
- Add a contextual filter content: nid, to filter out the active collection. Set title override to browse %1 and also verify that it is an ID for a collection node.
- Add a relationship, joining in the documentation pages included in the collection. Make sure to include all deltas.
- Add a view field content: nid. Exclude the field from display, and make sure it has no label.
- Add another view field content: nid. Use the relationship to the documentation pages, to get the node ID for the page instead of the collection. Enable rewriting, and change the field content to node/[nid]/[nid_1]. This is the path used for viewing documentation pages in a collection context. Exclude the field.
- Add a view field global: view result counter. Remove any label.
- Edit the title field included by default. Have it use the relationship to the documentation pages. Also reorder the fields to have the title last.
- Change the view style to jump menu. Use the page node ID field as path.
- Add a content pane display to the view. Change the argument input settings to from context, fetching a content ID from a node available as context.
- Set an administrative title, description and category of the display, so it will be easy to understand its functions when embedding it in a panel.
- In the overview for Page manager, edit the custom page for displaying a documentation page in the context of a collection. Add the new view at the top of the page, using the collection as filter value for the view
- At the custom page for node/13: Basic Page manager and Panels configuration, add a new variant called documentation collections. Use selection rules to only use this variant when viewing collections.
- In the collection page, add the collection navigation view pane and the node content of the collection. Make sure that the panel inherits the title from the node content.
Comments
- In this exercise it is actually possible to use a standard views block instead of a views content pane. This is simply because the function for loading the currently viewed node as contextual filter value is fooled by the URL being similar to a collection page. (This won't be the case in the next exercise.)
- The numbering of the pages is a bonus, not asked for in the user story.
- In the jump menu configuration, there is an option select the current contextual filter value. This is an inaccurate description for using the current path as default value in the list, if it matches any of the options. Checking this box will make the select list navigation more natural, since it displays the currently viewed page when possible.
- It may be a good idea to include the collection navigation at the bottom of the documentation pages as well. It seems reasonable that most people are interested in reading the next page when they are done with the current.
This documentation page also appears in…
As a site visitor viewing a documentation page, I would like a list of all collections that include this page. If I am already browsing a collection, I only want other collections to be listed. This is important since it may help me find and use other collections, learning more about how to use the topics I am studying.
View a video of this exercise and its suggested solution.

Figure 13.20: An example of how a list of collections may look, when viewing a documentation page.
How to demo
- Make sure there are at least three documentation pages available.
- Make sure that there are at least two documentation collections, and that there is at least one page they both refer to, and that they both have at least one page not referred to by another collection.
- Outside any collection context, view a documentation page included in more than one collection. Verify that there are links to the collections available on the documentation page.
- Verify that the links lead to the documentation page viewed in the context of the selected collection.
- Verify that any currently active selection is not present in the list of collections referring to the viewed page.
Preparation
- The site should have the documentation page and collection content types, as provided by the first exercises in this suite.
- The site should be able to display documentation pages in the context of a collection, as described in the previous two exercises.
Suggested solution
- Create a new node view, named collections mentioning the viewed page. No sorting, filtering or displays are necessary at the quick-wizard page.
- Add a contextual filter on the node reference field – filtering out all collections with a given value in their documentation page references. Verify that the contextual filter value is a node ID for a documentation page. Set the title override to collections mentioning this page.
- Add another contextual filter on content: nid. Select Display all results for the specified field as the action to take when no filter value is present.
- Validate that the (second) filter value is a collection node ID. Set the title override to other collections mentioning this page. In the more settings, check the exclude option.
- In the pager settings, set the view to display all results.
- Add a view field content: nid. Exclude the field, and use the rewrite options to change it to node/[nid]/!1 – matching the path for viewing documentation pages in the context of a collection.
- Edit the title view field provided by default and disable the link option.
- Set the view format to jump menu. Use the rewritten node ID field as path.
- Add a content pane display. Set administrative title, description and category in a way that makes it easy to understand the pane in Panels.
- Set the argument input to from context for both contextual filters, and fetch content ID from a node object. Make the second contextual filter value optional.
- At the Page manager overview and the node/13: Basic Page manager and Panels configuration page, add a new variant for documentation pages. Have it display the viewed page and also the view pane with collections mentioning the page. Use the viewed page as the first contextual filter input, while leaving the second empty.
- At the custom page displaying documentation pages in the context of a collection, add the view pane. Use the page for the first contextual filter value, and the collection for the second one.
Comments
- The user story doesn't tell how the collections should be listed – jump menu is one of several options. A plain HTML list would also work.
- It could make sense to add a no results behavior to the view, saying there are no (other) collections referring to this page. However, it would be difficult to vary the the text depending on the page being viewed in the context of a collection or not. It would be nice to exclude the "(other)" if there were no collections referring to the page at all.
Exercises: News site
These exercises build on previous exercises in the news site suite. They can be carried out individually, with some preparation, or in sequence with the previous exercises. The exercises require using the concepts described in parts A and B of this book, as well as this chapter.
Redirect fact boxes to article pages
As a site owner, I would like to prevent visitors from accidentally viewing fact boxes directly on their node pages. This is important since fact boxes are always a part of articles and should never be viewed out of context. (Also, the content pages for fact boxes are not styled properly.)
How to demo
- Log in to the site as a writer.
- Create an article and then create a fact box relating to the article. Copy the URL of the fact box page.
- Log out. As an anonymous visitor, visit the page for the fact box (by pasting the URL).
- Verify that you are redirected to the article page.
Preparation
- The site should have a news article and fact box content types, as provided by the first exercises in this suite.
Comments
- This is a rather simple case when fact boxes relate to the articles, since it makes it easy to access the relevant node ID. If the reference was put on the articles, relating to any number of fact boxes, it would still be possible to achieve this functionality. However, it would (most likely) require using the context display style in views and then loading the first result of the view as a context in Page manager.
Alternative fact box redirects for writers
As a writer, I do not want to be redirected to the article page when viewing a fact box, but rather the fact box edit page. This is important since I should be able to edit the content of fact boxes.
How to demo
- Log in to the site as a writer.
- Create an article and then create a fact box relating to the article.
- When saving the fact box, verify that you are end up at the edit page for the fact box rather than the view page.
- Manually truncate the URL of the fact box edit page to “node/NID” rather than “node/NID/edit”. Verify that you are still redirected to the edit page.
Preparation
- The site should have a news article content type, as provided by the first exercise in this suite.
Section lists for top sections only
As the site owner, I would like to redirect site visitors viewing taxonomy term lists for any sub section to the list for the corresponding top-level section. This is important since maintaining all the sub section lists takes up too much time for the editors and the time is better spent improving the top-level section lists.
How to demo
- Log in to the site as a writer.
- Create an article (Alpha), placing it in the World section.
- Create another article (Beta), placing it in the Europe sub section.
- Log out. As an anonymous visitor, visit article Beta and click on its section link Europe. Verify that you end up on the taxonomy term list for World.
- Verify that articles in world sub sections are also included in the list, by verifying that Beta is listed.
Preparation
- The site should have a news article content type, as provided by the first exercise in this suite.
- The site should have a section vocabulary, as described in the exercise in the taxonomy chapter.
Article view with top-level section article list
As a site visitor reading a news article, I would like to have more articles in the top-level section of the viewed article displayed at the bottom of the page. This is important since it helps me find more content I am interested in reading.
How to demo
- Log in to the site as awriter.
- Create an article (Alpha) and place it in the top-level section World.
- Create another article (Beta), also in the World section.
- Create a third article (Gamma) and place it in the sub section Europe.
- Create a fourth article (Delta) and place it in the top-level section Science.
- Log out. As an anonymous visitor, view the Gamma article. Verify that Alpha and Beta are listed below Gamma. Verify that Delta is not listed.
- View the Alpha article. Verify that the currently viewed article is excluded from the list below Alpha. Only Beta should be present. Verify that Delta is not listed.
Preparation
- The site should have a news article content type, as provided by the first exercise in this suite.
- The site should have the section vocabulary, as described by the exercise in the taxonomy chapter.
Comments
- This result is very similar to the exercise redirecting visitors to top-level taxonomy term lists. One difference is that this list only includes articles directly marked with the top-level term, sub sections are not included. This would be possible to do using the “depth” settings for contextual filters on taxonomy terms (in Views), but it would also lead to heavy database queries. An alternative approach is to use Rules to populate another taxonomy on the news articles with the top-level section and then run a contextual filter against that field. It would mean duplicated data, which generally should be avoided, but it is a lighter query.
Article view with same-level *and* top-level section lists
As a site visitor reading a news article, I would like to have more articles in the top-level section of the viewed article displayed below the article, and also a list with articles in the same sub section as the viewed article. If the article is in a top-level section, there should only be one list present. This is important since it helps me find more content I am interested in reading, without having me browse through duplicated lists.
How to demo
- Log in to the site as a writer.
- Create an article (Alpha) and place it in the top-level section World.
- Create another article (Beta) and place it, too, in World.
- Create a third article (Gamma) and place it in the sub section Europe.
- Create a fourth article (Delta) and place it in Europe.
- Log out. As an anonymous visitor, view the Gamma article. Verify that Alpha and Beta are listed below Gamma. Verify that Delta is listed in a separate list (while Gamma, as the currently viewed article, is excluded).
- View the Alpha article. Verify that Beta is listed below the article (while Alpha, as the currently viewed article, is excluded). Verify that there is only one list of articles present.
Preparation
- The site should have a news article content type, as provided by the first exercise in this suite.
- The site should have a section vocabulary, as described in the exercises in the taxonomy chapter.
Section editor presentation
As the site owner, I would like to have section editors presented with a photo and contact information along with all articles within my top-level section. This is important since it increases the trust our readers have for our news, if they feel that they can contact the responsible editor.
How to demo
- Log in to the site as administrator.
- Edit a user account (“Alice”), adding the top-level section World to it.
- Edit another user account (“Bob”), adding the top-level section Science.
- Log out. As an anonymous visitor, view an article in the Europe sub section. (Create one if necessary.) Verify that Alice’s image and e-mail address is displayed. Verify that Bob’s details are not present.
Preparation
- The site should have a news article content type, as provided by the first exercise in this suite.
- The site should have a section vocabulary present applied to both news articles and user accounts, as described in the exercises in the taxonomy chapter.
Help improve this page
You can:
- Log in, click Edit, and edit this page
- Log in, click Discuss, update the Page status value, and suggest an improvement
- Log in and create a Documentation issue with your suggestion
