On this page
- Pre-requisites:
- About miniOrange LDAP/Active Directory Login module:
- About NTLM / Kerberos:
- NTLM Authentication Protocol:
- Kerberos Authentication Protocol:
- Setup Kerberos For Ubuntu/RHEL/CentOS
- Step 1: Install Kerberos Client Libraries On The Web Server
- Step 2: Configure the Active Directory domain in the Kerberos Configuration file
- Step 3: Install the auth_kerb module for Apache
- Step 4: Create a Keytab file on the AD Domain Controller
- Step 5: Configure Kerberos SSO for the site directory
- Troubleshooting
- Steps To Setup Kerberos For Windows Authentication :
- Steps To Setup NTLM SSO with Apache on Windows :
- Configure browser settings for Kerberos Authentication
- Internet Explorer
- Google Chrome
- Mozilla Firefox
- Contact our 24*7 support team
NTLM & Kerberos Authentication
A dedicated guide has been created for setting up NTLM/Kerberos authentication. You can follow this guide for the Kerberos setup.
This document is designed to guide you through the steps to set up NTLM and Kerberos with your LDAP & Active Directory Server.
We provide Drupal LDAP / Active Directory Integration module which is compatible with Drupal 7, Drupal 8, Drupal 9, and Drupal 10.
Pre-requisites:
Please download the ldap_auth module and configure the same using the step-by-step setup guide. If you wish to test the fully-featured module, you can reach out to drupalsupport@xecurify.com for a free 7-day trial.
About miniOrange LDAP/Active Directory Login module:
miniOrange LDAP/Active Directory Login: The module enables your users to login into Drupal using their LDAP & Active Directory credentials. This module is compatible with all Drupal core versions - 7, 8, 9 and 10. It also includes support for NTLM/Kerberos authentication (Windows authentication) to auto-login your LDAP users to your Drupal site.
About NTLM / Kerberos:
Kerberos is an authentication protocol for client/server applications. For authentication purposes, tickets are granted to the clients via the Kerberos Key Distribution Center (KDC). The Kerberos ticket is presented to the servers after the connection has been established. Kerberos authentication tickets represent the client’s network credentials.
Windows New Technology LAN Manager(NTLM) is a challenge/response authentication protocol that utilises a three-way handshake to authenticate the user on networks that include systems running the Windows operating system and on stand-alone systems.
Windows authentication uses either the Kerberos authentication protocol or the NTLM authentication protocol, depending on the client and server configurations.
NTLM Authentication Protocol:
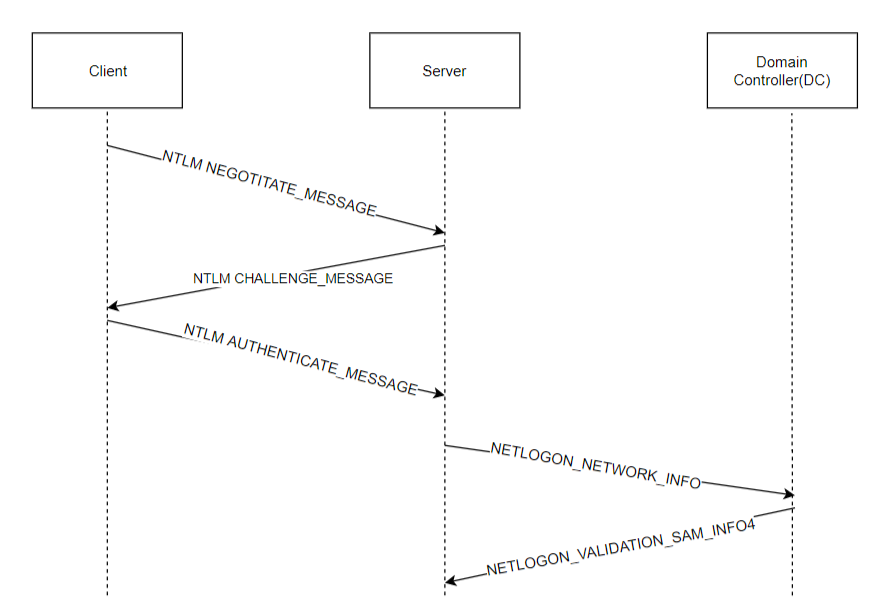
- The NEGOTIATE_MESSAGE defines an NTLM Negotiate message that is sent from the client to the server. This message lets the client specify its supported NTLM options to the server.
- The CHALLENGE_MESSAGE defines an NTLM challenge message that is sent from the server to the client and it is used by the server to challenge the client to prove its identity.
- The AUTHENTICATE_MESSAGE defines an NTLM authenticate message that is sent from the client to the server after the CHALLENGE_MESSAGE is processed by the client.
Kerberos Authentication Protocol:
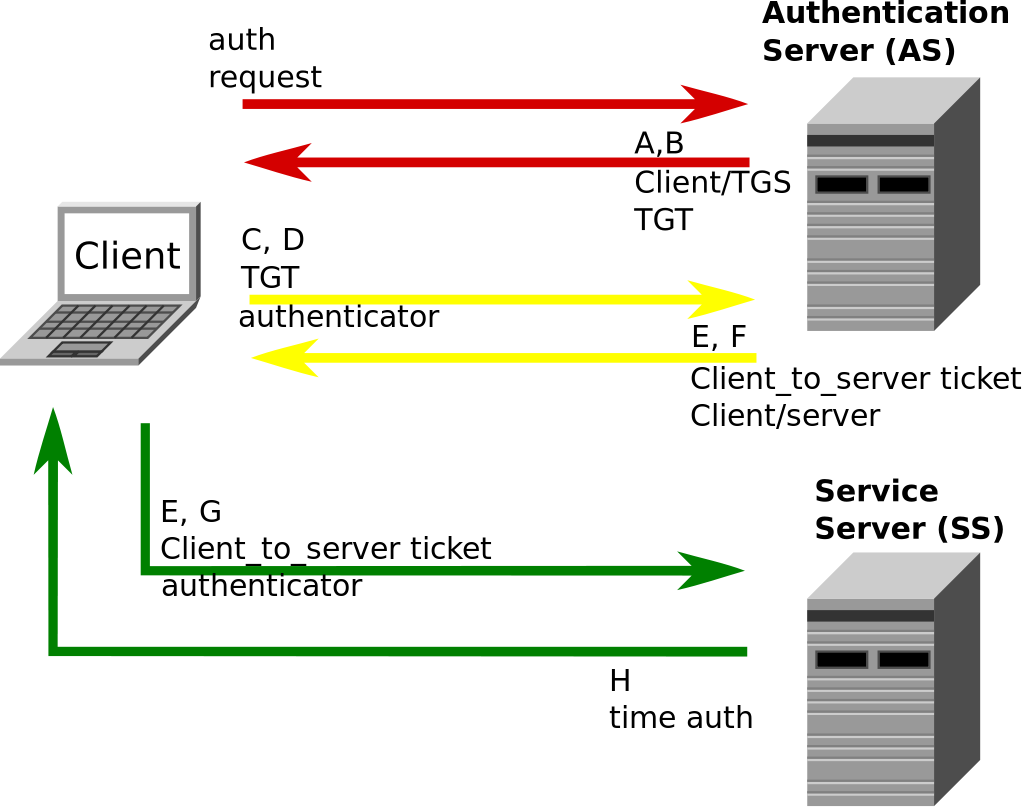
- Message A: Client/TGS Session Key is encrypted using the secret key of the client/user.
- Message B: Ticket-Granting-Ticket is encrypted using the secret key of the TGS.
- Message C: This message is composed of the TGT from message B and the ID of the requested service.
- Message D: Authenticator is encrypted using the Client/TGS Session Key.
- Message E: client-to-server ticket is encrypted using the service's secret key.
- Message F: The client/Server Session Key is encrypted with the Client/TGS Session Key.
- Message G: A new Authenticator, which includes the client ID, and timestamp and is encrypted using Client/Server Session Key.
- Message H: timestamp found in the client's Authenticator is encrypted using the Client/Server Session Key.
Setup Kerberos For Ubuntu/RHEL/CentOS
Step 1: Install Kerberos Client Libraries On The Web Server
- For UBUNTU:
-
Use the following command on your terminal to install the Kerberos client libraries.
sudo apt-get install krb5-user
For RHEL/CentOS:
-
Use the following command on your terminal to install the Kerberos client libraries.
yum install krb5-workstation krb5-libs krb5-auth-dialog
-
Step 2: Configure the Active Directory domain in the Kerberos Configuration file
- The following steps are used to configure the Active Directory Domains in the Kerberos configuration file:
- Open and edit the /etc/krb5.conf file.
-
Add the following configuration snippet to the krb5.conf file.
EXAMPLE.ORG= { kdc = <AD DOMAIN CONTROLLER IP/DNS> :88 }NOTE: Replace the AD DOMAIN CONTROLLER IP/DNS with your IP/DNS address. Ensure EXAMPLE.ORG should be in upper case.
- Replace the EXAMPLE.ORG with the Active Directory domain name.
- And ensure that port 88 on the AD Domain Controller is accessible from this server.
- Save the file.
Step 3: Install the auth_kerb module for Apache
- For UBUNTU:
-
Use the following command to install the auth_kerb module for Apache.
sudo apt-get install libapache2-mod-auth-kerb -
Once the auth_kerb module is installed, it needs to be enabled through the following command.
a2enmod auth_kerb - After enabling, Restart Apache to take effect.
For RHEL/CentOS:
-
Use the following command to install the auth_kerb module for Apache.
yum install mod_auth_kerb - Restart Apache to take effect.
-
Step 4: Create a Keytab file on the AD Domain Controller
-
On the AD Domain Controller, execute the following command to create the Keytab file.
ktpass -princ HTTP/<Server Host Name>@EXAMPLE.ORG -pass PASSWORD

	-mapuser <svc@EXAMPLE.ORG> -Ptype KRB5_NT_PRINCIPAL -out "<PATH>\spn.keytab"
NOTE: Ensure EXAMPLE.ORG should be in uppercase.
The following are the components of the command.
Server Host Name: It is the hostname of the site hosted on the Server. Server Host Name: It is the hostname of the site hosted on the Server. EXAMPLE.ORG: It is the Active Directory Domain Name. PASSWORD: It is the password of the service account used above. svc@EXAMPLE.ORG: It is a service account in Active Directory. Path: Path to a local location that will store the keytab file.
- NOTE: The above command creates a keytab file. It needs to be placed on the server. The user running Apache should have full access to this file. The user should have permission to the keytab file.
- The Service Account has a few prerequisites:
- The account password should have the password set to Not Expired.
- The account should be trusted for delegation.
- Copy the Keytab file from AD Domain Controller to the webserver hosted on Apache.
Step 5: Configure Kerberos SSO for the site directory
- For UBUNTU:
-Edit the /etc/apache2/sites-enabled/000-default.conf file.
-
Add the following section in the directory of the site.
<Directory "/placeholder"> AuthType Kerberos KrbAuthRealms EXAMPLE.ORG KrbServiceName HTTP Krb5Keytab <PATH TO KEYTAB> KrbMethodNegotiate on KrbMethodK5Passwd on require valid-user </Directory>
-
- For RHEL/CentOS:
-Edit the auth_kerb.conf configuration file in the /etc/httpd/conf.d/ folder.
-
Add the following section in the directory of the site.
LoadModule auth_kerb_module /usr/lib/apache2/modules/mod_auth_kerb.so<Directory "/placeholder"> AuthType Kerberos KrbAuthRealms EXAMPLE.ORG KrbServiceName HTTP Krb5Keytab <PATH TO KEYTAB> KrbMethodNegotiate on KrbMethodK5Passwd on require valid-user </Directory>NOTE: Ensure EXAMPLE.ORG should be in upper case.
The following are the components of the above configuration:
EXAMPLE.ORG: This is the Active Directory domain as configured in krb5.conf. PATH TO KEYTAB: Accessible path to the keytab on this server.
-
- After this configuration, Apache needs to be restarted for the changes to take effect.
Troubleshooting
These are the most common error messages:
gss_acquire_cred() failed: Unspecified GSS failure. Minor code may provide more information (, Permission denied).- Wrong file system permissions for /etc/krb5.keytab, i.e. not readable for the webserver’s Linux user.
-
To change file system permissions use $ chmod 400 filename
gss_acquire_cred() failed: Unspecified GSS failure. Minor code may provide more information (, Key table entry not found).
-
Missing service principal (possibly HTTP/webserver.yourdomain.com@YOURDOMAIN.COM) in /etc/krb5.keytab.
Warning: received token seems to be NTLM, which isn't supported by the Kerberos module. Check your IE configuration.
gss_accept_sec_context() failed: An unsupported mechanism was requested (, Unknown error)
-
The website is not in zone "Local Intranet“ in IE or IE is configured incorrectly, see Authentication Uses NTLM instead of Kerberos.
gss_accept_sec_context() failed: Unspecified GSS failure. Minor code may provide more information (, ).
- Wrong kvno or machine password in /etc/krb5.keytab → recreate the keytab using the correct information.
- Problem with the local Kerberos ticket cache on your workstation, use Kerbtray.exe to purge the ticket cache and open the website in IE again.
Steps To Setup Kerberos For Windows Authentication :
- Open the Command prompt in Administrator mode.
-
Execute the following command to add Service Principal Name (SPN) to the account.
setspn -a HTTP/## Server FQDN ## ## Domain Service Account ##Example: C:\Users\Administrator> setspn -A HTTP/mini.example.com gpadmin
Note: "mini.exmaple.com" here is FQDN. Make sure it's resolvable on the Windows server running the AD service.
- Open Active Directory Users and Computers.
- Search for the service account which was used to create the Service Principal Name (SPN).
- Navigate to the Delegation tab.
-
Select Trust this user for delegation to any service (Kerberos only).
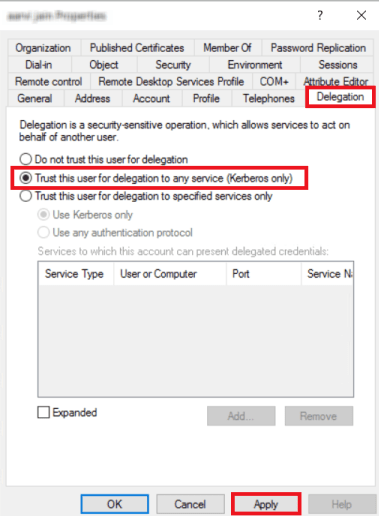
- Click Apply.
- Open up the IIS Manager.
- Select the site on which you want to enable Windows Authentication.
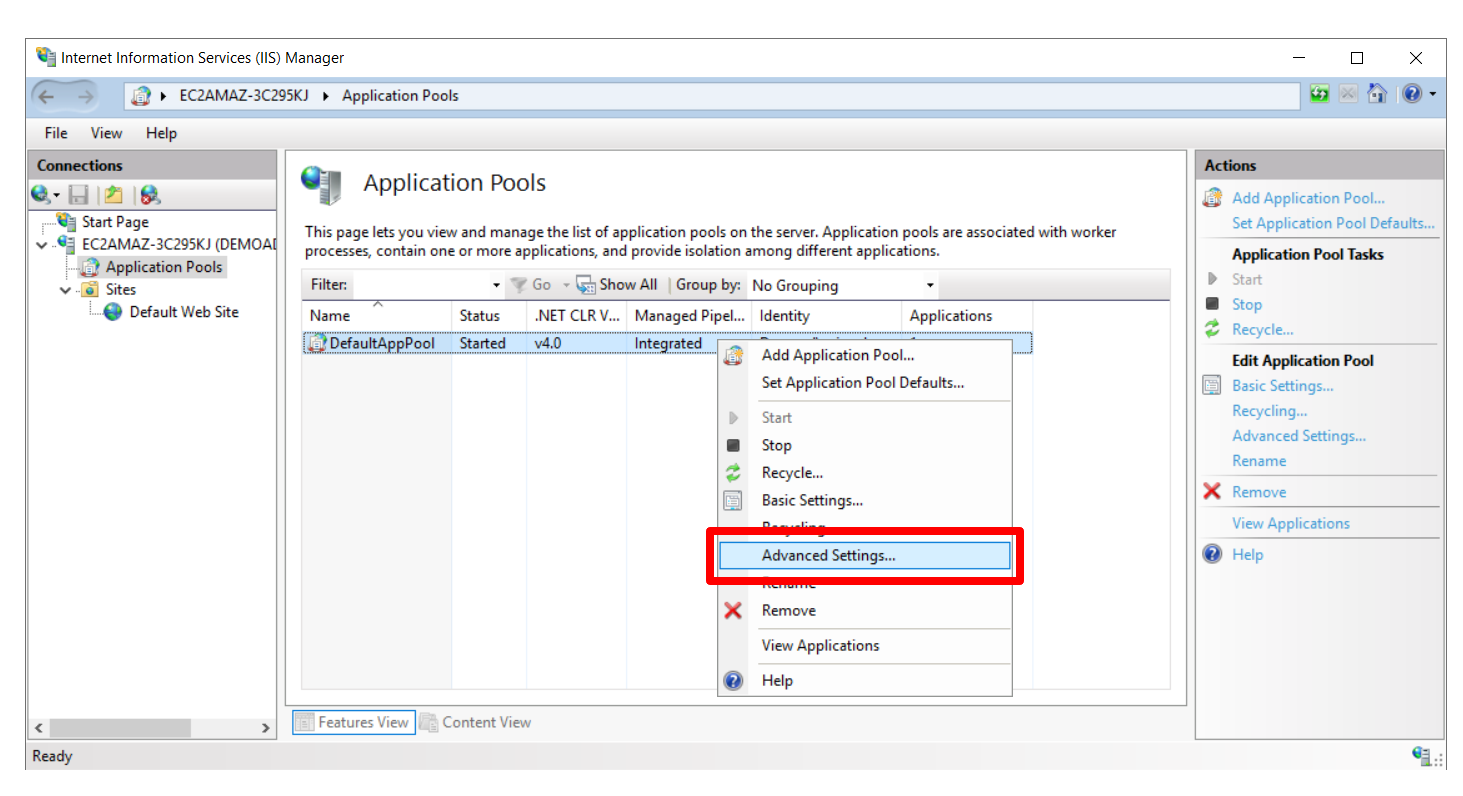
-
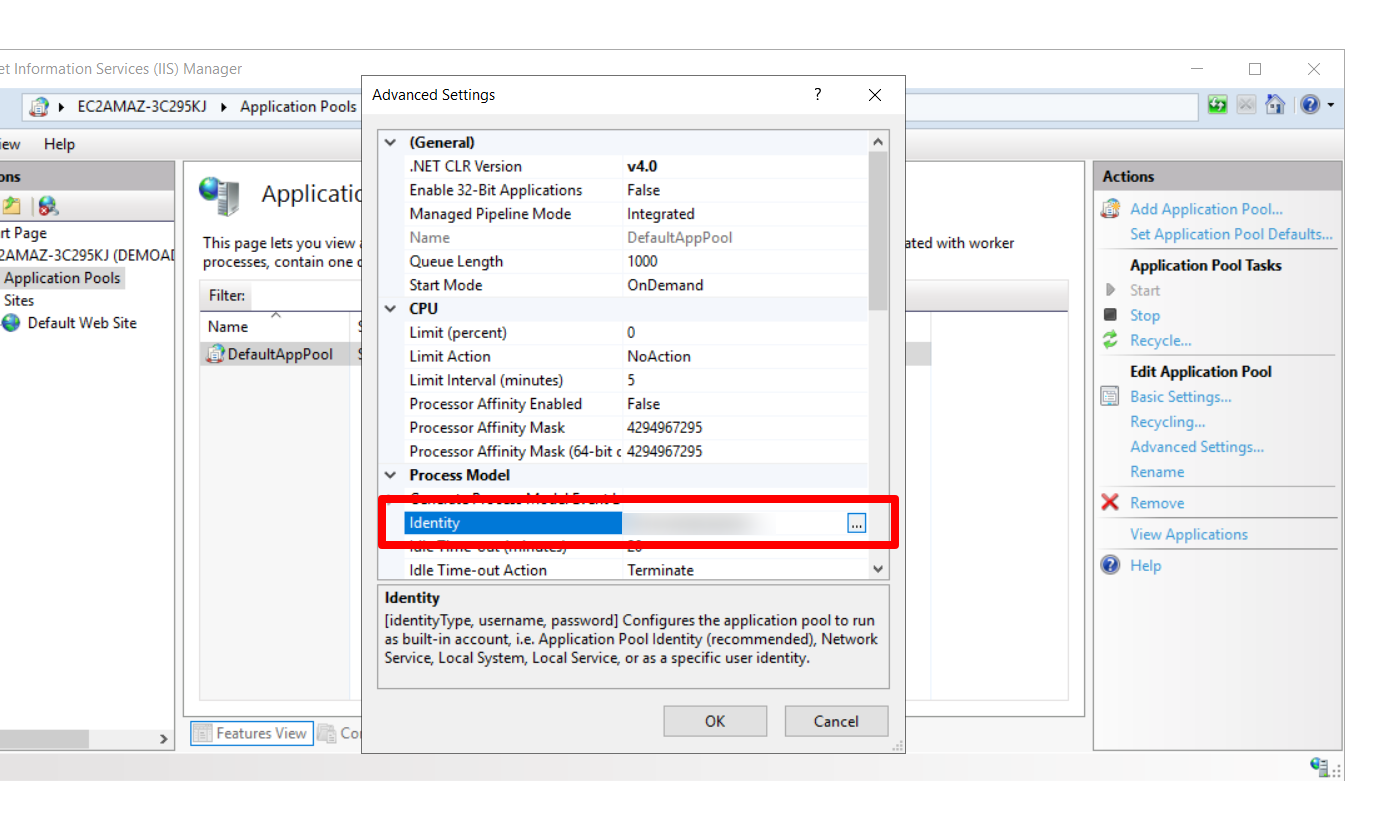
Select the Application Pool for that website. Right-click on it and select Advanced Settings.
-
Use Custom Account and set the account as the service account for which delegation was enabled. You would need to enter the password of the service account as well.
-
Navigate to the Authentication section for the website.
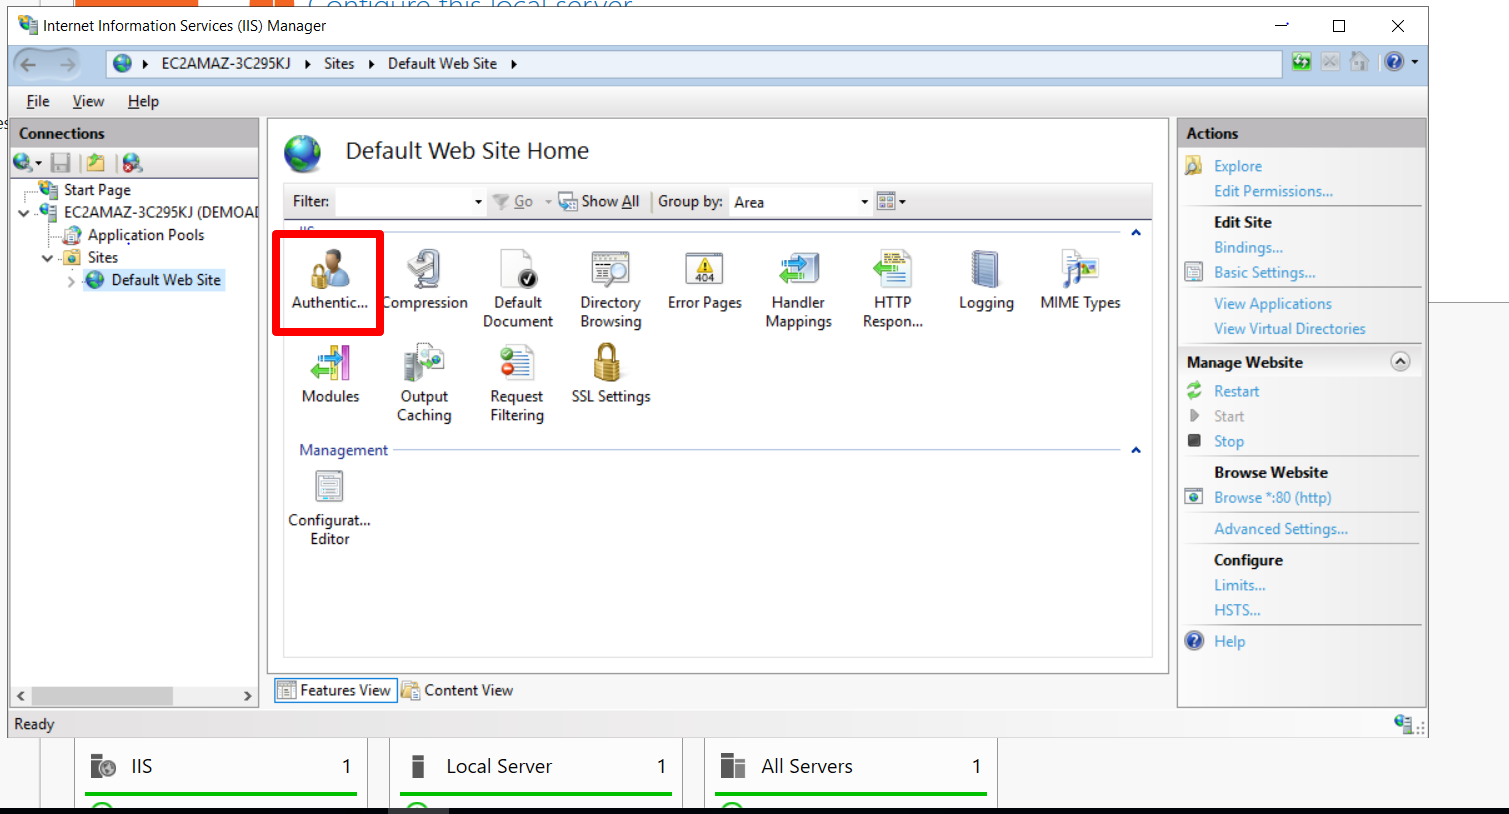
-
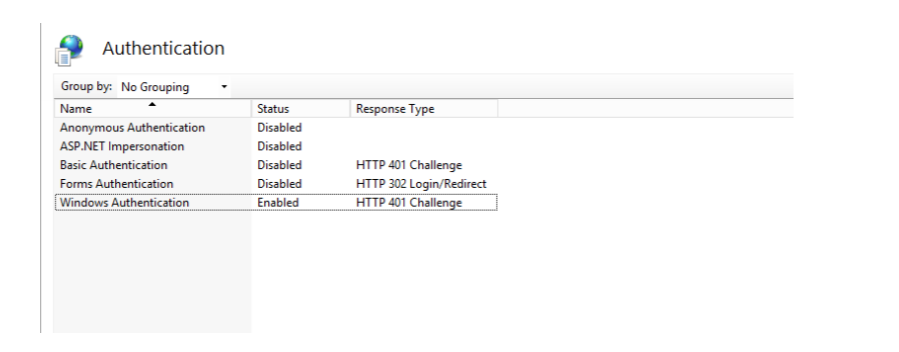
Enable Windows Authentication and disable Anonymous Authentication. (Both cannot work simultaneously)
-
Go to the Configuration Editor.
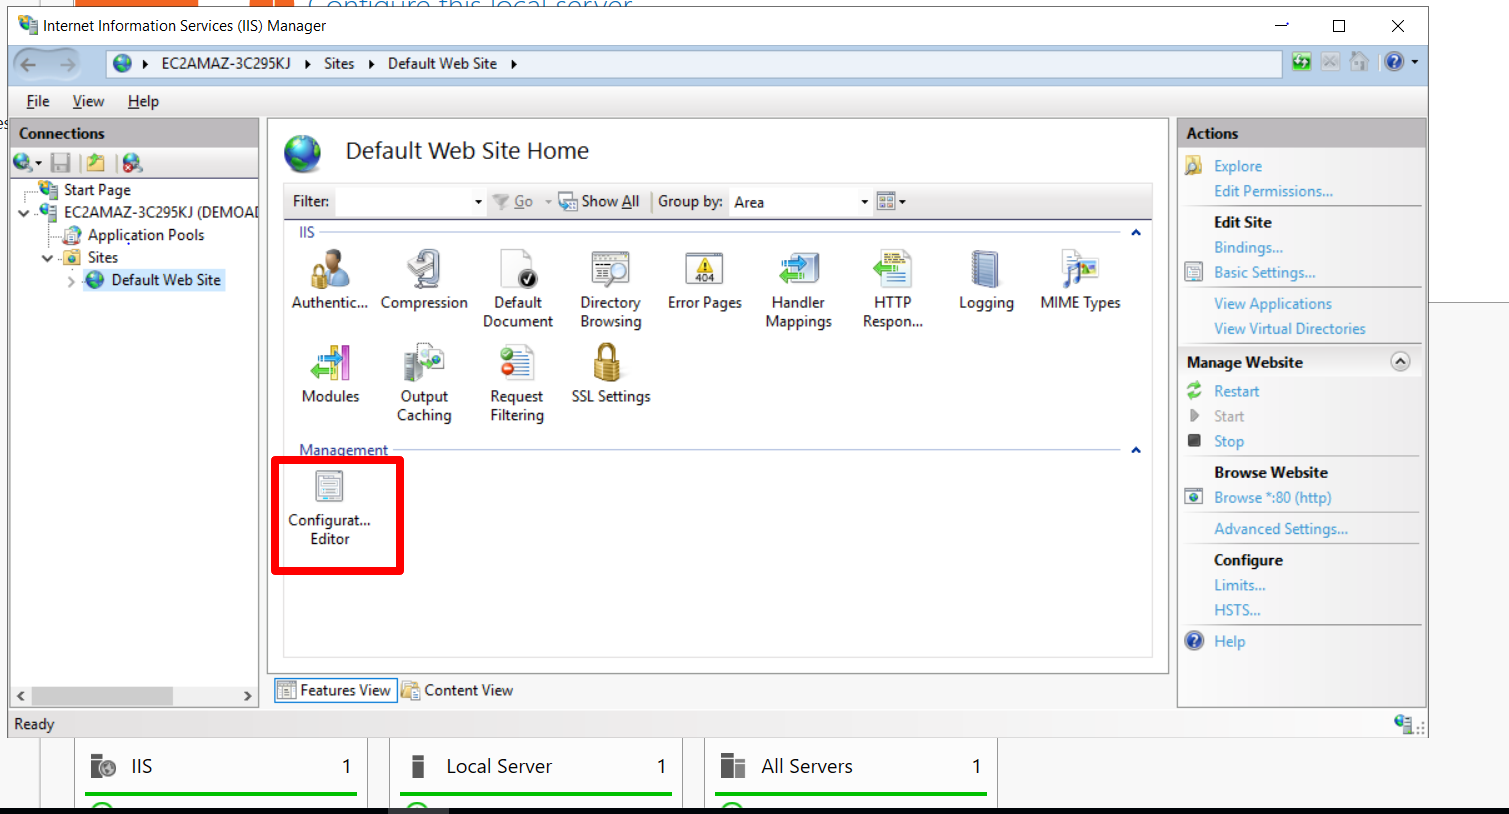
-
Search for: system.webServer/security/authentication/windowsAuthentication
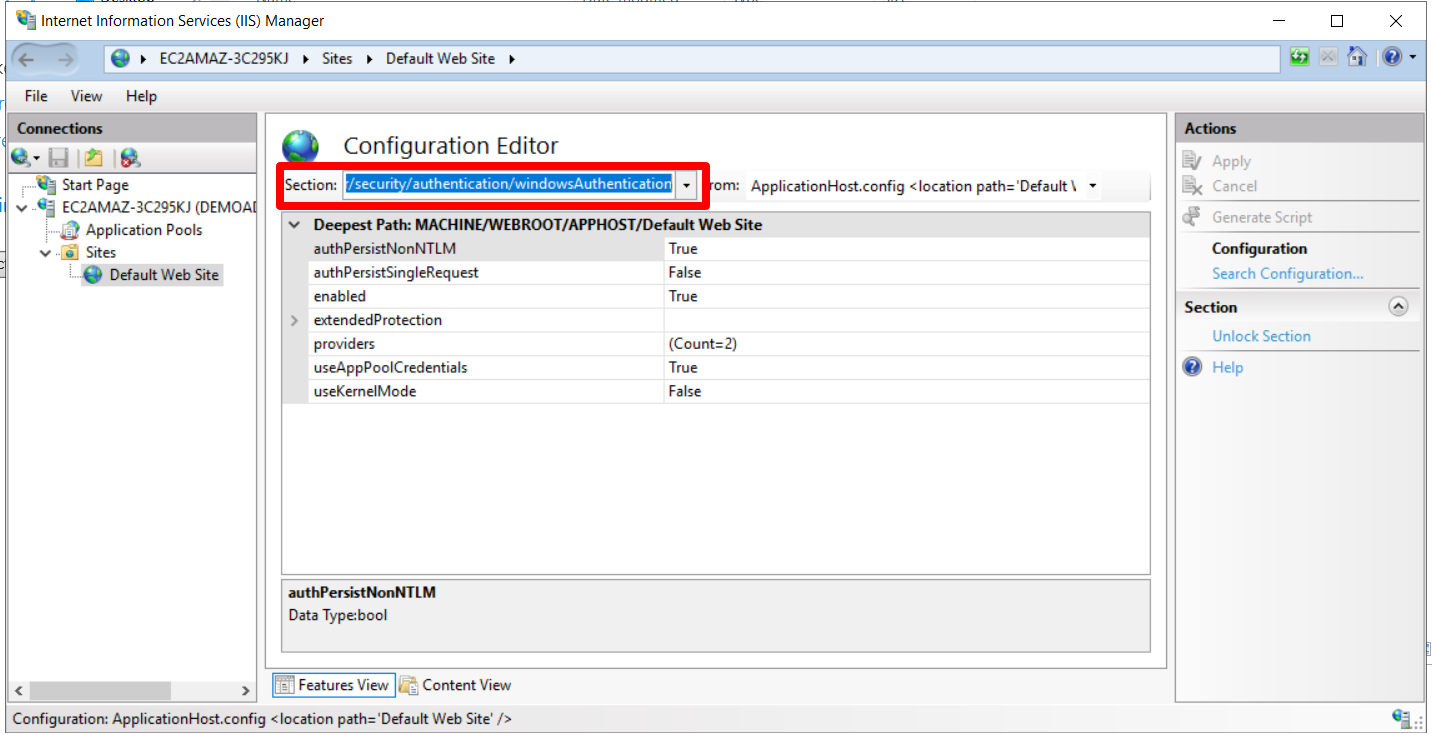
- Set useKernelMode as False and useAppPoolCredentials as True in the Configuration editor.
- Click Apply.
- Restart the IIS server.
Steps To Setup NTLM SSO with Apache on Windows :
- Click here to download the Apache module.
- Copy the mod_authnz_sspi.so from Apache24 > modules folder and place it in the modules
- Copy the sspipkgs.exe file from Apache24 -> bin folder and place it in the bin folder of your Xampp Apache folder (.....\xampp\apache\bin) on your web server.
-
Open httpd.conf (.....\xampp\apache\conf) and place the below line of code in the LoadModule section.
LoadModule authnz_sspi_module modules/mod_authnz_sspi.so
-
Make sure that the following modules are uncommented:
LoadModule authn_core_module modules/mod_authn_core.so
LoadModule authz_core_module modules/mod_authz_core.so
Note: Also, make sure to enable the LDAP extension.
- Open the httpd.conf file from (.....\xampp\apache\conf\httpd.conf).
-
Go to and paste the below lines after #Require all granted.
<Directory "...../xampp/htdocs">
………
………
#Require all granted
AllowOverride None Options None
AuthType SSPI
SSPIAuth On
SSPIAuthoritative On
Require valid-user
</Directory>
- Restart your Apache Server.
-
To test the configuration create a test.php file in your Drupal root directory.
(.....\xampp\htdocs\drupal\test.php).
Enter the below line:<?php var_dump($_SERVER); ?>
- Save the file and run it in the web browser.
- Search for "REMOTE_USER" and it should contain the currently logged-in username.
Configure browser settings for Kerberos Authentication
The client-side configuration enables the respective browser to use SPNEGO to negotiate Kerberos authentication for the browser. You must make sure that the browser on the end user's system is configured to support Kerberos authentication.
1. Internet Explorer
2. Google Chrome
3. Mozilla Firefox
Internet Explorer
-
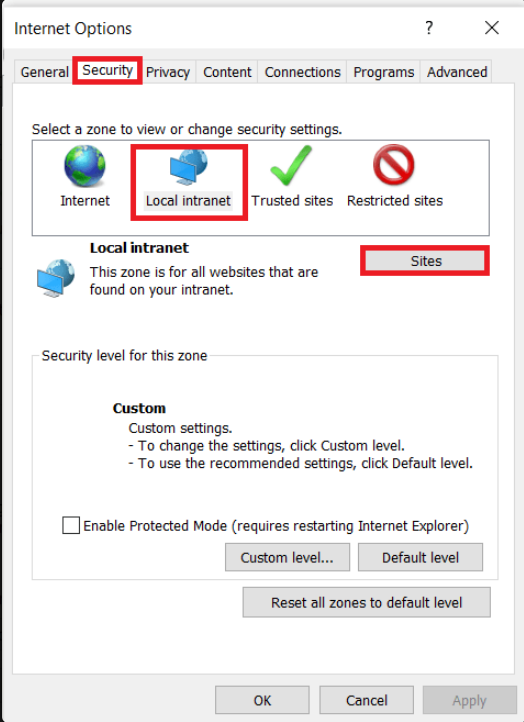
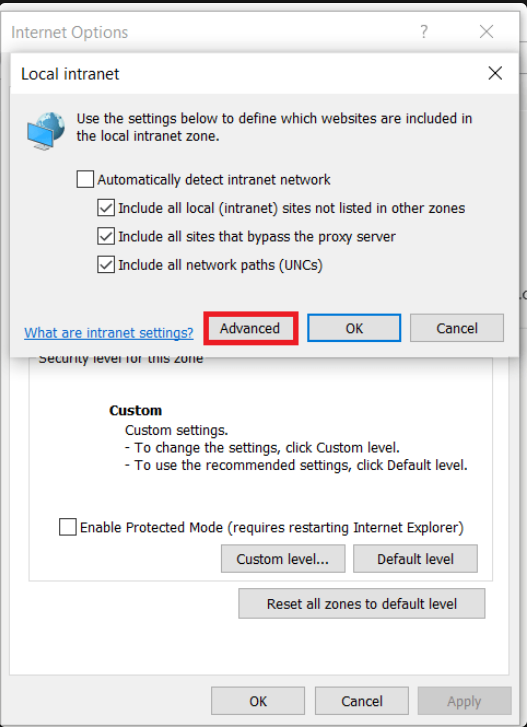
Open the Internet Explorer browser and click on Tools > Internet Options > Security > Local intranet > Sites > Advanced.
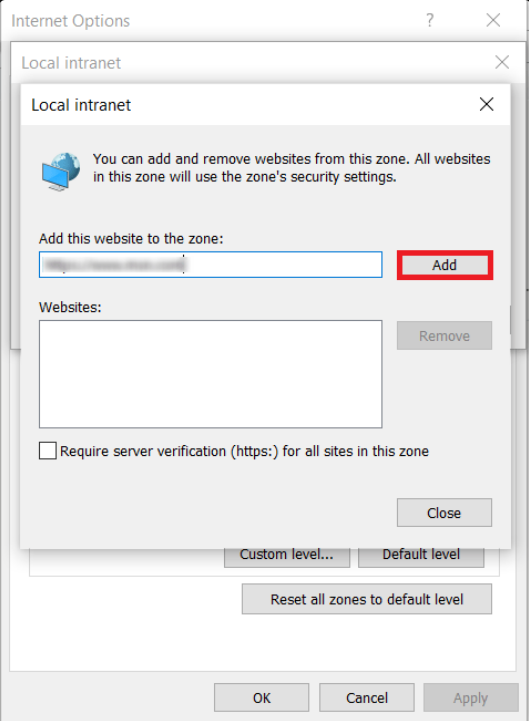
-
In Add this website to the zone field, enter the Base URL for the Drupal site, then click Add.
- Click Tools > Internet Options > Security > Local intranet > Custom Level.
- Scroll down to the User Authentication options and select Automatic logon only in the Intranet zone.
- Click OK and then restart your browser.
Google Chrome
Configuring Google Chrome settings for Kerberos can be done by utilizing the existing Internet Explorer settings. If you have already configured Internet Explorer, no additional settings are necessary for Google Chrome.
Mozilla Firefox
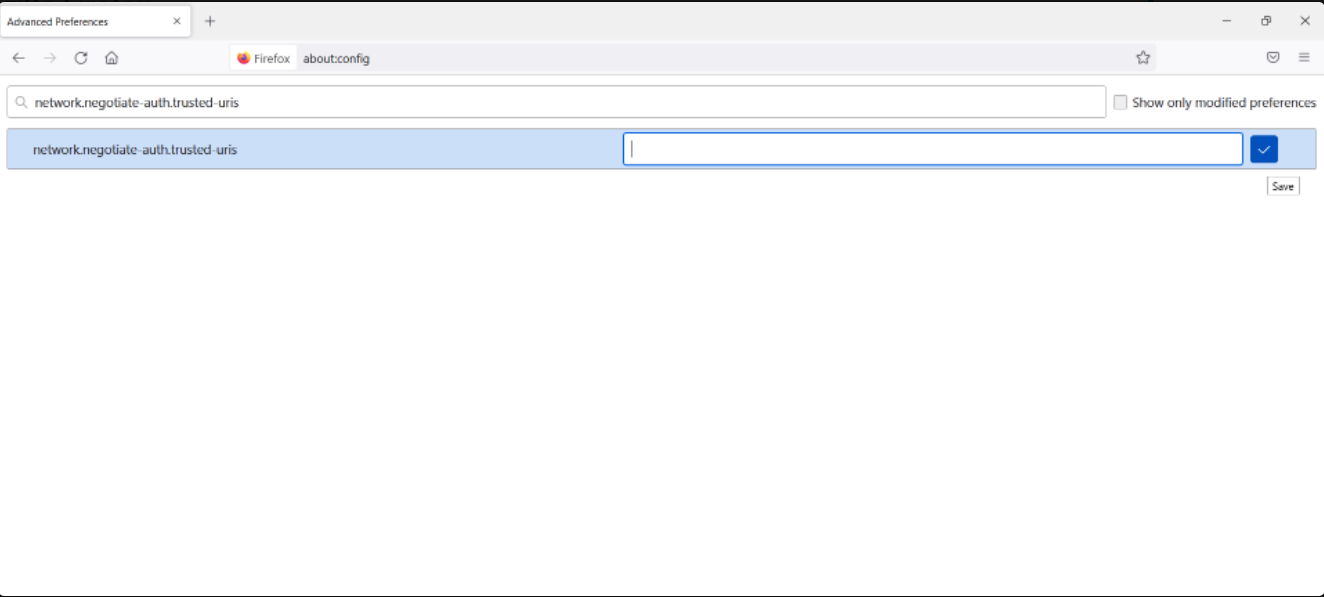
- Open the Mozilla Firefox browser and enter about:config in the address bar.
-
Search for network.negotiate-auth.trusted-uris Preference Name, and click on Edit. Enter the hostname or the domain of the web server that is protected by Kerberos HTTP SPNEGO. Specify multiple domains and hostnames separated by a comma.
-
Search for network.automatic-ntlm-auth.trusted-uris Preference Name, and click on Edit. Enter the hostname or the domain of the web server that is protected by Kerberos HTTP SPNEGO. Specify multiple domains and hostnames separated by a comma.
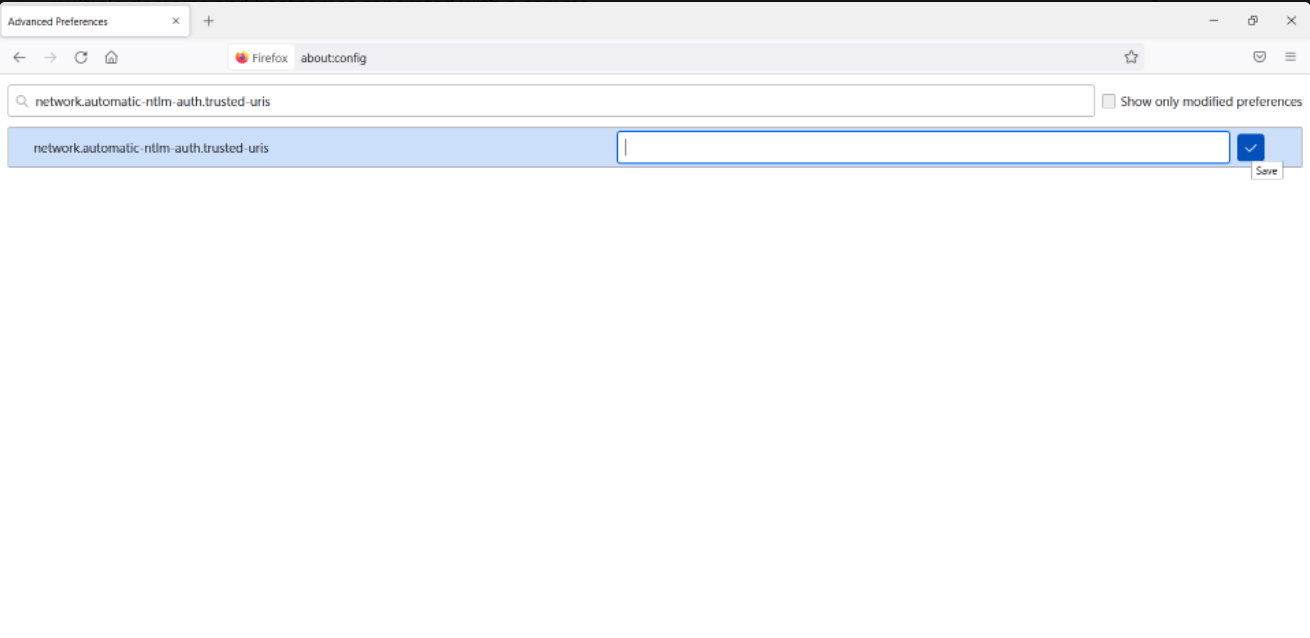
- Click OK and then restart your browser.
Contact our 24*7 support team
Feel free to reach out to our Drupal experts if you need any sort of assistance in setting up LDAP / Active Directory Integration on your Drupal site.
Help improve this page
You can:
- Log in, click Edit, and edit this page
- Log in, click Discuss, update the Page status value, and suggest an improvement
- Log in and create a Documentation issue with your suggestion


