On this page
- Configure the private file system path
- Configure credentials: Connect to Apigee Edge or Edge for Private Cloud
- Create a custom Apigee role
- Via a Drush command
- Manually
- Create Apigee user
- Configure basic authentication for Apigee Edge
- Configure OAuth2 Authentication for Apigee Edge
- Before you configure OAuth2 Authentication for Apigee Edge
- Steps to configure OAuth2 Authentication in Apigee Edge
- Configure credentials: Connect to Apigee or Apigee hybrid
- Create a Google Cloud service account
- Set the service account roles
- Generate a Google Cloud service account key
- Add the Google Cloud service account key to the module configuration
- Configure credential storage
- Apigee Edge credential key storage details
- Available key providers
- Key Provider Security
- Default storage settings
- Update the key provider
- Store Apigee credentials in a user-defined location with the File key provider
- Recommended methods based on hosting provider
- Storing Apigee credentials in environment variables
- Environment variables for basic authentication
- Environment variables for OAuth authentication
- Configure connection timeouts
- Configure error handling for a failed connection
Configure the connection to Apigee
The Apigee Edge module that is installed on the Drupal developer portal acts as a client for Apigee. Using the credentials that you configure, the portal initiates communication with Apigee by making REST requests over HTTP and HTTPS. For example, when a developer registers a new app on the developer portal, the portal makes a request to Apigee to send information about the app to your Apigee organization. For more information, see What information is stored on Apigee Edge?
To configure the connection between the developer portal and Apigee, perform the following tasks:
- Configure the private file system path
- Configure credentials: Connect to Apigee Edge or Edge for Private Cloud
- Configure credentials: Connect to Apigee or Apigee hybrid
- Configure credential storage
- Configure connection timeouts
- Configure error handling for a failed connection
Notes:
- If you do not configure the connection between the developer portal and Apigee, you will not be able to register developers on the developer portal (see What information is stored on Apigee Edge?) and may cause other issues with Drupal core functions. If you do not plan to configure the connection between the developer portal and Apigee, you should disable the Apigee Edge module.
- Do not enable two-factor authentication on Apigee if you are building a Drupal developer portal. Otherwise, the developer portal will not be able to communicate with Apigee.
Configure the private file system path
The private file system path defines the location to store private files that are created by Drupal. The private file system path should be writable by Drupal and not accessible over the web.
Before configuring the connection to Apigee, you need to ensure that you have configured the Private File Path value in web/sites/default/settings.php file, as described in the following procedure. See also Private file system settings in Drupal 8.
Note: The Private File Path value might be configured automatically by your hosting provider.
To configure the private file system path:
- Confirm whether the private file system path is set:
- Select Configuration > Media > File system in the Drupal administration menu.
- Check whether the Private file system path is set.
This value matches the Private File Path value that is set in thesettings.phpfile. - If the field is not set, proceed to step 2.
If the field is set, you can skip the rest of the steps in this procedure.
- Change permissions on
web/sites/defaultdirectory and files to make them writeable. For example:
chmod -R 775 web/sites/default - Open the
web/sites/default/settings.phpfile in your favorite editor. - Search for Private file path in the file and set the value to the location of your private file directory. For example:
$settings['file_private_path']= '/var/www/private';If you are using Lando or another tool to run a local web server inside a Docker container, you may need to create a
privatedirectory at the root of your project. Then, set the value of the Private file path in your settings.php. For example:$settings['file_private_path']= '/app/private';Note: Ensure that you uncomment the line in the file.
- Save the
settings.phpfile. - Clear Drupal cache by going to Configuration > Development > Performance (admin/config/development/performance) and clicking Clear all caches.
- Repeat step 1 to confirm that the Private file system path is set in Drupal.
Configure credentials: Connect to Apigee Edge or Edge for Private Cloud
Follow the steps below to configure the custom role, user account, and authentication credentials needed to connect your developer portal to Apigee Edge or Edge for Private Cloud.
Create a custom Apigee role
Note: For SAML-enabled organizations, you must contact your Apigee customer support representative for assistance. Do not use the procedure described in this section to create the developer administrator role.
Apigee recommends that you create a custom Apigee role to assign to the user whose credentials will be used to configure the connection between the developer portal and Apigee Edge. This role is used exclusively for connecting the developer portal to your Apigee Edge organization and limits access to only the API resources required for this purpose. For example, the Developer Administrator role cannot edit or delete API proxies.
To assign the developer administrator role for non-SAML enabled organizations:
Via a Drush command
Create the role with the appropriate permissions by executing the Drush apigee-edge:create-edge-role command.
Note: You must have Organization Administrator privileges to run this command against an Apigee org.
$ drush create-edge-role myorg me@example.com
The command above will create a new role named "drupalportal" in the org "myorg", using the Apigee user "me@example.com" for connecting to the Apigee org to create the role.
Running drush help apigee-edge:create-edge-role will give more details on the arguments and parameters:
# drush help apigee-edge:create-edge-role

Create a custom role in an Apigee organization for Drupal usage.

Create a custom Apigee role that limits permissions for Drupal connections
to the Apigee API.

Examples:
drush create-edge-role myorg me@example.com Create "drupalportal" role as orgadmin me@example.com for org myorg.
drush create-edge-role myorg me@example.com --role-name=portal Create role named "portal"
drush create-edge-role myorg me@example.com --base-url=https://api.edge.example.com Create role on private Apigee Edge server "api.edge.example.com".
drush create-edge-role myorg me@example.com --force Update permissions on "drupalportal" role even if role already exists.

Arguments:
org The Apigee Edge org to create the role in.
email An Apigee user email address with orgadmin role for this org.

Options:
--password[=PASSWORD] Password for the Apigee orgadmin user. If not set, you will be prompted for the password.
--base-url[=BASE-URL] Base URL to use, defaults to public cloud URL: https://api.enterprise.apigee.com/v1.
--role-name[=ROLE-NAME] The role to create in the Apigee Edge org, defaults to "drupalportal".
--force Force running of permissions on a role that already exists, defaults to throwing an error message if role exists. Note that permissions are only added, any current permissions not not removed.

Aliases: create-edge-role
Manually
The list of required permissions is available in the above-described Drush command's source code. (Permalink)
Create Apigee user
The Apigee Edge Drupal module makes calls to the Apigee API in order to do things such as create apps for a developer. In order to make calls to the Apigee API, you need to create a user account and assign the custom role created earlier to that user.
To create a user:
- Log into Apigee Edge with a user that has the Organization Administrator role.
- Select Admin >Users in the left hand navigation.
- Click +User in the upper right hand corner.
- Enter the user's email address.
- Enter the name of the custom role name created in the previous step.
- Click Save.
For more information, see Apigee documentation on assigning roles to a user.
Note: Apigee recommends creating a generic user account that all developer administrators can use. If you assign the role to an individual user account, communication may be impacted if the user account is deleted after transferring or leaving the company, for example. Using a mailing list or email alias that contains multiple administrators is also a good idea so that multiple persons can recover or change the account password.
Configure credentials by creating an authentication key that defines the Apigee Edge base URL, organization, and Developer Administrator username and password. The steps to configure credentials using basic or OAuth2 authentication are provided below.
Configure basic authentication for Apigee Edge
Note: Basic Authentication is less secure than OAuth2 authentication. Your credentials are not encrypted or hashed; they are Base64-encoded only. See also Recommended methods based on hosting provider.
To configure basic authentication for Apigee Edge:
- Select Configuration > Apigee Edge > General in the Drupal administration menu.
- Select the Credentials tab.
- Expand the Apigee Edge Connection Settings section (if necessary).
- In the Authentication type drop-down, select HTTP basic.
- Configure the credentials listed in the following table.
Credential Description Organization Name of your organization on Apigee Edge, defined when you create your account on Edge. Username Name of a user with Developer Administrator privileges. See Assigning the Developer Administrator role. Password Password for the user with Developer Administrator privileges. Apigee Edge endpoint Base URL to which Apigee Edge endpoint paths are appended. The default base URL is https://api.enterprise.apigee.com/v1. - To test the connection, expand the Test Connection section (if necessary) and click Send Request to send a test request using the specified credentials.
A message is displayed indicating whether the connection was successful. - Click Save configuration.
Configure OAuth2 Authentication for Apigee Edge
To configure OAuth2 authentication for Apigee Edge, perform the steps described in the following sections:
- Before you configure OAuth2 Authentication for Apigee Edge
- Steps to configure OAuth2 Authentication in Apigee Edge
Note: You can also use an external key management solution, such as Lockr, Townsend Security's Alliance Key Manager or any other Key module-compatible key management solution.
Before you configure OAuth2 Authentication for Apigee Edge
If you are using SAML, you will need to enable SAML on Apigee Edge if you have not done so already. Obtain the client ID and client secret from your Apigee customer support representative.
If you are not using SAML the default client ID and secret can be used by the system by leaving those fields empty when configuring the connection settings.
Steps to configure OAuth2 Authentication in Apigee Edge
To configure OAuth for Apigee Edge:
- Select Configuration > Apigee Edge > General in the Drupal administration menu.
- Select the Credentials tab.
- Expand the Apigee Edge Connection Settings section (if necessary).
- In the Authentication type drop-down, select OAuth.
- Configure the credentials listed in the following table.
Credential Description Organization Name of your organization on Apigee Edge, defined when you create your account on Edge. Username Name of a user with Developer Administrator privileges. See Assigning the Developer Administrator role. Password Password for the user with Developer Administrator privileges. Apigee Edge endpoint Base URL to which Apigee Edge endpoint paths are appended. The default base URL is https://api.enterprise.apigee.com/v1.Authorization Server Authorization server that issues access tokens to the client in the form: https://zonename.login.apigee.com/oauth/token
This value defaults to:https://login.apigee.com/oauth/tokenClient ID Client ID that is issued to the client during the registration process. This value defaults to: edgecliClient secret Client secret known only to the client and the authorization server. This value defaults to: edgeclisecret - To test the connection, expand the Test Connection section (if necessary) and click Send Request to send a test request using the specified credentials.
A message is displayed indicating whether the connection was successful. - Click Save configuration.
Configure credentials: Connect to Apigee or Apigee hybrid
Follow the steps below to configure the Google Cloud service account, service account roles, and service account keys needed to connect your developer portal to an Apigee (formerly "Apigee X") or Apigee hybrid org.
Note: Before you begin, ensure that you have access to the Google Cloud account and Google Cloud project ID bound to your Apigee or Apigee hybrid org. See Create a Google Cloud account and Create a Google Cloud project for more information about the credentials needed to work with an Apigee or Apigee hybrid org.
Create a Google Cloud service account
To connect your developer portal to an Apigee or Apigee hybrid org, you need a Google Cloud service account. The Google Cloud service account manages the connection credentials required for communication between the developer portal and the Apigee or Apigee hybrid org on Apigee.
For more information on the use of service accounts to make API calls and how they differ from user accounts, see What are service accounts.
Note: The service account you create should ONLY be used for your developer portal. We recommend that you do not reuse this service account to manage tasks for other applications.
You can create a service account using the Google Cloud console or using the gcloud command-line tool.
- To create a service account using the Console, follow steps 1-6 in Use the Google Cloud console. NOTE: To create service accounts in the Google Cloud console, you must have the Google Cloud Service Account Admin role or greater.
- To create a service account using the
gcloudcommand-line tool, follow the steps outlined in Creating and managing service accounts.
Set the service account roles
Next, assign the Apigee Developer Administrator role (roles/apigee.developerAdmin) to the service account you just created. This will set the service account’s scope and access privileges, permitting the service account to connect to your Apigee or Apigee hybrid org from your Google Cloud project.
You can assign the Apigee Developer Administrator role (roles/apigee.developerAdmin) to the service account using the Google Cloud console or using the gCloud command-line tool.
- To assign the role using the console, follow steps 7-9 in Use the Google Cloud console.
- To create a service account using the
gcloudcommand-line tool, follow the steps outlined in thegcloudtab of Granting roles to a service account for specific resources.
Generate a Google Cloud service account key
Once you have created a Google Cloud service account and assigned the appropriate role to the service account, you need to generate a Google Cloud service account key.
You can generate a Google Cloud service account key using the Google Cloud console or using the gCloud command-line tool.
- To generate a key using the console, follow steps 9-11 in Use the Google Cloud console and download the JSON key to your local machine.
- To generate a key using the
gcloudcommand-line tool, follow the steps outlined for thegcloudcommand in Creating service account keys.
Add the Google Cloud service account key to the module configuration
Once you have generated the JSON file containing your Google Cloud service account key, add it to your Apigee Edge module configuration.
- Select Configuration > Apigee Edge > General in the Drupal administration menu.
- Select the Credentials tab.
- Select “Apigee X” as the Apigee Instance type.
- Enter the name of your Apigee or Apigee hybrid org into the Organization field.
- Copy and paste the contents of your Google Cloud service account key JSON file into the GCP service account key text area, as shown in the figure below:
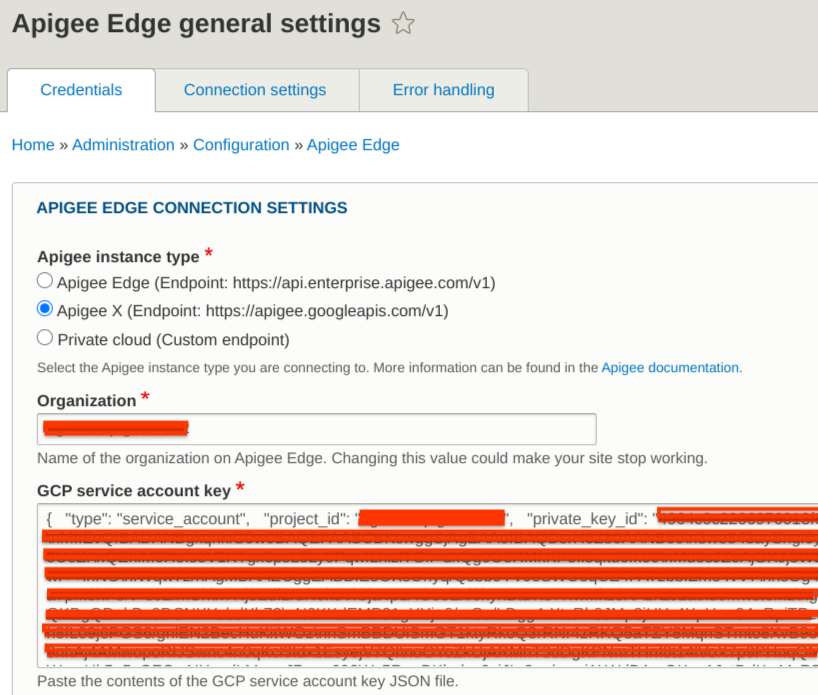
- Click Save configuration.
Configure credential storage
The Apigee Edge module uses the Drupal Key module to store Apigee connection settings, including the authentication credentials configured above. The Drupal Key module enables developer portal admins to define how and where sensitive information is stored. You can configure this module using the Apigee Edge connection settings page, as described below.
Warning: Apigee credentials are used by the Apigee Edge module to connect to Apigee organizations. If this information is compromised, the credentials can be used to connect to your Apigee organization and modify data.
Apigee Edge credential key storage details
When you configure credentials, the Apigee Edge module creates a new Key module key named Apigee Edge connection in your Drupal site by default. To see the full details of the Apigee Edge key, select Configuration > System > Keys in the Drupal administration menu.
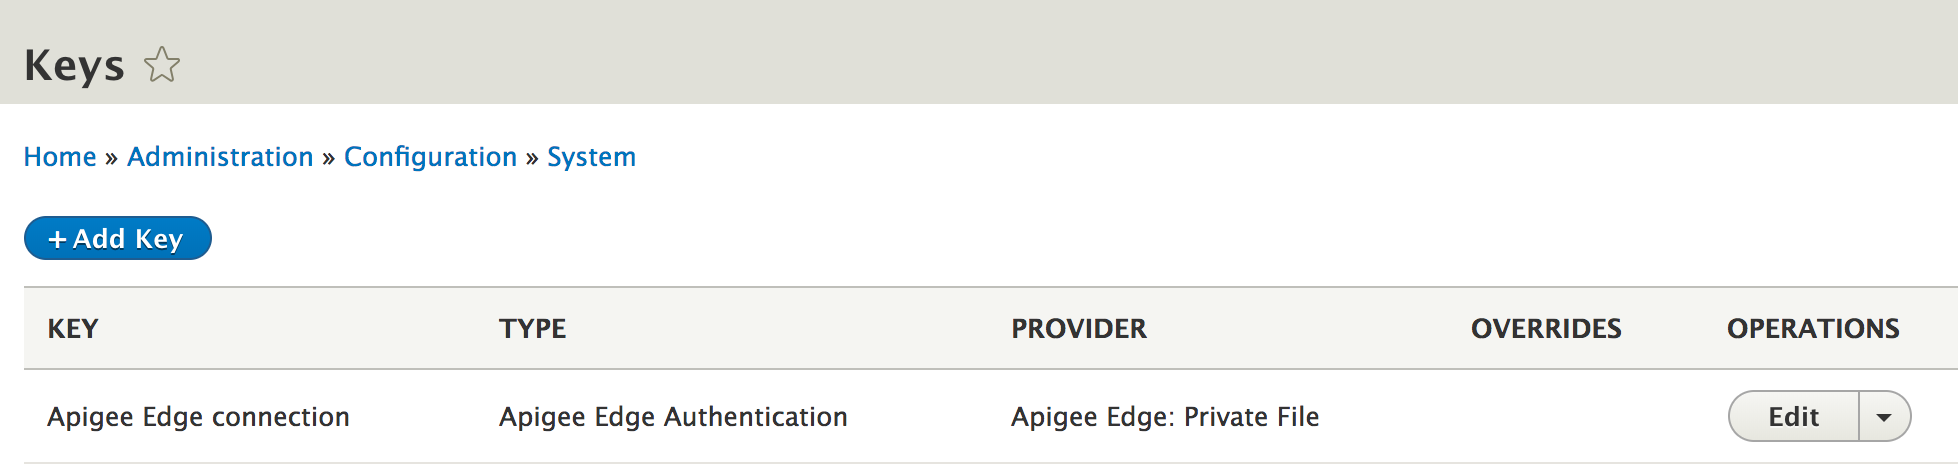
The key type will always be "Apigee Edge Authentication," as the data being stored is custom to Apigee credentials. The key provider is the configurable storage mechanism, in this case, "Apigee Edge: Private File." Key providers can be defined in the Key module or other modules to extend the ways the keys can be defined. For example, if you install the Drupal Lockr module, it will add a new key provider to store the key in Lockr.
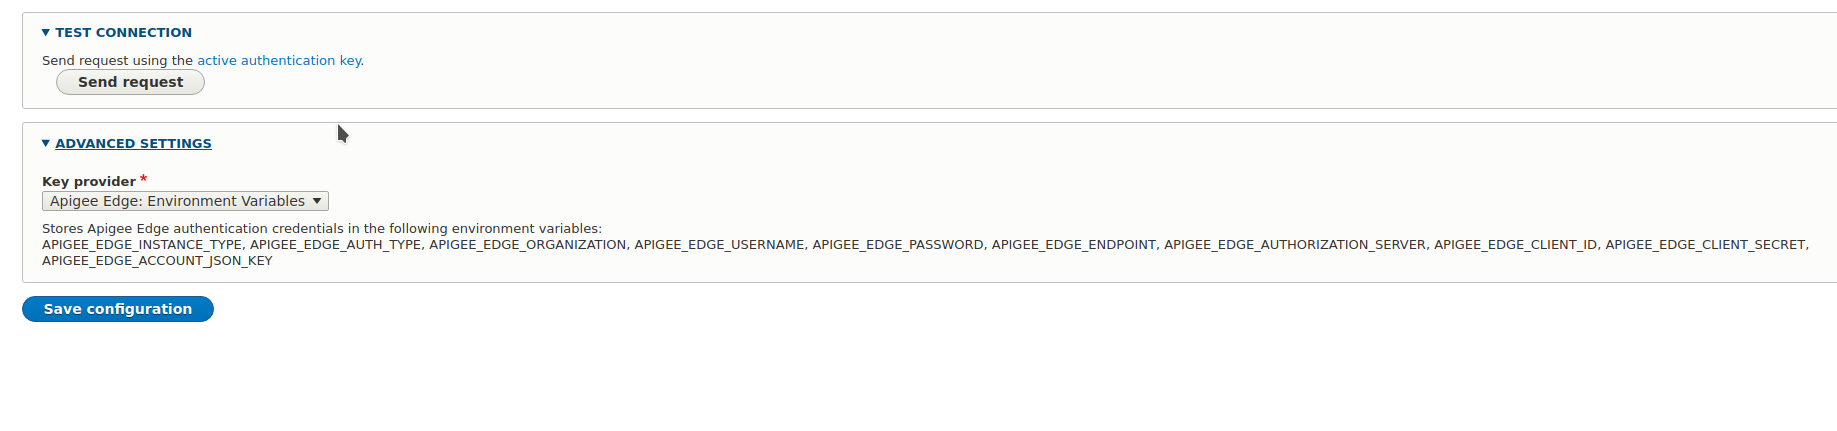
You can view and edit the Drupal Key module configuration for Apigee Edge credentials by selecting Configuration > Apigee Edge > General in the Drupal administration menu and then clicking “Advanced Settings.” This section will display the configured key provider, as shown in the figure below:
Available key providers
Three key providers are made available by the Drupal Key module:
- Configuration
- Environment
- File
A detailed description of the storage type and security level of each of these key provider plugins can be found in the Drupal Key module documentation.
The Apigee Edge module adds two additional key provider options:
- Apigee Edge: Private File: Apigee Edge credentials are stored in the
.apigee_edge/apigee_edge_connection_default.jsonfile located at the root of the Drupal private file system. See also Store Apigee Edge credentials in a user-defined location. Make sure the private filesystem is set to be a directory outside the web root. If you put your private filesystem under the web root, the files could be accessible to anyone through web server URLs. For more information, see the Drupal documentation on the File module. - Apigee Edge: Environment Variables: This key provider is the same as the Drupal Key module's "Environment" plugin and will be deprecated.
Key Provider Security
The following lists the relative security of each key provider:
| Configuration | Use for local development only |
| Apigee Edge: Private File | Better |
| File | Better |
| Environment | Better |
| Apigee Edge: Environment Variables | Better |
| External (such as Lockr, Townsend Security Key Connection, or any other Drupal Key module-compatible key management solution) | Best |
The configuration key provider is not considered a secure place to store credentials for a production site. Connection details are stored in the database which can cause the credentials to be vulnerable to SQL injection attacks and will be included in any database backup files or configuration exports.
Default storage settings
To make configuration easy for evaluation and local development, the Apigee Edge module uses the following default storage settings for Apigee connection credentials:
- If you use a basic Drupal site install with the Apigee Edge module, the key is stored in the private filesystem. If you plan to use your portal on a production server, you may want to use a more secure key provider.
- If you install your site using the Apigee Developer Portal Kickstart distribution, the key is stored in the Drupal configuration. Apigee strongly recommends changing the key provider if you plan to use your portal for anything other than local development as the key data would be included in your Drupal database and configuration files if exported. Learn more by reading about Drupal’s configuration management feature.
Update the key provider
To view the key provider associated with your Apigee Edge connection credentials, select Configuration > System > Keys in the Drupal administration menu. For the “Apigee Edge Connection” key, the value of the type field will always be "Apigee Edge Authentication," as the data stored in the key provides the Apigee Edge credentials. The provider field shows the selected storage mechanism.
You can update the Drupal Key module configuration for your Apigee Edge connection credentials by selecting Configuration > Apigee Edge > General in the Drupal administration menu and then clicking “Advanced Settings.” The dropdown will display the available key provide options, as shown in the figure below:
Key providers can be defined in the Drupal Key module or any other modules you may choose to install. For example, if you install the Drupal Lockr module, it will add a new key provider to store the key in Lockr.
To update your Apigee Edge connection key provider and storage mechanism:
- Select the desired key provider from the dropdown list.
- Click Save configuration.
Store Apigee credentials in a user-defined location with the File key provider
As shown in the figure above, the provider is set to Apigee Edge: Private File. The Apigee Edge: Private File key provider stores the Apigee Edge credentials in the .apigee_edge/apigee_edge_connection_default.json file located at the root of the Drupal private file system.
As noted above, you can modify the Apigee Edge connection key to use a different provider to store the connection information more securely. For example, Acquia and Pantheon.io allow you to store private files in a separate user-defined location. You can configure the File key provider to use this user-defined location instead of the Drupal private file system so that the connection settings are not stored during the standard file backup process.
To use the File key provider to store Apigee credentials in a user-defined location, such as /var/private:
- Determine the location of the Drupal private file system root is by selecting Configuration > Media > File system and noting the path defined for Private file system path.
- Copy the apigee_edge_connection_default.json file in the private_file_path/.apigee_edge directory to /var/private, where private_file_path is the location of your private file path.
Note: Ensure that the new file is readable by your web server or PHP process user/group. - Select Configuration> System> Keys.
- Click Edit in the Operations column associated with the Apigee Edge connection key.
- Under Provider Settings, change Key provider to File.
- In the File location field, specify the location of the file. For example: /var/private/apigee_edge_connection_default.json
- Click Save to save key settings.
- Go to Configuration > Apigee Edge > General and click Send request under Test Connection to validate the new settings are working properly.
- Delete the private_file_path/.apigee_edge directory.
Recommended methods based on hosting provider
Apigee supports the following methods for configuring credential storage using an authentication key:
- Credential storage using a private file (Good)
By default, Apigee credentials are stored in the.apigee_edge/apigee_edge_connection_default.jsonfile located at the root of the Drupal private file system. See also Store Apigee credentials in a user-defined location with the File key provider. - Credential storage using environment variables (Better)
- External key management solution, such as Lockr, Townsend Security Key Connection, or any other Key module-compatible key management solution (Best)
The following table summarizes the methods recommended for use in production environments based on hosting provider.
| Hosting Provider | Recommendation for Production Environments |
| Acquia | Use the Lockr module.
Alternatively, you can use the File key provider to store the credentials in the |
| Pantheon | Use the Lockr module.
Alternatively you configure the File or Apigee Edge: Private File key provider to use sites/default/files/private location for private files. See Private Paths for Files in the Pantheon documentation for more information. Note: Using environment variables is not supported with Pantheon. |
| Other installations | Use the Lockr module.
Alternatively, you can use environment variables stored on the server or a secure file location. Note: When configuring credentials using a private file, make sure to set |
Storing Apigee credentials in environment variables
Storing credentials in environment variables another option for handling credentials - even in development environments.
By default, the Apigee Edge module stores and reads credentials from an (unencrypted) private file. To read the credentials from environment variables:
1. Go to Configuration > Apigee Edge > General.
2. Expand the Advanced settings field set.
3. Select Apigee Edge: Environment variables.
4. Save the form.
You can only save the form if you have all the required environment variables set as described below.
This configuration can be export and shared between environments that use the same configuration.
IMPORTANT: After you set or change the Apigee Edge credentials always visit /admin/config/apigee-edge/settings and click Send request to test the connection. You should get a Connection successful message.
IMPORTANT: Each time you set or change the Apigee Edge credentials you must run the developer synchronization to ensure that all users (including Drupal User 1 (uid1)) have a developer account in Apigee Edge.
Store Apigee Edge authentication credentials in the following environment variables:
APIGEE_EDGE_INSTANCE_TYPE, APIGEE_EDGE_AUTH_TYPE, APIGEE_EDGE_ORGANIZATION, APIGEE_EDGE_USERNAME, APIGEE_EDGE_PASSWORD, APIGEE_EDGE_ENDPOINT, APIGEE_EDGE_AUTHORIZATION_SERVER, APIGEE_EDGE_CLIENT_ID, APIGEE_EDGE_CLIENT_SECRET, APIGEE_EDGE_ACCOUNT_JSON_KEY
Environment variables for basic authentication
APIGEE_EDGE_AUTH_TYPE=basic

APIGEE_EDGE_ORGANIZATION

APIGEE_EDGE_USERNAME=john.doe+acmelocal@email.com

APIGEE_EDGE_PASSWORD=<whateverpasswordyouchose>
The APIGEE_EDGE_ENDPOINT=http://on-prem-apigee-edge-address.test environment variable is optional. Set this if the Management server is on-prem.
Environment variables for OAuth authentication
They are the same as for basic authentication, but:
APIGEE_EDGE_AUTH_TYPE=oauth

APIGEE_EDGE_CLIENT_ID=edgecli

APIGEE_EDGE_CLIENT_SECRET=edgeclisecret
These are the default client id and client secret for Apigee Edge Public Cloud, but they could be changed by Apigee support. You can find more information about OAuth authentication in Configuring OAuth2 Authentication for Apigee Edge.
Configure connection timeouts
To configure connection timeouts:
- Select Configuration > Apigee Edge > General in the Drupal administration menu.
- Select the Connection config tab.
- Configure the following fields:
Field Description Default Connection timeout Number of seconds before an HTTP connection to Apigee Edge is assumed to have timed out. 30 seconds Request timeout Number of seconds before an HTTP request to Apigee Edge with no response is assumed to have timed out. 30 seconds - Click Save configuration.
Configure error handling for a failed connection
To configure error handling for a failed connection between the developer portal and Apigee Edge:
- Select Configuration > Apigee Edge > General in the Drupal administration menu.
- Select the Error handling tab.
- Configure the title and content of the error page.
- Click Save configuration.
Help improve this page
You can:
- Log in, click Edit, and edit this page
- Log in, click Discuss, update the Page status value, and suggest an improvement
- Log in and create a Documentation issue with your suggestion


