Interactive Function Task
The Interactive Function task allows workflow admins and developers to create custom UIs for their workflows. Interactive Function task types allow the workflow administrator to configure the task to show the end user a custom form when clicked on in the task console.
The custom form is defined in a function written in a Drupal module using the Drupal Form API. They can be very simple function or extensive where the user is prompted with multiple questions and input on a form that is then handled in the form's submit handler to set process variables or update associated workflow content. Custom action buttons can be added to these forms and used to trigger different logic in the workflow - ie: set a process variable that is tested in the workflow to control the path of execution. So this is a very customizable task type.
If you have a custom form or custom set of questions and actions you need to implement in your workflow - then this is the task type to use.
To define an new Interactive function that Maestro will know about, refer to the section below and example of a new custom interactive function.
Configuring the Interactive Function Task:
In the Template Builder, add a new task of type Interactive Task to your workflow. Once it's added, click on the Edit menu icon on the top left corner of the task. You should see the available interactive function names in the handler fields as you start to type. Once one is selected, you will see the help or description appear just below the handler field. This help text is defined for the selected function in your modules use of hook_maestro_interactive_handlers.
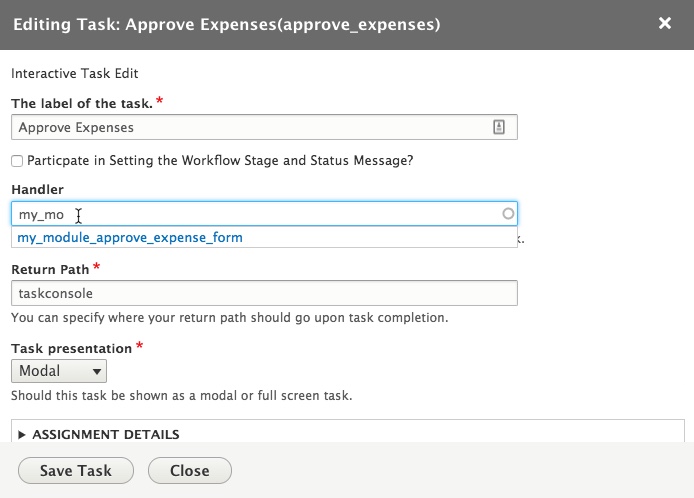
In the image above, the handler field is filled in with a function name that will be used to generate the form for the interactive task. When left blank, Maestro defaults to a simple Accept/Reject button UI.
The "Return Path" option specifies where to redirect the user to after completion. By default this is set to "taskconsole", which means that the task will redirect to the url "/taskconsole" after completion.
The "Task presentation" drop down gives you two options: Modal or Full Page. The Modal option will pop up the task's user facing UI in a modal dialog window, whereas the Full Page option takes the user to a full page rendering of the handler.
Defining a new Interactive Function:
You will need somewhere to place your code. I would suggest not using any of the Maestro core files for this as any updates to Maestro will most likely overwrite those files and you’ll lose your code. The best approach is to write your own custom Drupal module so that you can easily maintain your own custom codebase.
In your module, first you need to tell the Template Editor about your new Interactive Function so it will appear as an option when your defining the handler in the Interactive Function task configuration settings. You need to implement HOOK_maestro_interactive_handlers and return an array of function names and function descriptions. The function description will appear in the editor below the handler field once it's selected. You can return as many as you need - this is an example of just one. Note how this example shows the name of the identifier that is expected. In this case, the content_type task would be setup to use 'expenses_request' as the unique identifier so the submitted expense form can be attached to this interactive task when opened.
For this example, let's create and interactive task to approve an expense form that has been submitted as a content type.
/**
 * Implements hook_maestro_interactive_handlers
 */
function my_module_maestro_interactive_handlers() {
  return [
    'my_module_approve_expenses_form' => t('Approve Expenses (identifier: expenses_request)'),
  ];
}
Now, add your function. The node id will be set in a process variable we added to the template called expense_request. All interactive functions pass in the process_id and the queue_id so you have both the ID of the overall active process and the id of this individual task, known as the queue_id in the maestro engine. We will use the Maestro API to retrieve the tracked entity and then load the node and attach it for viewing by the manager with buttons to accept or reject the expenses.
Ideally, you would also add a text field to collect a reason and attach that for review by the employee. The workflow would us an IF Task after this to test for the completion status and branch accordingly.
Enable the maestro_form_approval_example module to better understand this workflow. Most of the code in this example function is standard Drupal form API code that should look very familiar to a Drupal developer.
/**
 * The manager approval form used in the workflow.
 *
 * @param unknown $form
 * @param number $queueID
 */
function my_module_approve_expenses_form(&$form, $queueID = 0, $obj) {
  $form['queueID'] = array(
      '#type' => 'hidden',
      '#title' => 'the queue ID in the event we need it in later processing',
      '#default_value' => $queueID,
      '#description' => ('queueID'),
  );

  //overriding the "Accept" default label with the "complete" text
  $form['actions']['submit']['#value'] = t('Accept Expenses');

  //adding our own reject button
  $form['actions']['reject'] = array(
    '#type' => 'submit',
    '#value' => t('Reject and send back to Employee'),
    '#ajax' => array(
      'callback' => [$obj, 'completeForm'],
      'wrapper' => '',
        ),
  );
  //change the title of the modal popup from the default bland Maestro title
  $form['#title'] = t('Review the Employee Expenses');
  //we are going to give the user a link to the approval form here.  We do this by loading the
  //queue and fetching off the approval form and providing a link to it.
  $processID = MaestroEngine::getProcessIdFromQueueId($queueID);
  $entityID = MaestroEngine::getEntityIdentiferByUniqueID($processID, 'expenses_request');
  $url = Url::fromUserInput('/node/' . $entityID, array('attributes' => array('target' => '_new'))); //[0] is the unique key, [1] is the type, [2] is the node ID

  $node = Node::load($entityID); //load the node
  $build = \Drupal::entityTypeManager()->getViewBuilder('node')->view($node, 'full' ); //generate a view of the node

  $form['node'] = $build; //attach the node to the form for viewing
  $form['node']['#prefix'] = '<div id="expenses-approval-node">';  //wrapper to beautify it
  $form['node']['#suffix'] = '</div>';

  $form['url'] = array (  //we throw this link in here ot show that you can still link directly to the node if you want
    '#type' => 'link',
    '#title' => t('(View Request in full page)'),
    '#url' => $url,  //will open in new tab
    '#target' => '_new',
    '#suffix' => '<br><br>'
  );

  $form['#attached']['library'][] = 'my_module/maestro_expense_approval_form_css';  //our own css for node form beautification

  return $form;
}


/**
 * This is the submit handler passed off to us from the Maestro Engine.
 *
 * @param array $form
 * @param FormStateInterface $form_state
 * @param number $queueID
 */
function my_module_approve_expenses_form_submit(&$form, &$form_state, $queueID = 0) {

  //In our custom submit handler, **WE** are responsible for telling the engine what to do.
  //This is a pretty simple process by just using the API to tell the engine to complete the task
  //However, we can also set "fancy" status like cancelling as we've done here by detecting
  //if the submit button was hit or not.

  $queueID = intval($form_state->getValue('maestro_queue_id'));
  $triggeringElement = $form_state->getTriggeringElement();
  if(strstr($triggeringElement['#id'], 'edit-submit') !== FALSE && $queueID > 0) {
    MaestroEngine::completeTask($queueID, \Drupal::currentUser()->id());
  }
  else {
    //we'll complete the task, but we'll also flag it as TASK_STATUS_CANCEL
    MaestroEngine::completeTask($queueID, \Drupal::currentUser()->id());
    MaestroEngine::setTaskStatus($queueID, TASK_STATUS_CANCEL);
  }
}
Help improve this page
You can:
- Log in, click Edit, and edit this page
- Log in, click Discuss, update the Page status value, and suggest an improvement
- Log in and create a Documentation issue with your suggestion


