On this page
- Configure the app registration form
- Manage the displayed and required fields
- Add a field
- Managing fields
- Configuring the base fields
- Manage the order and appearance of fields in the form
- Configure how a developer associates API products with an app
- Allow app developers to select a single API product only
- Manage the fields displayed when viewing an app
- Configure the default expiration for an API key
Configure app registration
Before developers can use your APIs, they must register on the developer portal. After they log in, developers can use the My Apps or Team Apps page to register apps, choose the API products they want to use, and access the unique API credentials (consumer keys and secrets) needed to access your APIs. If you have installed the Apigee Developer Portal Kickstart distribution, you can use the Apps page for this functionality.
Configure the app registration process, as described in the following sections:
Note: Steps to configure both developer apps and teams apps are described.
- Configure the app registration form
- Manage the fields displayed when viewing an app
- Configure the default expiration for an API key
Note: In addition, you can configure the following:
- Alias that is used to refer to applications in the developer portal, as described in Configure aliases.
- Caching of specific application data, as described in Configure caching.
Configure the app registration form
Configure the app registration form, including the fields displayed and how a developer associates an API product with an app. Configure app registration for developer apps and team apps.

Configure the app registration form as described in the following sections:
- Manage the displayed and required fields
- Manage the order and appearance of fields in the form
- Configure how a developer associates API products with an app
- Allow app developers to select a single API product only
- Configure the alias used to refer to applications in the developer portal
Manage the displayed and required fields
A developer registers an app by clicking Add app on the My Apps page or Add team app to add a teams app and completing the developer or team app registration form.
Manage the fields that are available and required for app registration for:
- Developer apps by selecting Configuration > Apigee > Developer Apps to display the Developer Apps configuration page and clicking the Manage fields tab.
- Team apps by selecting Configuration > Apigee > Apps > Team Apps to display the Team Apps configuration page and clicking the Manage fields tab.
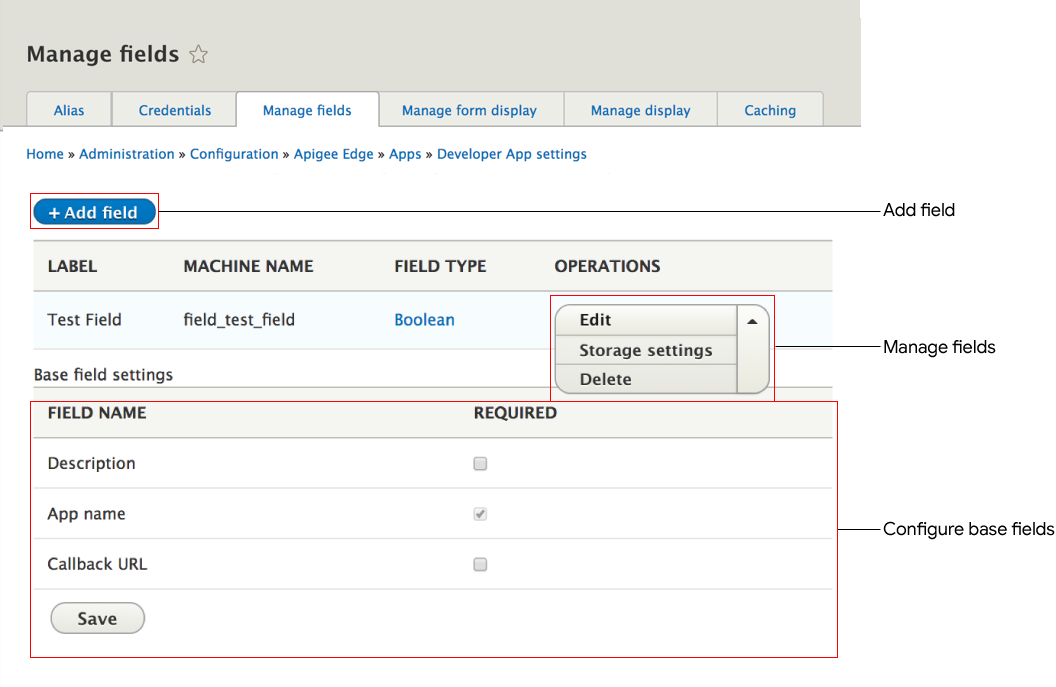
As highlighted in the previous figure, you can perform the following tasks from the Manage fields tab:
Add a field
You add fields to the app registration form to prompt the developer to provide additional information such as a customer ID, the target platform of the app, or other information that can serve as a custom attribute of the app. The additional form fields can be:
- Required or optional
- Displayed by different HTML elements, such as text boxes, radio buttons, check boxes, and more
- Can be set to appear anywhere on the form between the Callback URL field and the Product field
When you add new fields to the app registration form, the field values are automatically uploaded to Apigee, along with all the other fields, when the developer registers and submits the form. You can view or modify those fields on Apigee, or use the Apigee management API to access those fields from a script. The new field values appear as custom attributes with a name that corresponds to the field's internal name. Field values of the following field type are saved in CSV format (other field types are stored as JSON):
- Boolean
- Numbers (integer, float, decimal)
- List (integer, float, decimal)
- Text (plain)
- Text (plain, long)
To add a new field to the app registration form:
- Click Add field.
- Select the field type in the Add a new field drop-down.
- Enter a label for the field.
Optionally, click Edit to edit the internal name of the field.
- Click Save and continue.
- Configure the field by setting the options on the following tabs:
Note: The configuration options vary based on the field type selected.
Use this tab... To configure... Edit Information about the field, such as label, help text, default value, whether it is required, and so on. Field settings How data in the field is stored, such as the total number of values that can be specified, and so on. - Click Save settings on the Edit tab or Save field settings on the Field settings tab to save the field. To delete the field without saving, click Delete on the Edit tab.
Managing fields
To manage a field, select one of the following from the Operations menu associated with the field:
- Edit - Edit the field information.
- Storage Settings - Edit how data in the field is stored.
- Delete - Delete the field.
Configuring the base fields
The following base fields are displayed in the app registration form, by default:
| Base field | Description |
|---|---|
| App name | Name of the application. |
| Description | Description of the application. |
| Callback URL | External site to which an app consumer is redirected to log in when using three-legged OAuth. Valid values must be prefixed with one of the following protocols: http:// or https:// |
To configure the base fields:
- In the Base field settings section, configure whether each field is required or optional.
- Click Save to save the new settings.
Manage the order and appearance of fields in the form
A developer registers an app by clicking Add app on the My Apps page or Add team app on the Teams Apps page and completing the developer or team app registration form. If you are using the Kickstart distribution, you can click Add app on the Apps page.
Manage the order and appearance of the fields displayed on the app registration form for:
- Developer apps by selecting Configuration > Apigee > Apps > Developer Apps to display the Developer Apps configuration page and clicking the Manage form display tab.
- Team apps by selecting Configuration > Apigee > Apps > Team Apps to display the Team Apps configuration page and clicking the Manage form display tab.
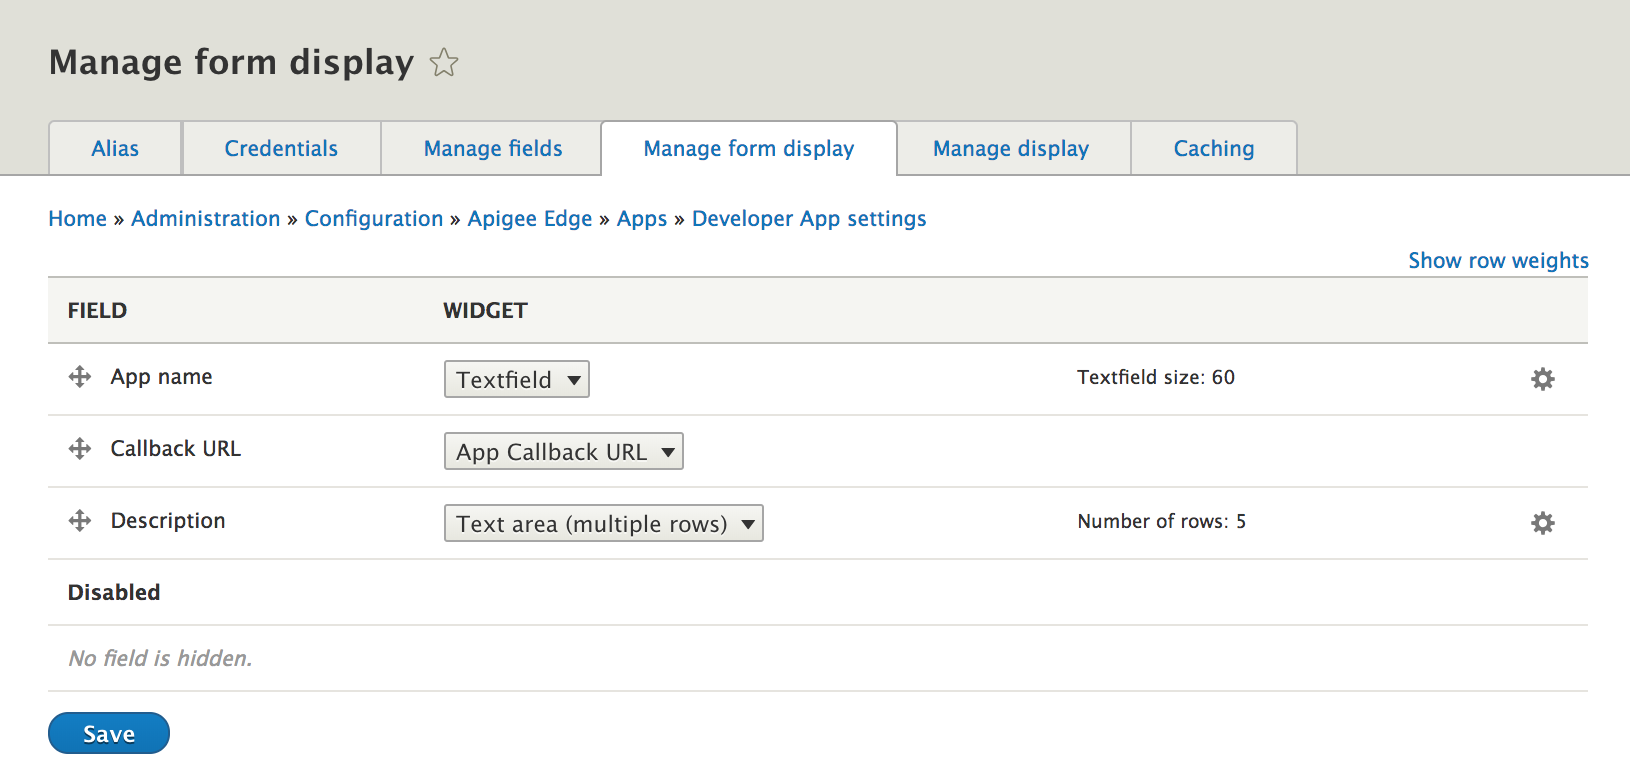
To manage the app registration form display, configure the following settings for each field, and click Save.
| Setting | Description |
| Rearrange fields. Click and hold the drag-and-drop handle and drag the field to the desired location. To disable a field, drag it into the Disabled section.
Note: If you click Show row heights, you can change the order of fields by weight. In this case, lower values appear before higher values. |
|
| Widget | Select the widget to be used for the field from the drop-down menu (if there are multiple options). |
Configure the widget properties and click Update to save the changes. A quick summary of the configured properties are displayed. For example: Textfield size: 60 |
Configure how a developer associates API products with an app
A developer associates API products with an app when registering an app.
Configure how a developer associates API products with an app, including the following:
| Option | Description |
|---|---|
| Display the API Product widget as a select box | Control the HTML element that appears on the app registration form that the developer uses to select the API product. Options include:
Note: By default, developers can select multiple API products. You can restrict developers to select only a single API product, using drush, as described in Allow app developers to select a single API product only. |
| Let users select the product(s) | Select to enable developers to deselect the default API products when registering an app. If disabled, administrators must configure at least one default API product that will be selected for all developers by default. This ensures that at least one API product is selected. |
| Default API Products | Associate one or more API products to all apps, by default.
Note: If Let users select the product(s) is disabled, you must select at least one API product. |
To configure how a developer associates API products with an app:
- Select Configuration > Apigee > Apps > General to display the Apps configuration page.
- Click the API Product associations tab.
- Configure the desired options.
- Click Save configuration.
Allow app developers to select a single API product only
By default, app developers can select multiple API products when registering an app.
To configure the Apigee module to allow developers to select a single API product only, execute the following Drush command:
drush config-set apigee_edge.common_app_settings multiple_products 0 If any app developers had selected multiple API products before you enforce single API product selection, the next time that they edit the app they will be prompted to select a single API product, as follows:
Developer Apps status now require selection of a single API; multiple API selection is no longer supported. Confirm your API selection below.
To reconfigure the Apigee module to allow developers to select multiple API products, execute the following Drush command:
drush config-set apigee_edge.common_app_settings multiple_products 1 Manage the fields displayed when viewing an app
After registering an app, a user can view the app details by clicking its name on the My Apps or Team Apps page. For a Kickstart portal, app details can be found on the Apps page.

Manage the fields displayed when viewing an app for:
- Developer apps by selecting Configuration > Apigee > Apps > Developer Apps to display the Developer Apps configuration page.
- For Apigee developer portal installations, click the Manage display tab.
- For Kickstart developer portal installations, click the Manage display tab, and then click the Collapsible card sub-tab.
- Team apps by selecting Configuration > Apigee > Apps > Team Apps to display the Team Apps configuration page and clicking the Manage display tab.
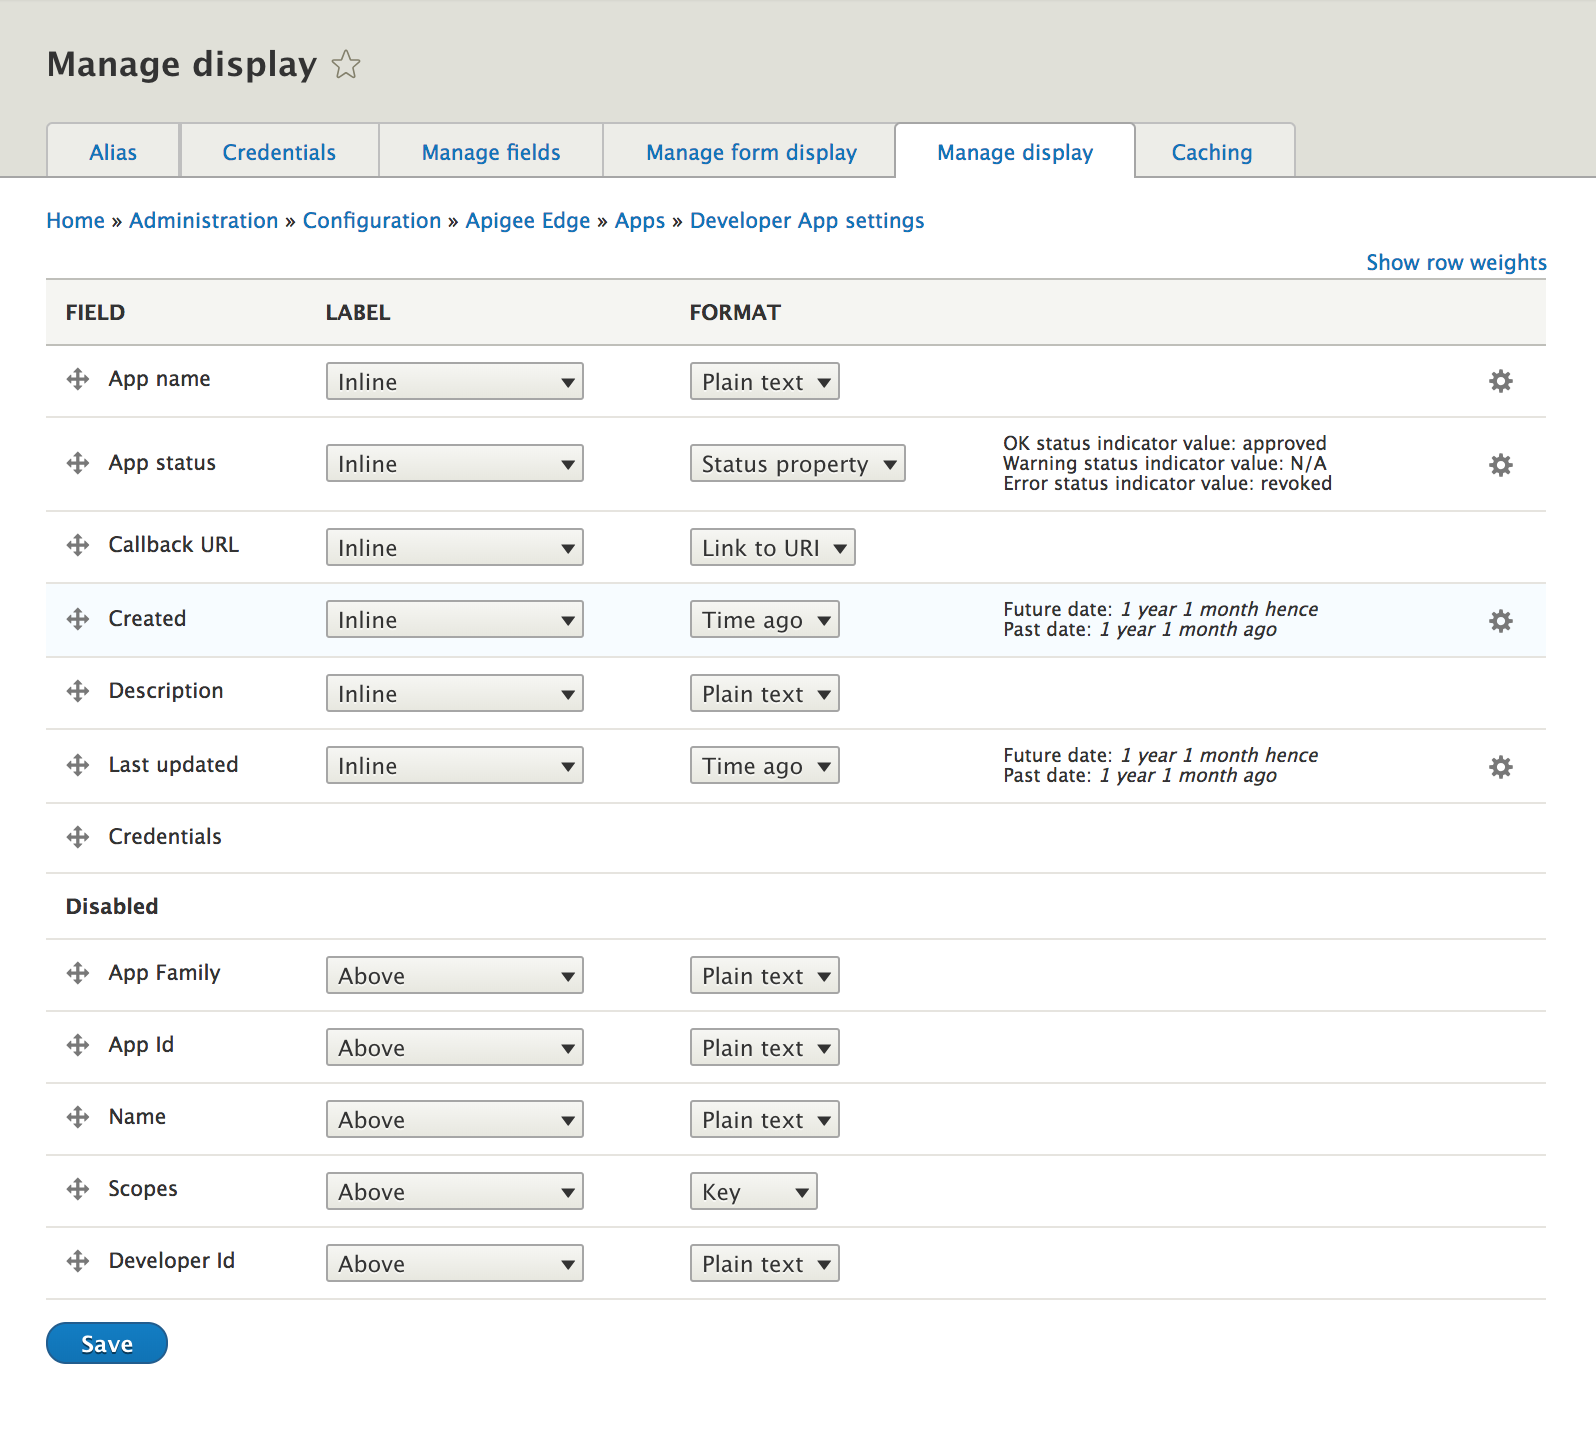
To manage the details, configure the following settings for each field, and click Save.
| Setting | Description |
| Rearrange fields. Click and hold the drag-and-drop handle and drag the field to the desired location. To disable a field, drag it into the Disabled section. To display a new field, drag it from the Disabled section to the desired location.
Note: If you click Show row heights, you can change the order of fields by weight. In this case, lower values appear before higher values. |
|
| Label | Location in which the field label is displayed. Valid values include Above, Inline, Hidden, or Visually Hidden. Visually Hidden is provided for accessibility, to hide the field from view, but make it available to screen readers. |
| Format | Select the format to be used for the field from the drop-down menu (if there are multiple options). |
|
|
Configure the widget properties and click Update to save the changes. A quick summary of the configured properties are displayed. For example: Textfield size: 60 |
Configure the default expiration for an API key
Configure the default expiration for an API key (number of days). A value of 0 indicates no expiration.
To configure the default expiration for an API key:
- Select one of the following:
- To configure developer apps: Configuration > Apigee > Apps > Developer Apps
- To configure team apps: Configuration > Apigee > Apps > Team Apps
- Click the Credentials tab.
- Set the number of days in the text field or 0 for no expiration.
- Click Save configuration.
Help improve this page
You can:
- Log in, click Edit, and edit this page
- Log in, click Discuss, update the Page status value, and suggest an improvement
- Log in and create a Documentation issue with your suggestion


