On this page
Creating a screenshot for the administration page
Drupal 7 will no longer be supported after January 5, 2025. Learn more and find resources for Drupal 7 sites
Note: There is a separate page on this for Drupal 7: http://drupal.org/node/647754
Every theme for 4.5+ needs a screenshot in the form of a screenshot.png placed in the theme directory. These are displayed in the theme listing within a Drupal installation (i.e. at Administer > Site building > Themes in Drupal 5 or 6). It is best that screenshots are consistent. The guidelines for core theme screenshots are (starting from a blank Drupal site):
- Log in as the first user.
- Enable the following modules, for some extra menu items: aggregator, blog, node, search and tracker.
- Turn on the features that the theme supports (logo, site name, slogan, search box). Add some primary and secondary links if needed. We suggest "Link 1" "Link 2" "Link 3", you can link them to e.g. "user/1".
- Set the site name to Drupal and slogan to Community Plumbing.
- Create the following article node:
Donec felis eros, blandit non
Morbi id lacus. Etiam malesuada diam ut libero. Sed blandit, justo nec euismod laoreet, nunc nulla iaculis elit, vitae. Donec dolor. Class aptent taciti sociosqu ad litora torquent per conubia nostra, per inceptos hymenaeos. Vivamus vestibulum felis <a href="#">nec libero. Duis lobortis</a>. Cum sociis natoque penatibus et magnis dis parturient montes, nascetur ridiculus mus. Nunc venenatis pretium magna. Donec dictum ultrices massa. Donec vestibulum porttitor purus. Mauris nibh ligula, porta non, porttitor sed, fermentum id, dolor. Donec eu lectus et elit porttitor rutrum. Aenean justo. Phasellus augue tortor, mattis nonummy, aliquam euismod, cursus eget, ipsum. Sed ultricies bibendum ante. Maecenas rhoncus tincidunt eros.
- Look at the node, and make sure the tabs are visible. Take a screenshot.
- Cut out a piece about ~420x252 (5:3 ratio) resized to exactly 150x90 (~35% of the original size). Try to show only useful page elements (menu, tabs, title, links). Don't include browser chrome (toolbar, status bar, scrollbar, etc).
- Apply a standard 'sharpen' filter to the thumbnail for clarity.
- Save as a PNG, in paletted colorspace to cut down on size.
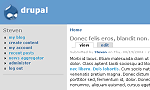
Example:
Screenshots for Drupal.org display
For Drupal.org project thumbnails (displayed at http://drupal.org/project/Themes and on the individual theme project pages), use the guidelines above except that:
- You should fill up the site more. For example, add a comment to the story node or add some blocks.
- The screenshot should show the entire page, though still without browser chrome (toolbar, status bar, scrollbar, etc).
- Try to make your original screenshot have a width of about 1000 pixels, so that the thumbnail is about 30% of the original size.
- Try to keep the image small: save as paletted PNG or as a JPEG with 10-20% compression. This reduces the load time of the theme list on Drupal.org.
- To add the image to your project, click the Edit tab on the project node and expand the "Attached Images" section. Browse to find your screenshot locally and add it. A thumbnail will be created and added to the upper right corner of the project page once you submit your changes.
If you need to change the image you have uploaded, click the thumbnail on your project page (this takes you to the image node) and then click the Edit tab. You may then upload a new picture which will replace the existing one.
Help improve this page
You can:
- Log in, click Edit, and edit this page
- Log in, click Discuss, update the Page status value, and suggest an improvement
- Log in and create a Documentation issue with your suggestion


