Selling site access (roles)
Drupal 7 will no longer be supported after January 5, 2025. Learn more and find resources for Drupal 7 sites
Many sites often want to offer exclusive content, features, or access to users who pay a subscription fee. Drupal roles allow you to assign a special set (or sets) of permissions to some of your users. Ubercart extends this to automatically grant roles upon receipt of payment. Depending on your implementation, you may do many things with roles. One of the most common functions is to allow users special content access (e.g. an exclusive website forum or a newsletter access). Sites like Warner Brothers's fan websites use the Ubercart Roles module to offer fan club membership for its bands. Here we will cover how to setup and use the Roles module.
Initial Setup
Enabling
Instead of creating a product that is exclusively a role product, Ubercart uses its product feature system to attach role assignment to any product. This way if you wanted to offer a tangible product as well as exclusive access to the site, you could create your standard product then attach a role assignment feature to it. To get started, enable the Roles module, found at under Administer > Modules (in Drupal 6.x, this is Administer > Site building > Modules). Check the box next to Roles and press the "Save settings" button.
Permissions
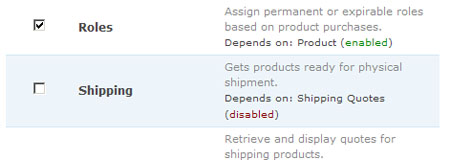
After enabling the module, the next step is to set permissions for using the Roles module. Do this by browsing to Administer > People > Permissions (in Drupal 6.x, this is Administer > User management > Permissions). This form will show you all the permissions available on your Drupal site and which roles have each permission. Scroll down to the permissions for the uc_roles module. Here you will see one permission for "view all role expirations", this will give a user the permission to view any role expiration on anyone's user page. It is recommend that you only give this role to a site or store administrator.

Settings
Once the module is enabled, it still needs to be configured to work. If you haven't setup the module you will see a warning message at Administer > Store administration

The Roles module is set up under Administer > Store administration > Configuration > Product setting
(in Drupal 6.x this is Administer > Store administration > Configuration > Product settings > Product features). You should see a tab (in Drupal 6.x this is a link) that says Role assignment settings, after clicking the tab it should open up a form to specify settings for the Roles module. It's here where you'll set the following settings:

- Order status
- This specifies when to grant the role to the user; when an order status reaches the status specified the customer will be granted the role. By default, this happens when the order status changes to Payment received (in Ubercart 6.x-2.6 and earlier, role grants were triggered on the Completedstatus).
- Default expiration
- This is the default expiration length of role assignment features when a store administrator begins to add a role assignment to a product.
- Default role
- This is the default role the role assignment feature grants when a store administrator begins to add a role assignment to a product. If this blank, you will need to select roles to use in the Product role form field below.
- Product roles
- These are the roles that can be used for role assignment features. If there are no roles listed here you will need to add a role underAdminister > People > Permissions > Roles (in Drupal 6.x this is Administer > User management > Roles).
- Show expirations on user page
- If this box is checked, any expirations of roles is displayed on a customer's user page (My account).
- Header
- If "Show expirations on user page" is checked this is the header that shows on the user page. Depending on what you call access to your site, you might want to change this text.
- Title
- For each role expiration a Title & Message is displayed. By default, the title is the name of the role that is expiring.
- Message
- The message informing the user of the expiration of the role. By default, the message is "The role will expire on !date" where "!date" is formatted string containing the expiration date.
After filling out this form you can click the "Save settings" button to save your configurations.
Cron
If you have any role assignments that have expirations you will need to set up a cron job to run on your site. For more information on to configure cron jobs, see configuring cron jobs on drupal.org.
Adding Role Assignment to Products
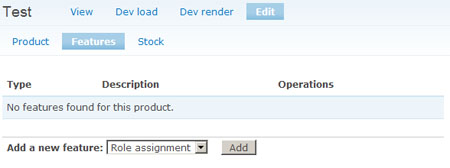
From here you need to start adding role assignment features to your products. This tutorial assumes the reader already knows how create an Ubercart product. If you do not you can reference ubercart product creation. Once your product is created you should see a "Features" tab on the product edit page. After clicking the "Features" link, you'll see a empty list of product features. Select "Role assignment" from the Add a new feature select box and click "Add".
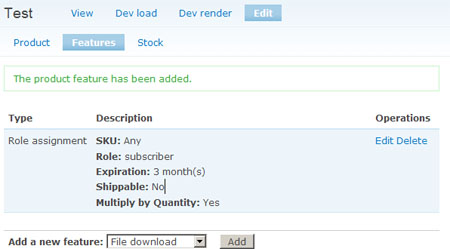
The next step is to fill out the feature form with the following details:

- Model/SKU
- The Model/SKU of the product that grants the role assignment. If the product you are selling is solely a role assignment you'll want to keep this to "Any". If however the product you're selling has different SKU adjustments you might only want to grant a role assignment on a specific SKU (e.g. you sell a product with an attribute that can add optional access to website forum).
- Role
- The role that will be granted when a customer purchases the product.
- Time until expiration
- How long the role will last. If set to "never" the role will never expire. The expiration date is set based on when a customer is granted the role.
- Shippable product
- This checkbox specifies whether the product associated with the role assignment is shippable or not (if there are no shippable items in a customers order he won't be asked for a shipping address at checkout). If there is a shippable product included with this role assignment you will need to check this box, otherwise leave it blank.
- Multiply by quantity
- Checking this box will specify whether the product qty affects the role expiration length. In other words, if a role assignment attached to a product lasts for a year, buying 10 products will make the role last for 10 years. If a role assignment has no expiration this option has no effect on the role assignment. It is set by default.
After filling in the form, clicking "Save feature" will add the feature to your product. You should see the summary of the role assignment feature on the product feature page. You can click the "edit" link to change any details of the role assignment feature. Clicking the "delete" link will remove the role assignment feature altogether.
User/Role expiration Administration
If for whatever reason, you need to manually add/edit/view role expirations that occur within your site, the Roles module helps you accommodate this. For viewing any role expirations you can browse to Administer > User management > Users > Role expiration. On this page you will see all role expirations that are set to occur. From this page you can view people's user page, edit their role expirations, or delete their role expirations.

If you choose to edit a role expiration, you will be able to do so under Account information. Here you will see a Role expirations link. Clicking that link will open up a form where you can adjust current role expirations or add new ones. Clicking "Submit" will apply your adjusted settings.

Customer Notification
At this point, any customers that purchase the product should have a new role once their order goes into the status you have specified. From here it is up to you to set up a workflow configuration that will move the order into the correct status once a customer has paid.
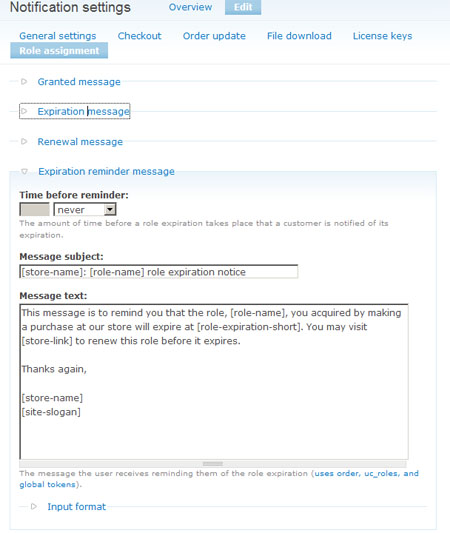
If you wish to send the customer a notification about new roles, you can do so with the built in notification support. To do this make sure you enable the Notify module in the same place where you enabled the Roles module. After the Notify module is enabled, you can browse to Administer > Store administration > Configuration > Notification settings > Role assignment where you can set up the email templates that will get set out to the customer once they complete the sale. On this form you will see four links, each dealing with a different notification: new role assignment, expiration of a role, renewal of a role, and a reminder message of a pending expiration.
Three of these message templates are the same; checking the box will allow a message to be sent at role granted/expiration/renewal. The fourth is slightly different in that you specify the amount of time before an expiration occurs that a user is notified. Setting this to "never" means a user won't be sent a reminder message about a role expriation. Everything else is the same in the message templates. The tokens [role-expiration-short] and [role-name] contain the expiration date and the role name, respectively. Other tokens will let you customize the message further (a link in the notification form will describe each token you can use).
At this point you should know everything there is to assigning roles to your product.
Help improve this page
You can:
- Log in, click Edit, and edit this page
- Log in, click Discuss, update the Page status value, and suggest an improvement
- Log in and create a Documentation issue with your suggestion


