On this page
- Introduction
- The example
- step 1: create the view
- step 2: create a module
- step 3: register the module with the Views module
- step 4: define data structure and handlers.
- Tip:
- step 5: define the 'handler'
- step 6: export the views code and keep it in a file
- step 7: register the view(s) with the Views module
- Remark
- step 8: activate the view code
How to add a column with dynamically generated action buttons in a View
Drupal 7 will no longer be supported after January 5, 2025. Learn more and find resources for Drupal 7 sites
Introduction
Imagine you have a View that lists some entities (articles, users or whatever entity you have defined) and you want to add a column that displays in a dynamic way (depending on the users' roles or the entity's attributes) and in graphical format (as small icons) links to the actions ('delete', 'view' , 'edit', ...) .
It took me a while to find out how to get the job done (being a Drupal newbie). This page is going to explain how I managed to do it. I hope my output will help other people, looking for the same solution. And maybe there are better ways, all reactions are welcome ...
The example
To keep it simple, I have used for this example (see the annex for the module) a view for articles, with 2 actions: 'delete' and 'edit'. Enough to make the basics clear and applicable in the most basic Drupal environment.
step 1: create the view
Start with the definition of your view. In this example a view with published articles - format 'Table'.
step 2: create a module
Some coding is required to have this action column defined. So the next step is to define a module.
Create a basic module :
• info file
• module file
• views subdirectory
• images subdirectory
o copy your action-icons here, in the example 'delete.png' and 'edit.png'
In this example, the name of the module = 'view_actions'. This module name is used in the code examples further on.
step 3: register the module with the Views module
In the module file, you need to register your module with the Views API and define a path to the .inc files. This is done with the 'hook_views_api' see hook_views_api. It's a good practice to place all views related files in a 'views' directory. The path statement in this hook declares the location. This is the code:
function view_actions_views_api() {
  return array(
    'api' => '3.0',
    'path' => drupal_get_path('module', 'view_actions') . '/views',
  );
}
step 4: define data structure and handlers.
For the Views module, to render a view, it needs a data structure as an input, a data structure that defines all the elements that make up the view.
This is in the first place information about the fields (the 'columns' in the view). But it is also about the filters, the arguments, the relationships and the sort conditions. The functionality to deal with fields, arguments, filters and sort conditions is defined in 'handlers'. Handlers are PHP classes. The Views module has standard handlers on board. For a field, it has a standard handler 'views_handler_field'. The class provides for a 'query' method, to get the value of the field, and a 'render' method to render the output of the field.
In our coding, we want to add a new 'field' to the view, an 'actions' field. This is an 'artifact' that does not exist in the database. To add this field or column to the view, we need to add it to the data structure.
The Views module provides a hook to modify the data structure: hook_views_data_alter
We will need to render our own data (the 'action buttons'), so we will define our own handler for this field.
---------------------------------------------------------------------------
Tip:
The syntax of the data structure we need to alter is described in Views doc
But I struggled somewhat in my search for the correct syntax. After some trial and error, I took a simple print-out of the existing data structure for a node. This data structure is available as an argument in the 'hook_views_data_alter' function, and with the help of the following statement, you can make a print-out and check the existing data structure:
debug($data['node']);
---------------------------------------------------------------------------
The following code in the 'hook_views_data_alter', makes a new field 'Content: actions' available in the Views interface. Create a file 'MODULENAME.views.inc' in the subdirectory 'Views' (or any directory you defined in the 'path' statement of the 'hook_views_api' function), and add the following code:
function view_actions_views_data_alter(&$data) {
  // debug($data['node']);
  $data['node']['actions'] = array(
    'title' => t('Actions'),
    'help' => t('Clickable links to actions a user may perform on a Node.'),
    'field' => array(
      'handler' => 'view_actions_views_handler_field_actions',
      'group' => 'Content',
      'click sortable' => FALSE,
    ),
  );
}
If you enable your module now, you will find the field 'Content: actions' in the list of available fields for your view. But on adding the field, you will get a 'broken handler' error. This makes sense: we still need to define our own bespoke handler.
step 5: define the 'handler'
Our bespoke handler is a class, that overrides the standard handler class. The code for the handler is kept in separate inc files, defined in the module. Obviously, it makes sense to put these files in the 'views' subdirectory;
In our example, we defined a new field 'actions'. The handler to deal with this field will extend the standard class 'views_handler_field'.
See the doc.
A good practice is to have the following naming convention for the class file:
views/modulename_views_handler_field_fieldname.inc
In our example, we created a file views/view_actions_views_handler_field_actions.inc
Add the following line in the module.info file to identify this file:
;views handlers
files[] = views/view_actions_views_handler_field_actions.inc
The code in the class file:
<?php

/**
 * @file
 * handler class for the new field 'actions'
 */

/**
 * class definition
 */
class view_actions_views_handler_field_actions extends views_handler_field {
  /**
   * Render function: return html output
   * Including edit and delete action
   */
  function render($values) {
    $actions = array();

    if (user_access('edit any content')) {
      $alt = t('Edit node');
      $actions[] = array(
        'name' => t('Edit'),
        'url' => 'node/' . $values->nid . '/edit',
        'icon' => theme('image', array('path' => drupal_get_path('module', 'view_actions') . '/images/edit.png', 'alt' => $alt)),
        'title' => $alt,
      );
    }
    if (user_access('delete any content')) {
      $alt = t('Delete node');
      $actions[] = array(
        'name' => t('Delete'),
        'url' => 'node/'  . $values->nid . '/delete',
        'icon' => theme('image', array('path' => drupal_get_path('module', 'view_actions') . '/images/delete.gif', 'alt' => $alt)),
        'title' => $alt,
      );
    }

    $output = '';
    foreach ($actions as $action) {
      $output .= l($action['icon'], $action['url'], array('attributes' => array('title' => $action['title']), 'html' => TRUE));
    }
    return $output;

  }
  /**
   *
   */
  function query() {
    // Do nothing, leave query blank, we render the contents
  }
}
We have defined 2 functions:
- a render function and a query function. The render function generates the links to our actions. Conditional statements can be used to check whether the action URL may be rendered.
- a query function gets the values for the given field. In our case, it is left empty: we don't need any values from the database.
step 6: export the views code and keep it in a file
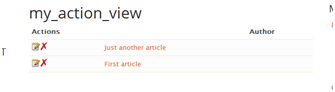
At this stage, the required functionality is available. You can go to your view configuration, add the actions field to the view, and you will see a new column with the action buttons.
Probably, you want your view to be part of your module, so you can move it easily to other systems. This is exporting the view to coding.
A lot of info on exporting views is available on the web, for example. You could also use the 'features' module'.
For the sake of completeness, I have added the steps I used to export my view in the example module in the following sections.
Create a file in the views directory , with following name 'modulename.views_viewname.inc, in this example 'view_actions.views_my_action_view.inc' and add following code :
<?php

// copy view export here
$views[$view->name] = $view;
Go to the view and select the menu option 'Export view'.

Copy the code displayed on the output screen and paste it in the modulename_view_viewname.inc file, on the line '// copy view export here'.
step 7: register the view(s) with the Views module
Next, we need to register our views, stored in PHP files, to the Views module. This is done with the hook_views_default_views
This hook can be put in the module file, but it's better to add it in 'MODULENAME.views_default.inc' in the path specified by the 'hook_views_api'. Reason to put it in a separate 'inc' file: this file will only be loaded when required by the views module (better performance).
In this example, the file is named: 'view_actions.views_default.inc.
----------------------------------------------------------------
Remark
we could paste the exported code of the view (see the previous step ) directly in the function 'hook_views_default_view', instead of creating separate files. But when dealing with several views, the code in this function would explode and would become difficult to manage. It's a good practice to add the exported code in separate files. With the code hereunder, one includes all the separate files in a dynamic way.
----------------------------------------------------------------------------
function view_actions_views_default_views() {
  $path = './' . drupal_get_path('module', 'view_actions') . '/views/view_actions.views*.inc';
  $views = array();
  foreach(glob($path) as $views_filename) {
    require_once($views_filename);
  }
  return  $views;
}
step 8: activate the view code
The view is still rendered based on the manual configuration settings (kept in the database). Getting the rendering from a file gives better performance. In the views list, the manually created view is shown with a status "Database overriding code".

The views module tells us that the view is rendered based on database settings, but that some code is available. In the operations column, look for the 'revert' action. This will enable the code, and that's exactly what we will do now.
Help improve this page
You can:
- Log in, click Edit, and edit this page
- Log in, click Discuss, update the Page status value, and suggest an improvement
- Log in and create a Documentation issue with your suggestion


